Tasks

Overview
In general, a Cotalker task is something that someone has to do but can be much more than that. Every task represents an asset and has at least a name, description, state, and assignee.
Cotalker tasks exist within a workflow and represent the state of a real-life task.
Tasks count with a corresponding channel workspace. Furthermore, tasks can be assigned to users, monitored (either by other users or automatically), and updated (manually or automatically). Start and end dates along with SLAs can be configured to give programmed responses or notifications according to established deadlines. This amplitude of functions gives tasks the versatility to adapt to each organization's needs.
Tasks can be created and updated either manually or automatically:
- manually:
- automatically:
- surveys within the Cotalker environment
- public surveys outside the Cotalker environment
- other automations available and configurable within the Cotalker environment
- To view or modify a task, users must be associated with the task and count with the corresponding permissions and task roles.
- Admins can set permissions that allow unassociated users to follow or edit tasks within a task group.
By default, tasks are accessed through the task view, but can be configured to be viewed through the group panel.
- From the task view, tasks can be organized and filtered to help users view and manage them.
- In the group panel, tasks appear within their task group (or workflow group). Through the group panel, you can access a task's channel workspace or enter the group's task view.
Accessing the Task View from Group View
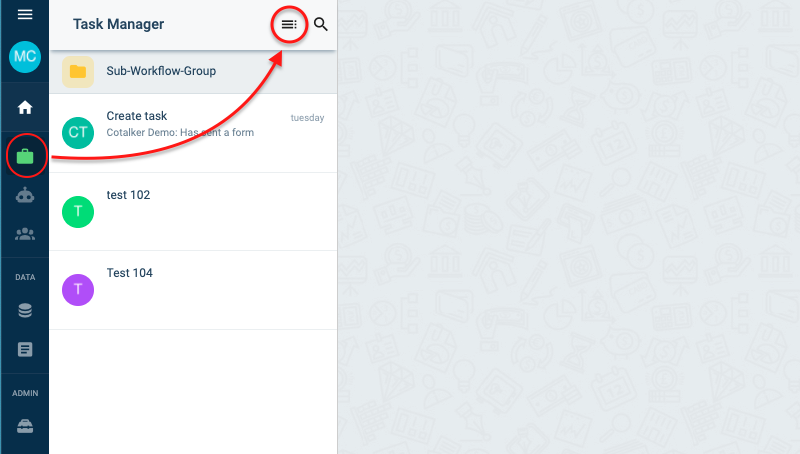
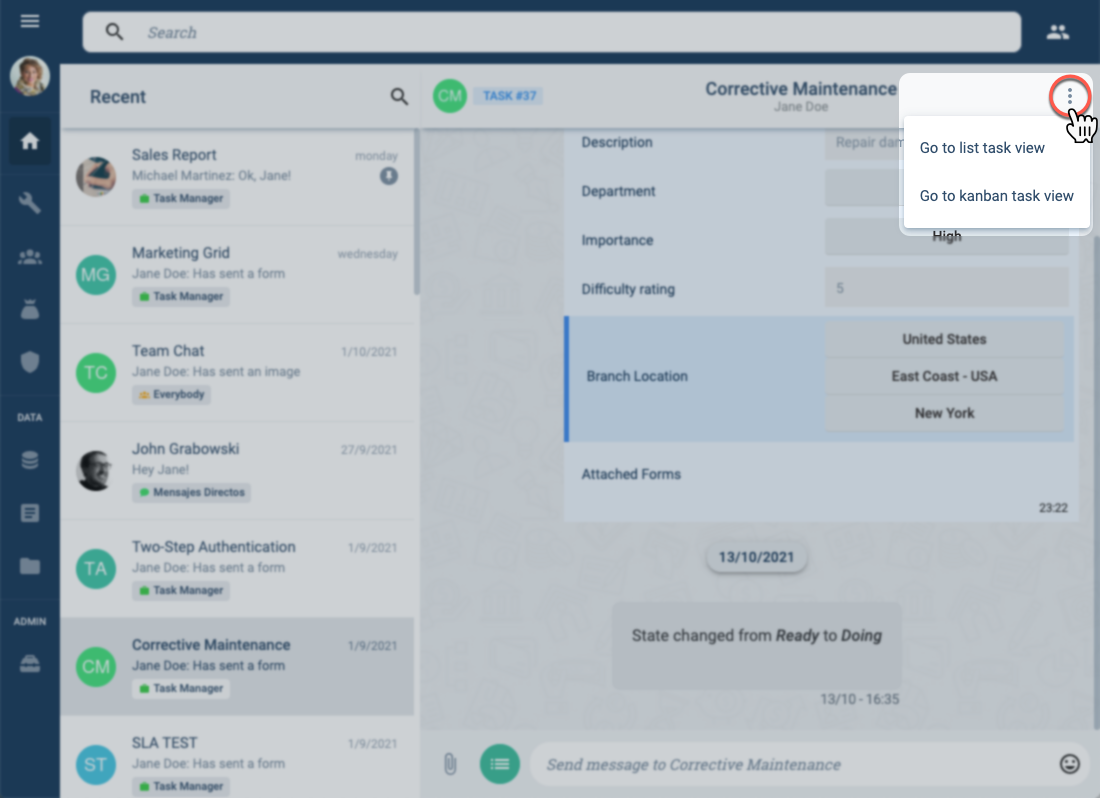
If you are not automatically taken to the task view when you choose a task group (workflow group) from the group panel, you can access the tasks view as shown below:
Through the task button, found on top of the group panel:
By pressing the kebab menu icon in the upper-right corner of the channel workspace:
Task View
The task view is a graphic interface to view tasks at a glance. It's an easy way to search for and manage tasks, along with getting a general idea of the status of tasks in your company. Furthermore, it can also cover the visualization of other implemented solutions, such as the statuses of a company's client.
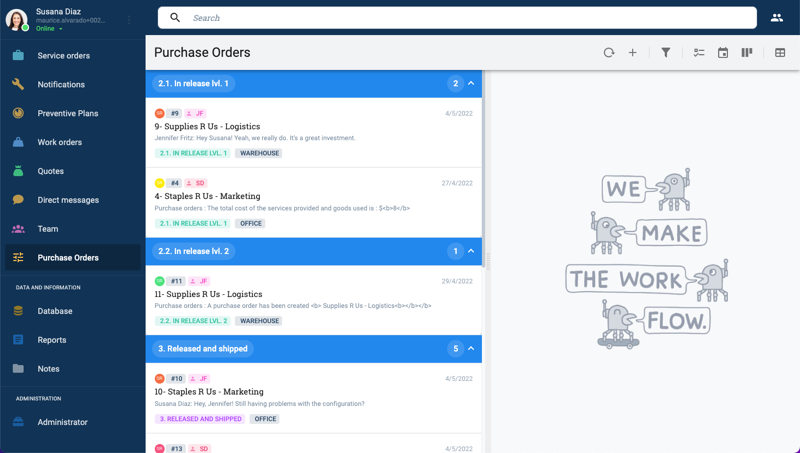
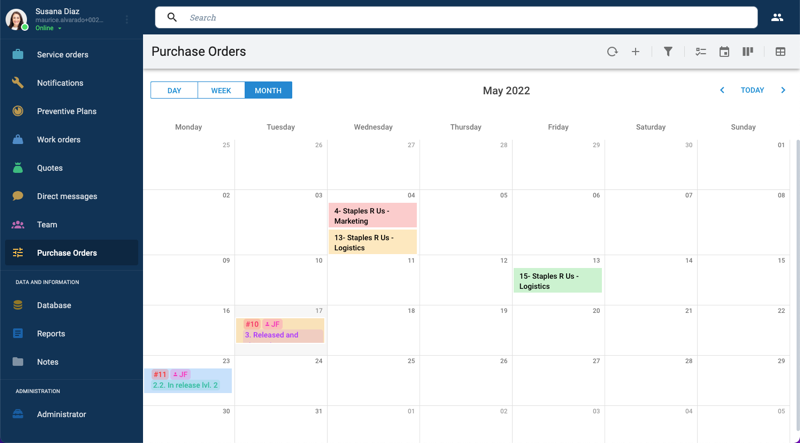
There are four different task views: list view, calendar view, kanban view, and table view. Each view permits different ways to visualize and handle the tasks.
For admins:
Click here for more details on configuring the task view.
List View
Calendar View
Kanban View
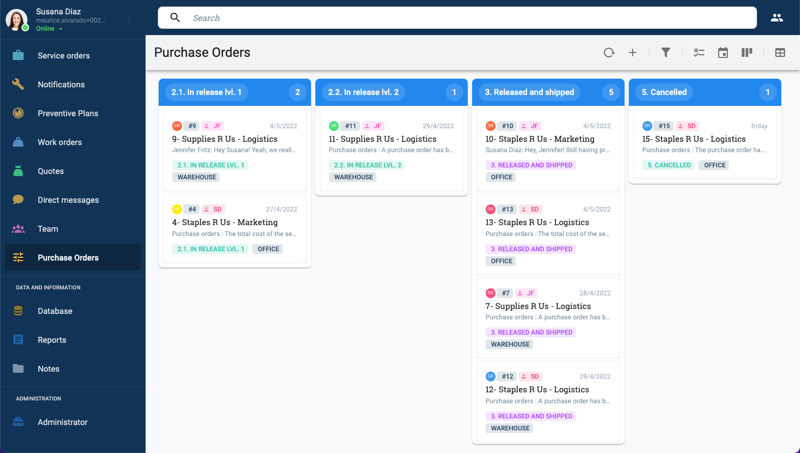
Table View
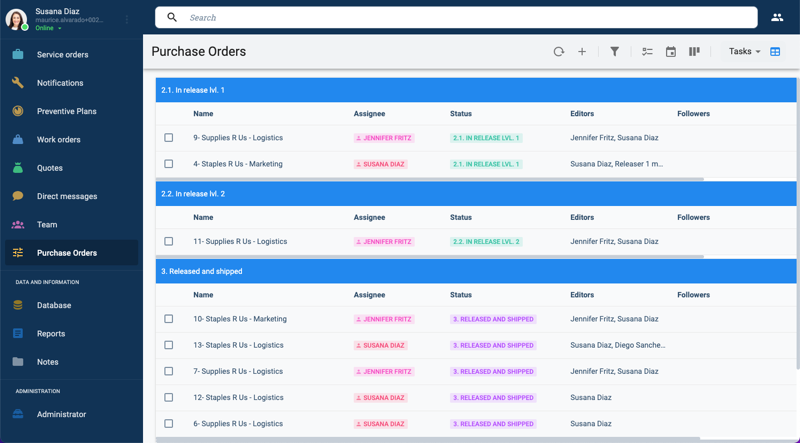
Menu Bar Icons
From the button bar on the top of the tasks screen, you can access the different tasks views as well as other tools, like filters and the creation of new tasks.
| Action Name | Image | Description |
|---|---|---|
| Create |  | Create a task/item |
| Reset |  | Reload the page |
| Collapse |  | Collapse the tasks/items |
| Expand |  | Expand the tasks/items |
| Search |  | Search for tasks/items by name |
| Filter |  | Filter display |
| List View |  | Vertical order |
| Calendar View |  | Sort by days, weeks, or months |
| Kanban View |  | Horizontal order |
| Table View |  | Sort by process |
Task Filters
Customizing the way tasks are displayed is crucial. You can sort or filter them through multiple criteria, e.g., item status, the task's assigned user, etcetera. Up to three filters and three sorting criteria can be used per view.
When creating a filter for the first time, press the filter button in the top menu bar. A small cog icon will appear. Press it to open the filter dialog box.
Your screen should look something like this:
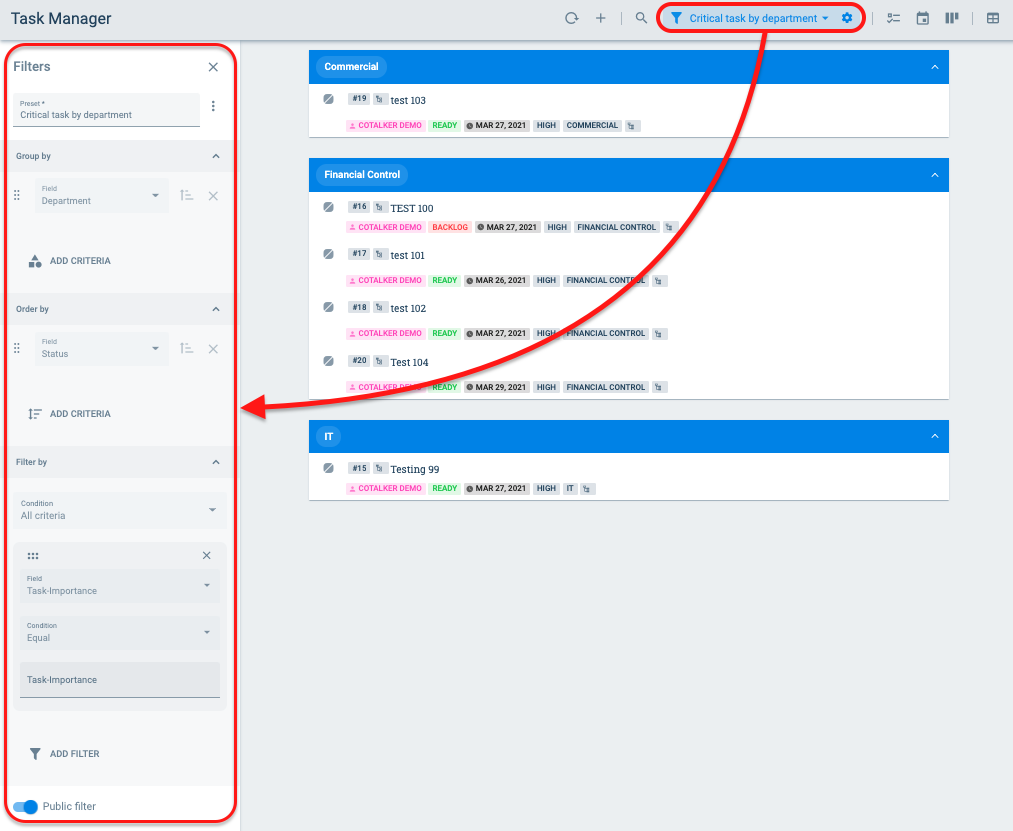
Once you are done adjusting the filters in the dialog box, it's possible to save the filter as a preset, so the next time the task view is accessed, the saved filter will be shown as an option next to the filter button.
Filters can be saved for personal use or shared globally with the rest of the company by selecting the Public filter option.
Below is an example of a filter grouping tasks together by their state machine and ordering them by name alphabetically.
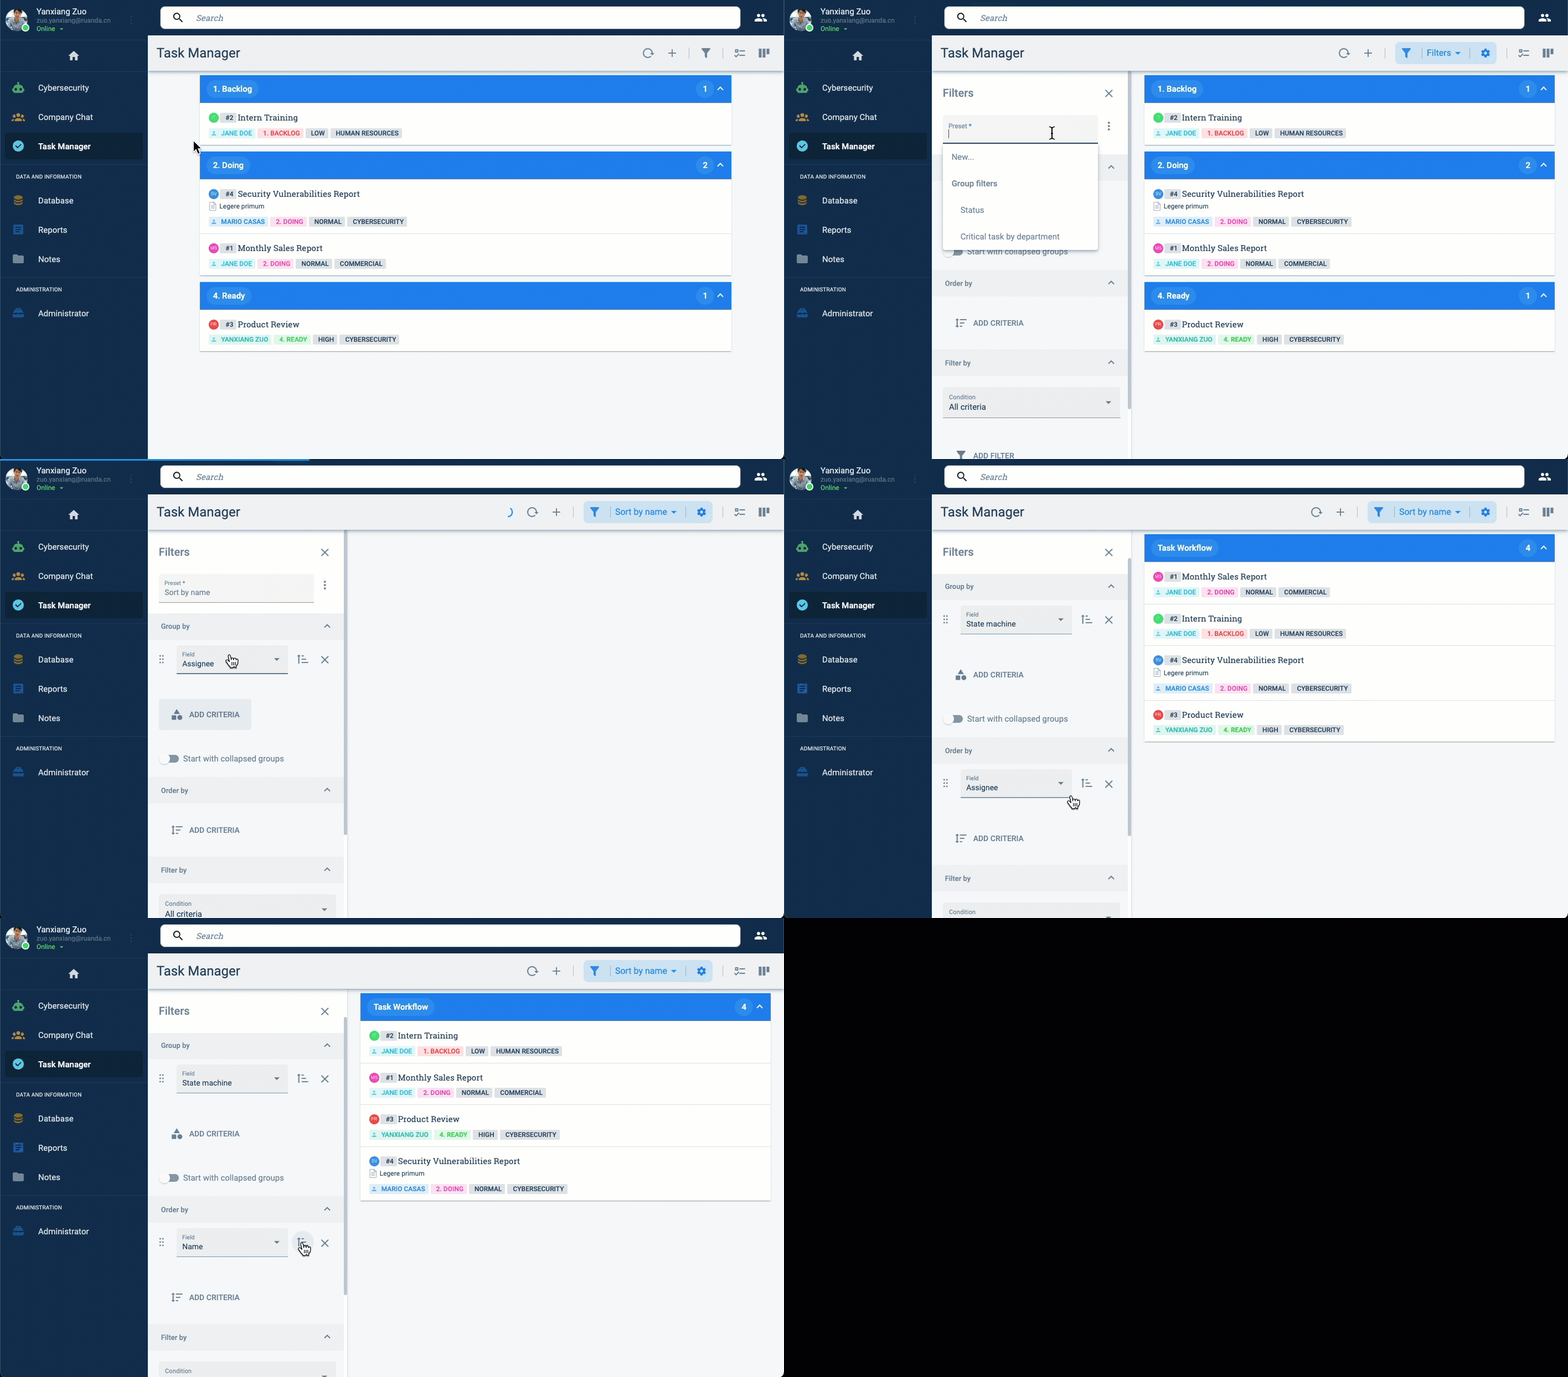
See the Task View Tutorial for more examples on using filters to organize tasks in the task view.
Channel Workspace in Task View
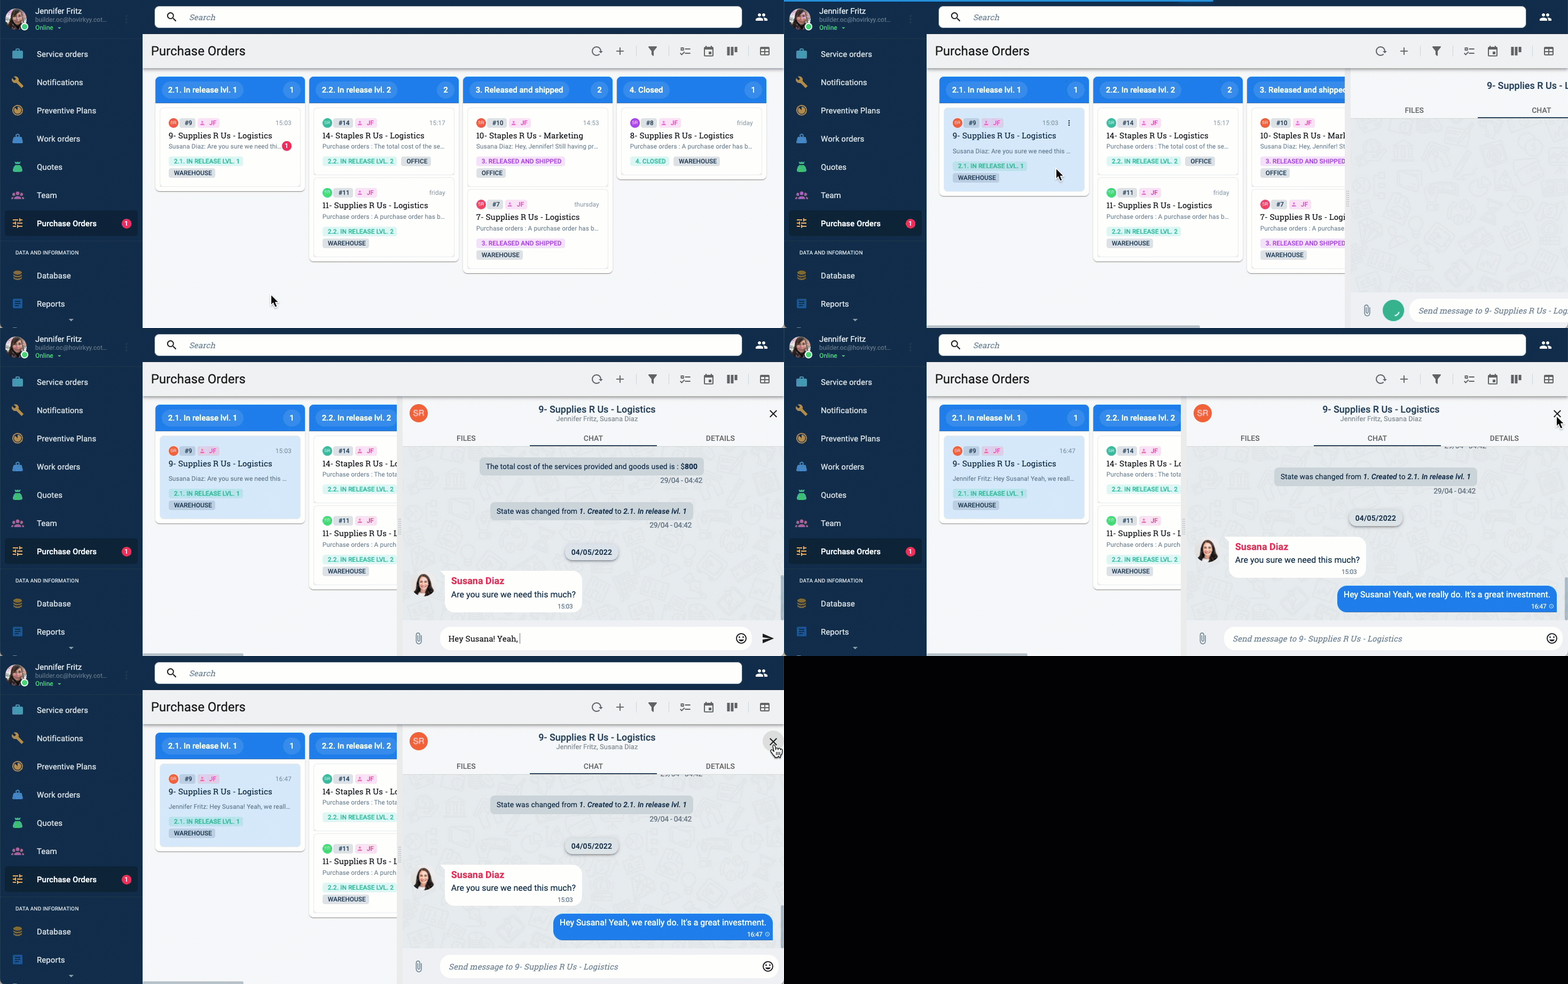
Channel workspaces are viewable from list and kanban views. By simply pressing the task's information card, a side panel opens on the right side of the screen with access to the task's shared files and notes, chat area, and other settings.
In List View, your screen will look something like this:

New message notification icons appear on the task information card. Both new user and system messages display the notification icon. By simply clicking on the task information card, you open the chat area and can read and respond messages.
Below is an example of viewing and responding task messages in Kanban View:
Creating Tasks
Depending on workflow configurations, users can create tasks through one of the following methods:
- In some configurations, administrators might program a Workflow Start Form to appear when creating a new task. This feature permits administrators make sure that users correctly fill out all the necessary information for a task and help teams stay informed of all created tasks.
- Tasks can also be created through public surveys for users outside the Cotalker environment.
Creating tasks from the task view
Regular task creation:
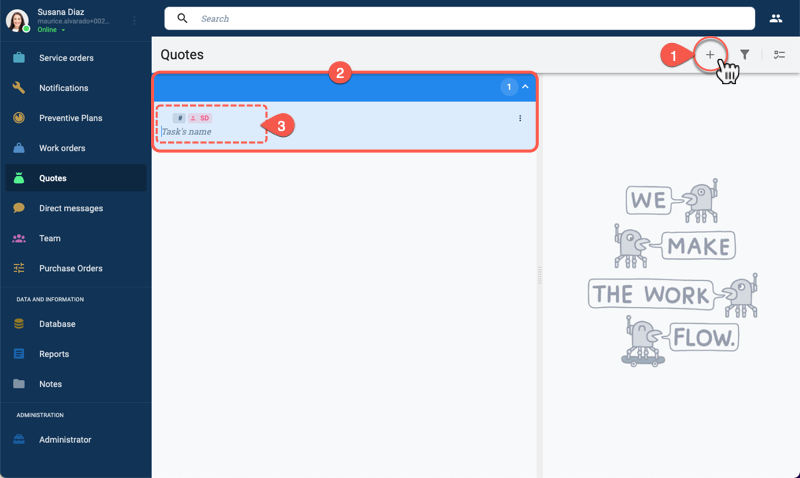
- From the task view toolbar, press the + icon.
- A new task card opens up.
- Write the task's name and press Enter to create the task.
Task start survey:
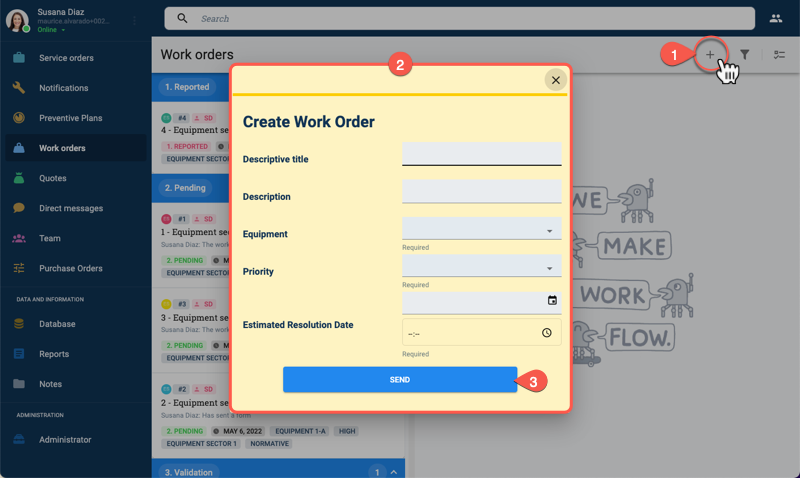
- From the task view toolbar, press the + icon.
- A survey form opens up.
- Fill out the survey and press Enter to create the task.
Creating tasks from the channel workspace
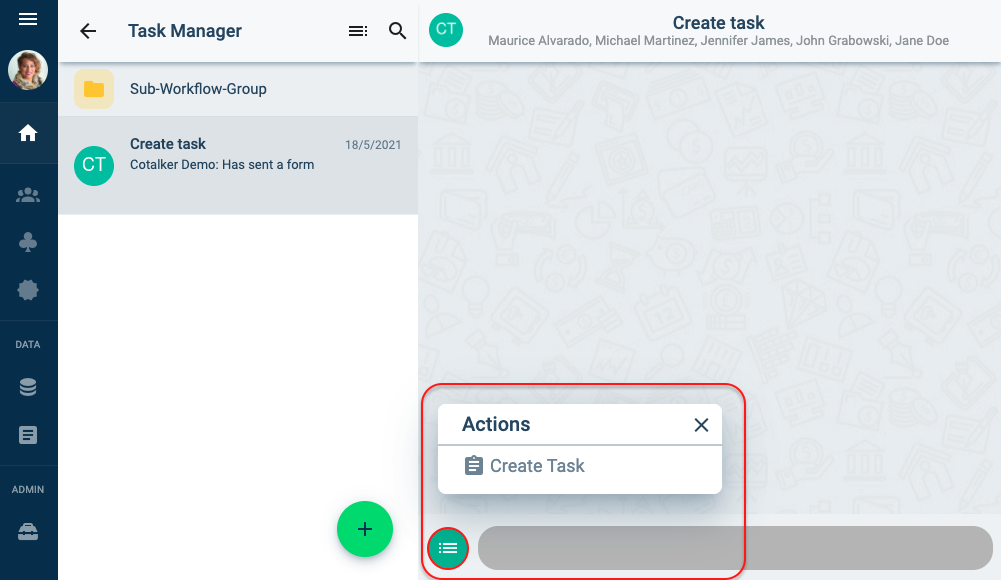
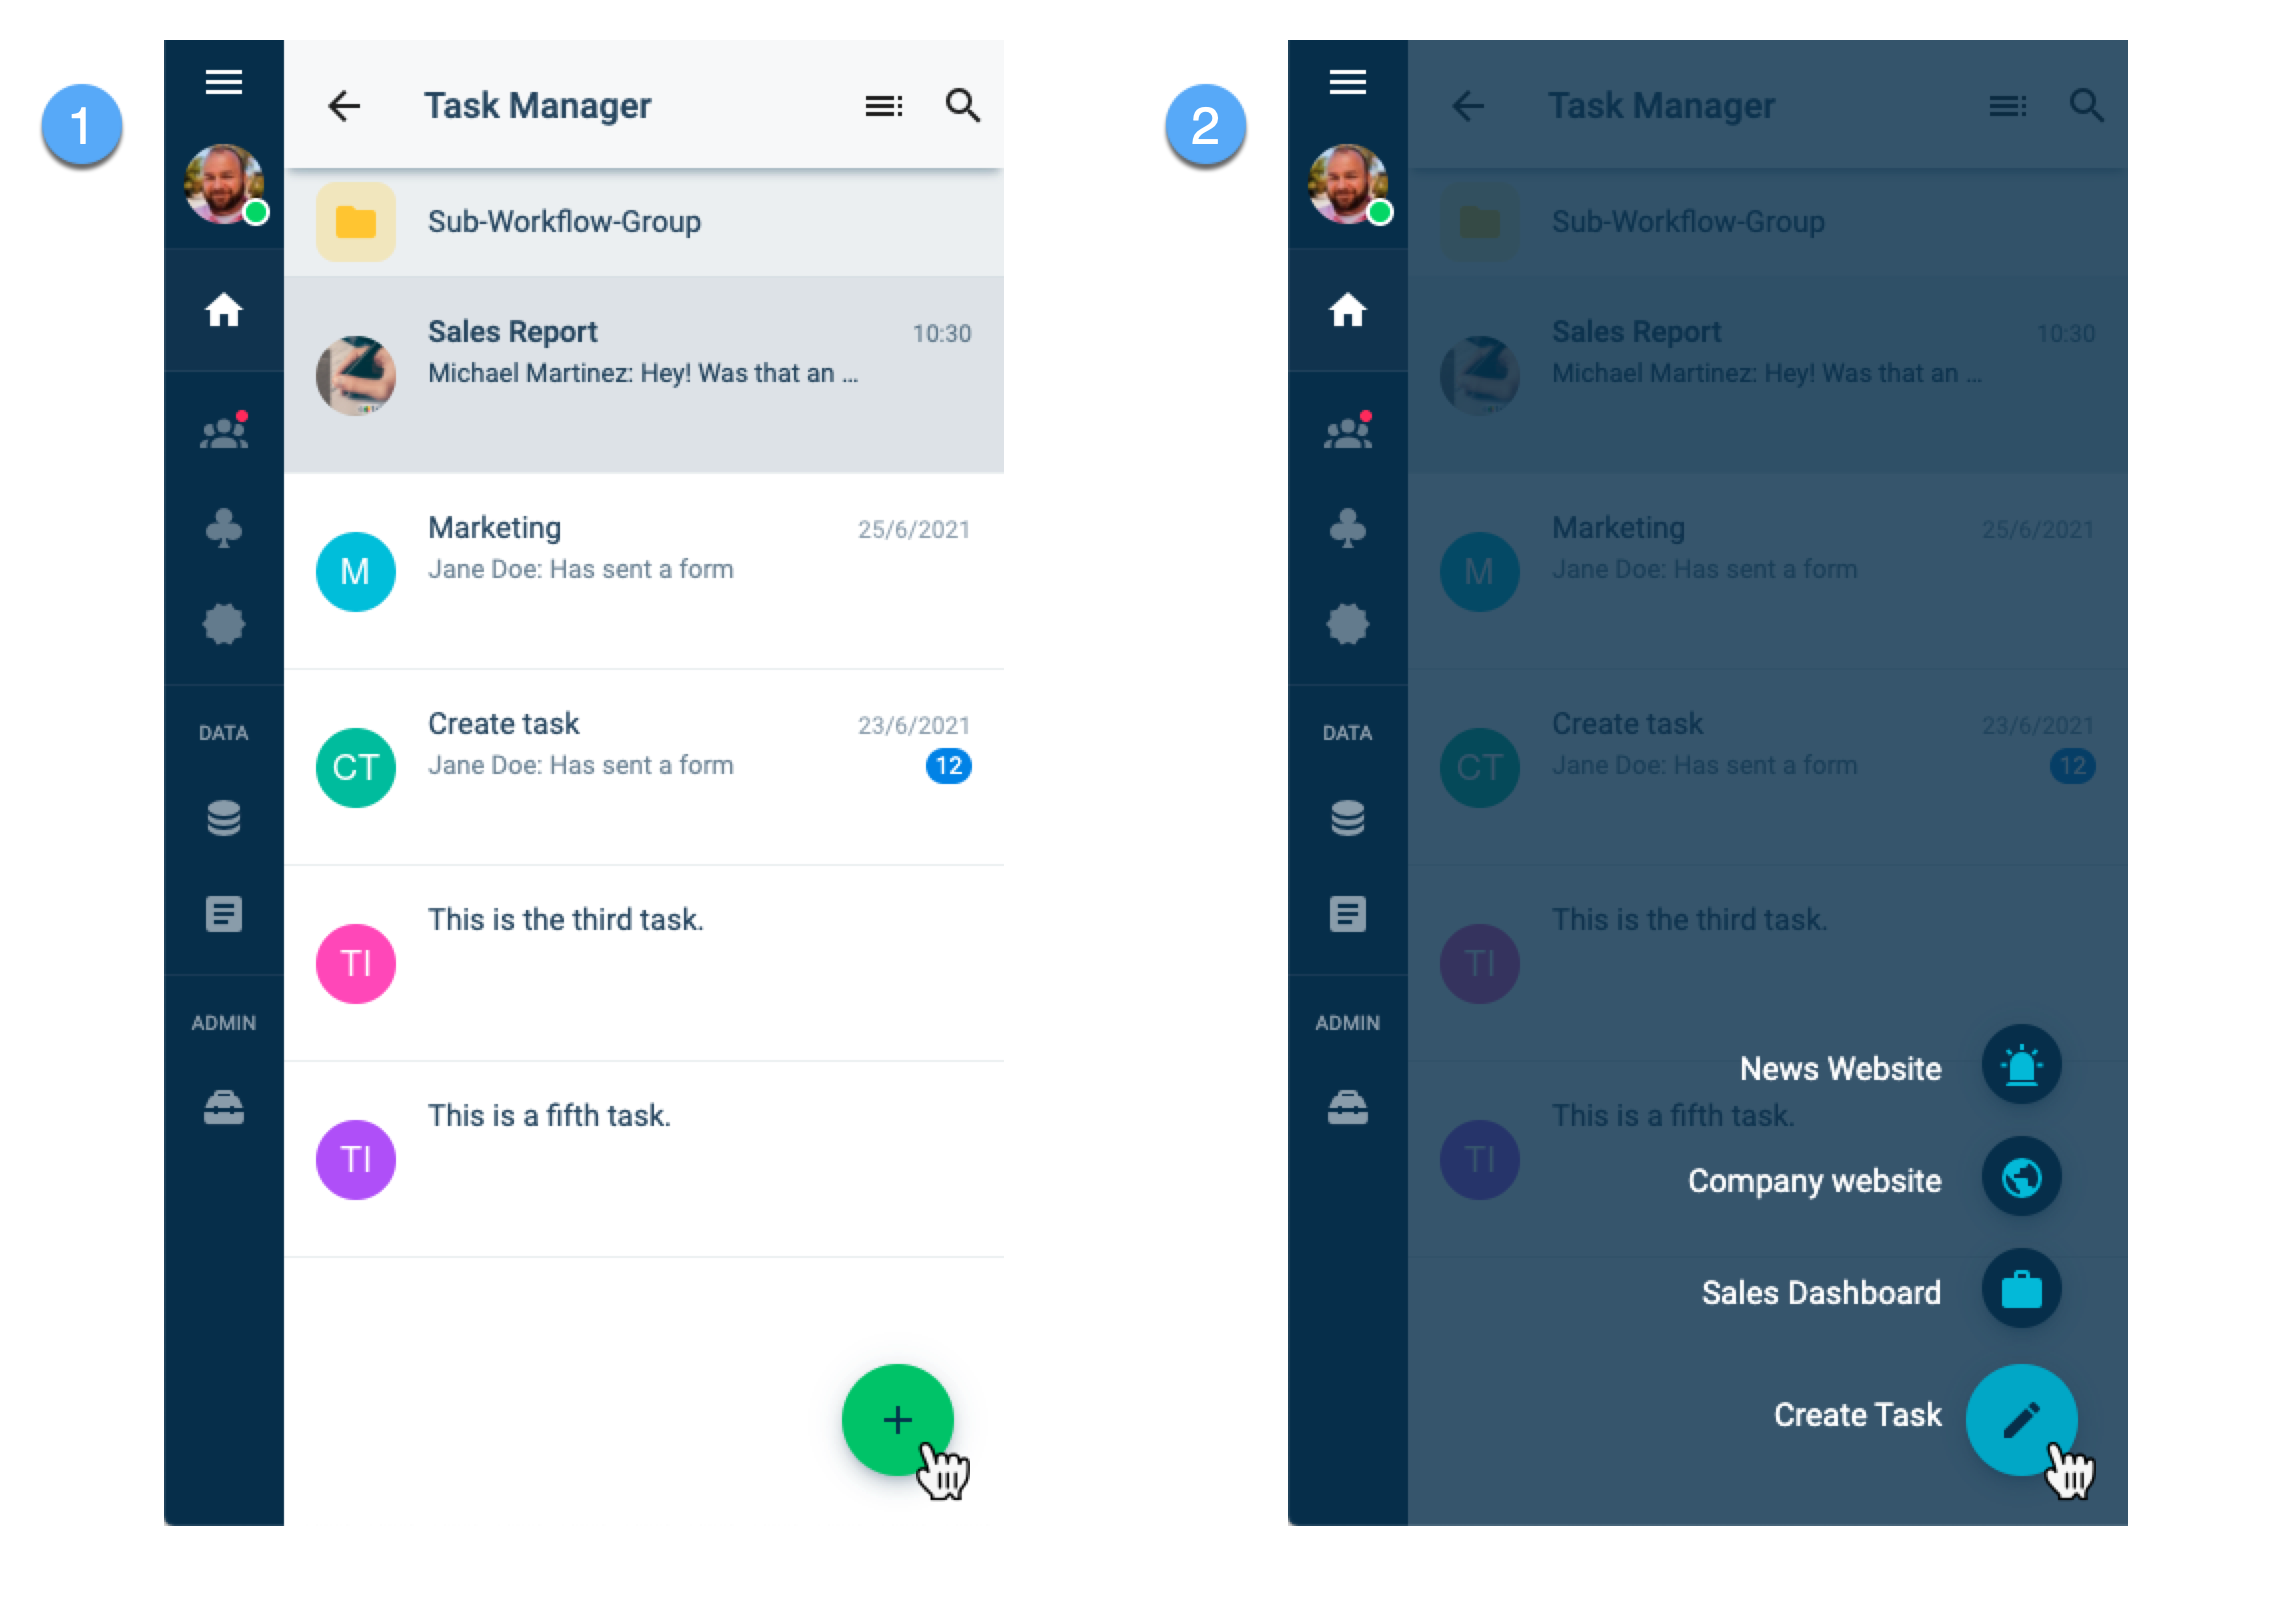
By pressing the actions buttons found at the bottom of the channel workspace, a workflow start form opens up to initialize a new task.
Creating tasks from the group panel
By pressing the actions buttons found at in the group panel, a workflow start form opens up to initialize a new task.
Updating a Task
Depending on users' permissions and role within the task, they will be able to view or update certain task aspects.
Once a task has been updated or modified a system message is sent to the task's chat channel notifying the change.
Updating tasks can be carried out through various means detailed below.
If programmed by the administrator, a State Start Form window might also appear when trying to modify the task.
Task Details Panel
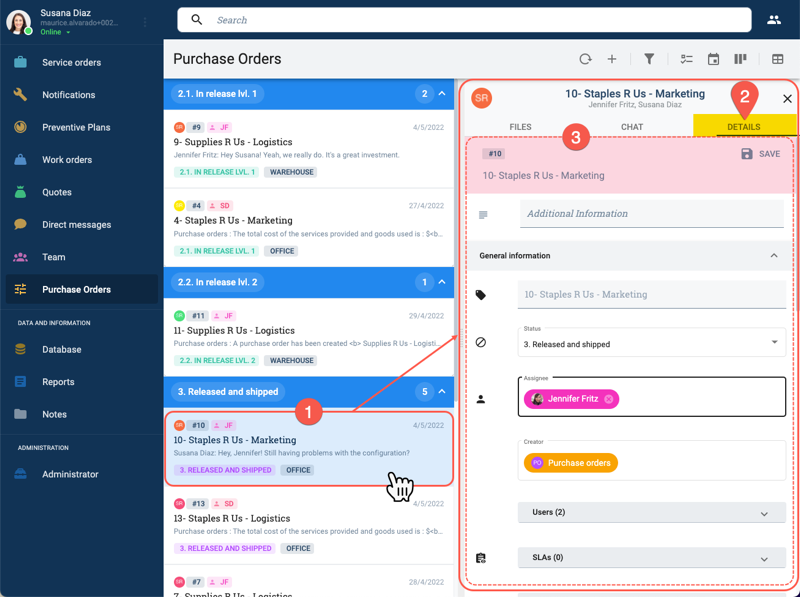
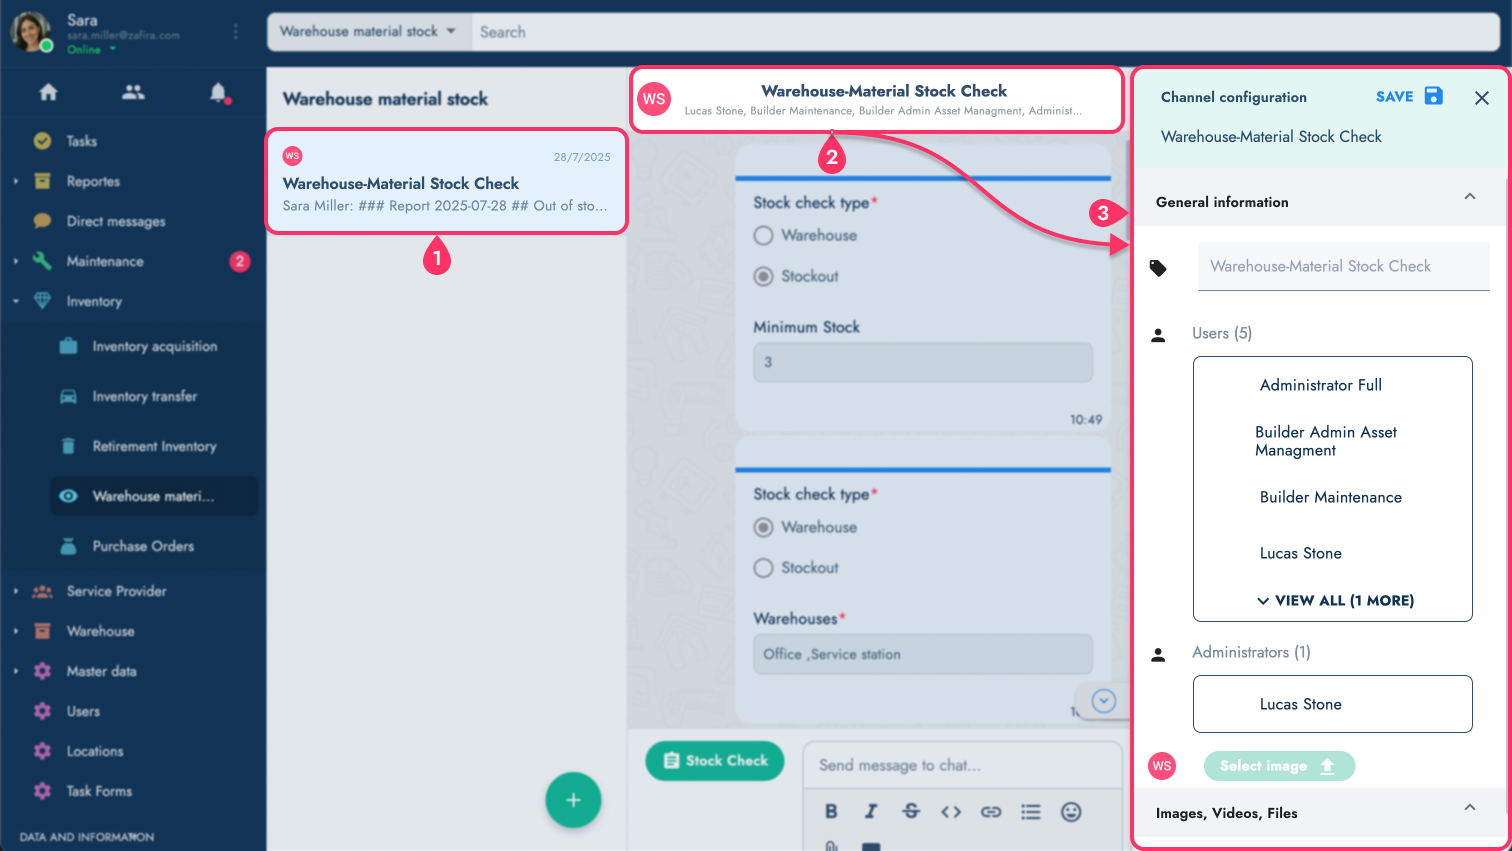
You can update a task by opening a the Details side panel with its settings. Open the side panel either by selecting it through the task view or by pressing the title bar in the task's channel workspace when viewing by group.
From the Task View:
From the Group Panel view:
Actions Button
If configured, you can change a task's state using the actions button in its channel workspace, as shown below:

- Press the actions button found at the bottom of the channel workspace.
- Select options with this icon to change the task's state to the one indicated in the menu.
- Select options with this icon to open a survey form. Survey forms can also be configured to create or update tasks.
User Task Roles
User task roles are set in the task Details section. If you have the proper permissions and task role, you can write the name of the user in the corresponding field.
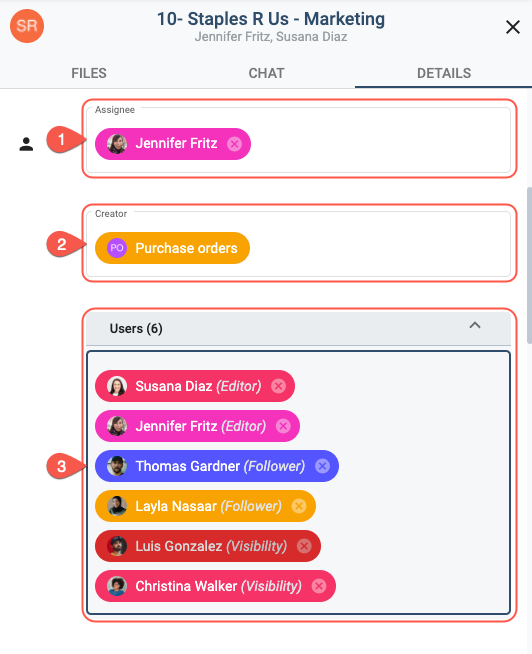
- Assignee: The user in charge of carrying out the task. Only one assignee can be designated at a time. By default, the creator of the task is designated as the assignee, but can later be changed.
- Creator: The user that created the task. The creator can be a human or a bot.
- Users (doble-click on the user tag to shuffle through the following options):
- Follower: A follower can read task details and participate in the chat area, but cannot update task states or details.
- Editor: An editor has read & write access on all task detail fields and can participate in the chat area.
- Visibility: Users with the visibility tag can view limited task details. They can participate in the chat area and view notes, but they cannot change the task's state.
Best Practices
Sorting Tasks
Tasks should be sorted in the group panel by states so that users can visually identify the state their tasks are found in. Sorting tasks by states can be set in the layout section of the settings panel by choosing the collection where the workflow states are found in.
Task State Names
State names should begin with a number or individual letter corresponding to their order in the group panel and task view. For example: "1. Backlog", "2. Doing", "3. Finished", "4. Unable to Complete". Since states are elements within collections, their names are configured and edited from the settings panel in the Database panel.
Associating Tasks from Different Workflows
If needed, tasks that belong to different workflows can be associated with one another.