Generate HTML-3.0.0
Generates an HTML from a template and an object with data
key: PBTemplate
Overview
The Generate HTML bot creates an HTML file that can be used during the routine by another stage bot to structure and stylize information.
The Create PDF (PBPdf) stage bot can use the files created by Generate HTML to produce PDF files with a standardized design and format that include relative task data. For example, it can be used to create invoices or purchase orders that automatically include client data, items, costs, and much more.
Settings Layout
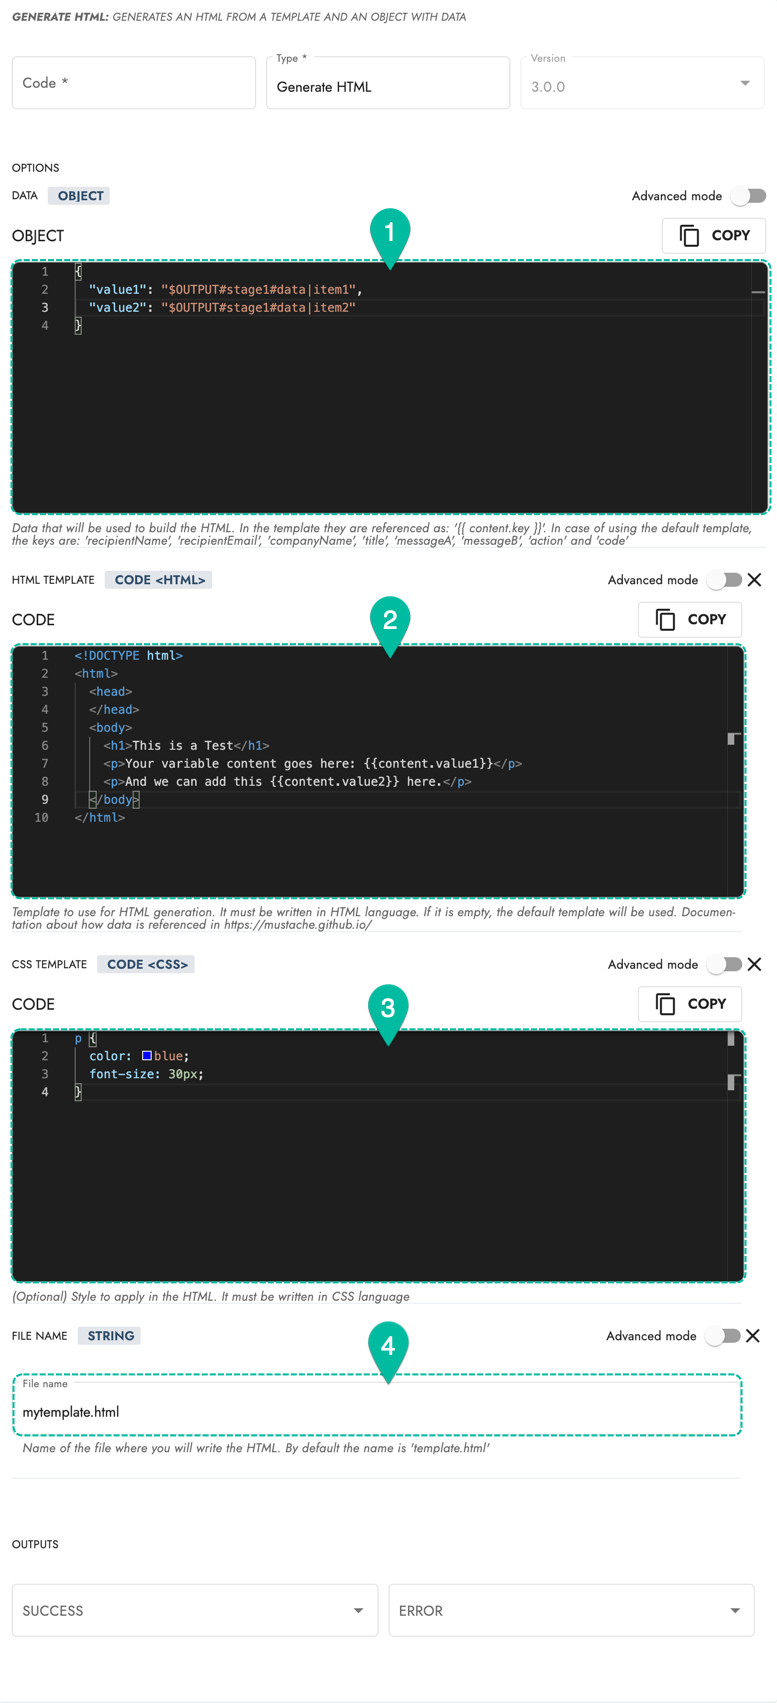
1. Data (Object):
JSON object with template keys and variable values. Use an object corresponding to either the default or customized template. Template info below.2. HTML Template (Code):
Customized HTML template goes here. The default template is used if no customized code is inserted.3. CSS Template (Code):
Customized CSS template used for stylizing the HTML template.4. File Name:
The file name used to store the HTML template. The template is summoned by its file name on HTML-compatible stages within the routine.
To display items 2–4, you must select +Add Optional Inputs.
Templates
The Generate HTML stage bot enables other stages within the routine to use either the default or a customized HTML template to generate their own documents.
Whether the default or a customized template is used, the Data (Objects) section must contain a JSON object with template keys and values.
Within the Data (Object) section, you can use COTLang (Cotalker Scripting Language) to extract context data and use it within the JSON object that contains the variables so that your templates are generated with the relative data. Context data can include things like assets, users, and other task details found within the database.
You must save the HTML file by using the File Name option. Otherwise, the template will not be available for use by other stage bots during the routine.
Note: The file is stored in memory only during the routine.
Default template
The default template requires a JSON object with the following structure and keys:
{
    "recipientName": string,
    "recipientEmail": string,
    "title": string,
    "messageA": string,
    "messageB": string,
    "action": string,
    "code": string,
    "companyName": string,
}
- If no customized HTML Template is defined, the system will use the default template and expect the use of the JSON object shown above.
- The default template is similiar to the default email template used for sending automatically generated emails within a routine.
Custom Template
By pressing Add Optional Inputs within the settings panel, you can add a customized HTML Template.
The variable keys must be inserted with the {{content.key}} format.
Below is a simple example of how to write your HTML code with its variable keys:
<!DOCTYPE html>
<html>
  <head>
  </head>
  <body>
    <h1>{{content.title}}</h1>
    <p>Your variable content can go here: {{content.value1}}</p>
    <p>And we can add this {{content.value2}} here.</p>
  </body>
</html>
Below is an example of the JSON object with the template keys and their values that will appear in the final output:
{
  "title": "This is the Title",
  "value1": "$OUTPUT#stage1#data|item1",
  "value2": "$OUTPUT#stage1#data|item2"
}
☞ Read the mustache documentation for more details and options for displaying variable and conditional content on your HTML template.
CSS Template
Through Add Optional Inputs, you can modify your HTML template's design with a CSS Template.
Simply insert CSS code, as shown below:
p {
  text-decoration: underline;
  color: red;
}
Below you will find the complete list of options available on the Generate HTML (v3.0.0) stage bot:
Inputs
1. Data (key: content)
Data that will be used to build the HTML. In the template they are referenced as: '{{ content.key }}'. In case of using the default template, the keys are: 'recipientName', 'recipientEmail', 'companyName', 'title', 'messageA', 'messageB', 'action' and 'code'
Required: true
Data Type: object
2. HTML Template (key: htmlTemplate)
Template to use for HTML generation. It must be written in HTML language. If it is empty, the default template will be used. Documentation about how data is referenced in https://mustache.github.io/
Required: no
Data Type: code html
3. CSS Template (key: cssTemplate)
(Optional) Style to apply in the HTML. It must be written in CSS language
Required: no
Data Type: code css
4. File name (key: fileName)
Name of the file where you will write the HTML. By default the name is 'template.html'
Required: no
Data Type: string
Next Stages
1. SUCCESS
2. ERROR
Outputs
1. File Path (key: filePath)
Required: no
Data Type: string
2. Errors (key: errors)
Required: no
Data Type: array string