Introduction

The administrative panel is the admin's main workplace. From here, they can configure and monitor the entire Cotalker environment.
Access and use of the administrative panel is limited by the user's access roles.
Accessing the Administrative Panel

- Press Administrator in the Main Menu Bar.
- The administrative panel opens up,
- A corresponding settings panel shows up.
Layout/Index
The administrative panel's layout serves also as this documentation section's index.
From the administrative panel, you can access the following:
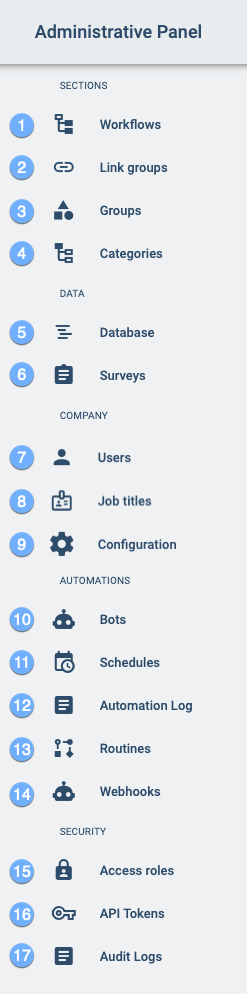
- Workflows: Create and configure workflow groups and workflows.
- Link Groups: Create links that appear on the Main Menu Bar or within a group.
- Groups: Create standard groups for communicating with other users and sharing information.
- Categories: Configure sub-menus on the Main Menu Bar.
- Database: Manage collections and elements.
- Surveys: Create and modify surveys used to gather information from users or configure workflows.
- Users: Create and modify user profiles along with their access roles, job titles, and additional fields.
- Job Titles: Create job titles that can be associated to users as elements with special attributes.
- Configuration: Edit company information and language.
- Bots: Create and edit customized bots to carry out automated routines.
- Schedules: Create and edit scheduled routines.
- Automation Log: Monitor all automations carried out in the Cotalker environment.
- Routines: Create or edit predetermined bots that can be later used in routines.
- Webhooks: Set up triggers that send data to your server upon certain events.
- Access Roles: Create and modify sets of permissions given to users for different types of access.
- API Tokens: Create API tokens or bearer keys that grant different levels of access and can be shared with users even outside the Cotalker environment.
- Audit Logs: Monitor creation and modifications of users and access roles.
Icons
When using the administrative panel, various icons will appear in its settings panels to offer possible actions or options.
Below, we find the descriptions of the buttons used for in all list tables:
| Action Name | Image | Description |
|---|---|---|
| Search | Search for a specific element | |
| Create | Create a new element | |
| Edit | Edit a specific element | |
| Download | Open download menu | |
| Import | Open import menu. (This is not available for all models) | |
| Change Page | Moves user list backward / forward | |
| Change the whole Page | Moves user list to the first / last page |
The description of the page buttons for creating or editing an element can be found in the following table:
| Action Name | Image | Description |
|---|---|---|
| Save | Save current configuration | |
| Deactivate | Deactivate the element | |
| Camera | Set image | |
| Back | Back to all elements list | |
| Disable | Show disabled items | |
| Checkbox | Select the item to disable | |
| Disable Button | If it is blue, it activates the item, otherwise it deactivates it. |
The buttons used when downloading a list of items are found in the next table:
| Action Name | Image | Description |
|---|---|---|
| Download | Download the list | |
| Cancel | Retract the download |
In the next table, buttons for when a list of items is imported:
| Action Name | Image | Description |
|---|---|---|
| Select | Select a file from your finder | |
| Cancel | Retract the import |