Automation Log
Overview
The automation log helps you test and debug routines. Every time a routine or automation runs, its operation is recorded in the automation log. There you can find information concerning the automation's execution date, duration, owner, data context, and result. This tool allows you to see how your routines are working and do any necessary debugging.
Whenever you test a routine (Run Routine) from the Routine Builder, the test will also be recorded in the log.
Logs can be accessed directly through the Administrative Panel or anywhere a routine can be built, like workflows, SLAs, or other automations.
Logs List
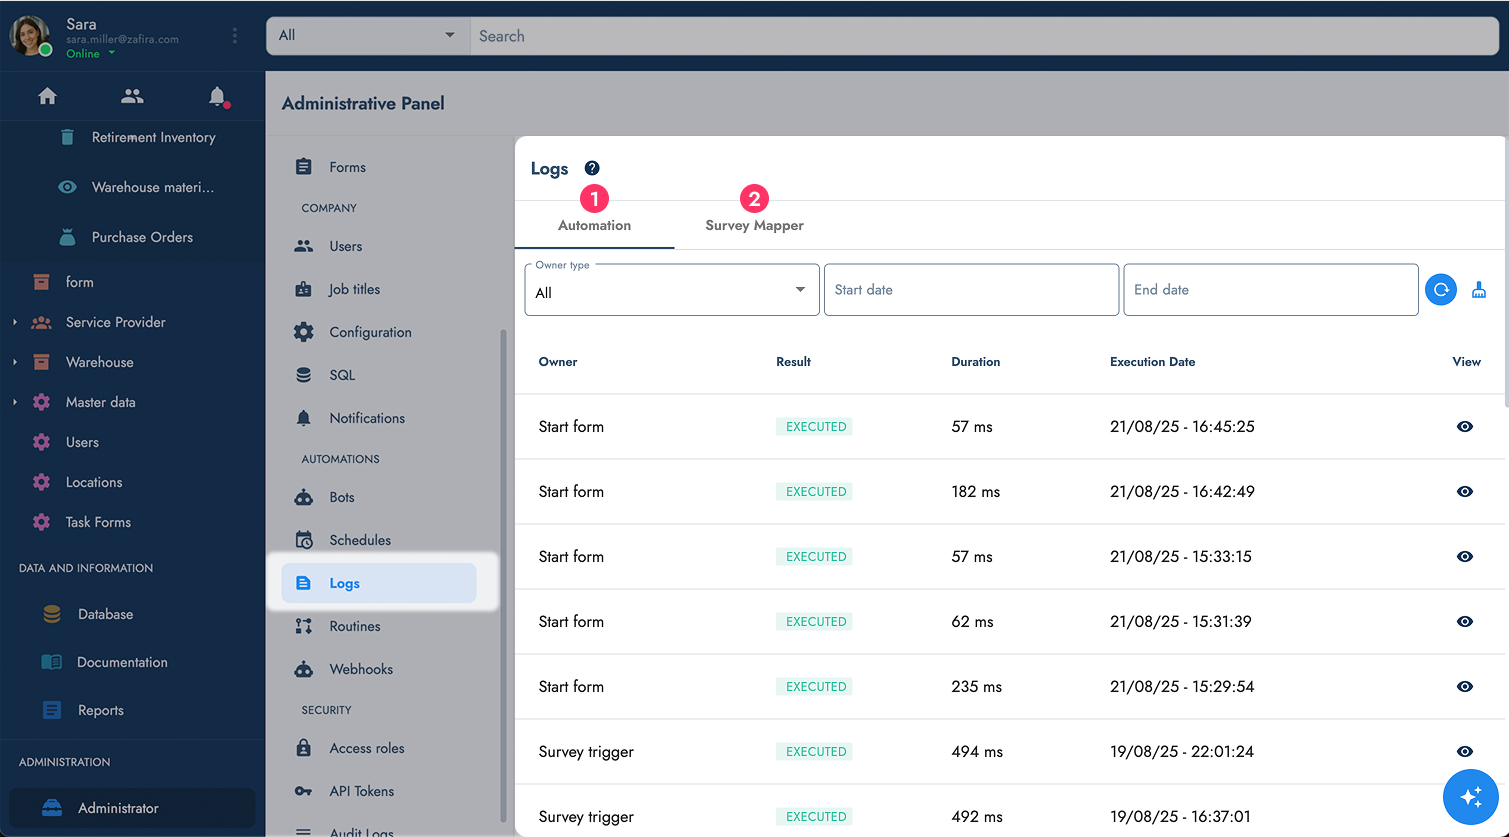
- 1 Automation logs list: list of logs for bot, start form, survey trigger, state change, SLAs and custom owner.
- 2 Survey Mapper logs list: list of logs for survey mapper
Filter Bar
The automation log includes a comprehensive filter bar to help you quickly locate specific log entries. The filter options make it easier to search through logs by narrowing down results based on various criteria:
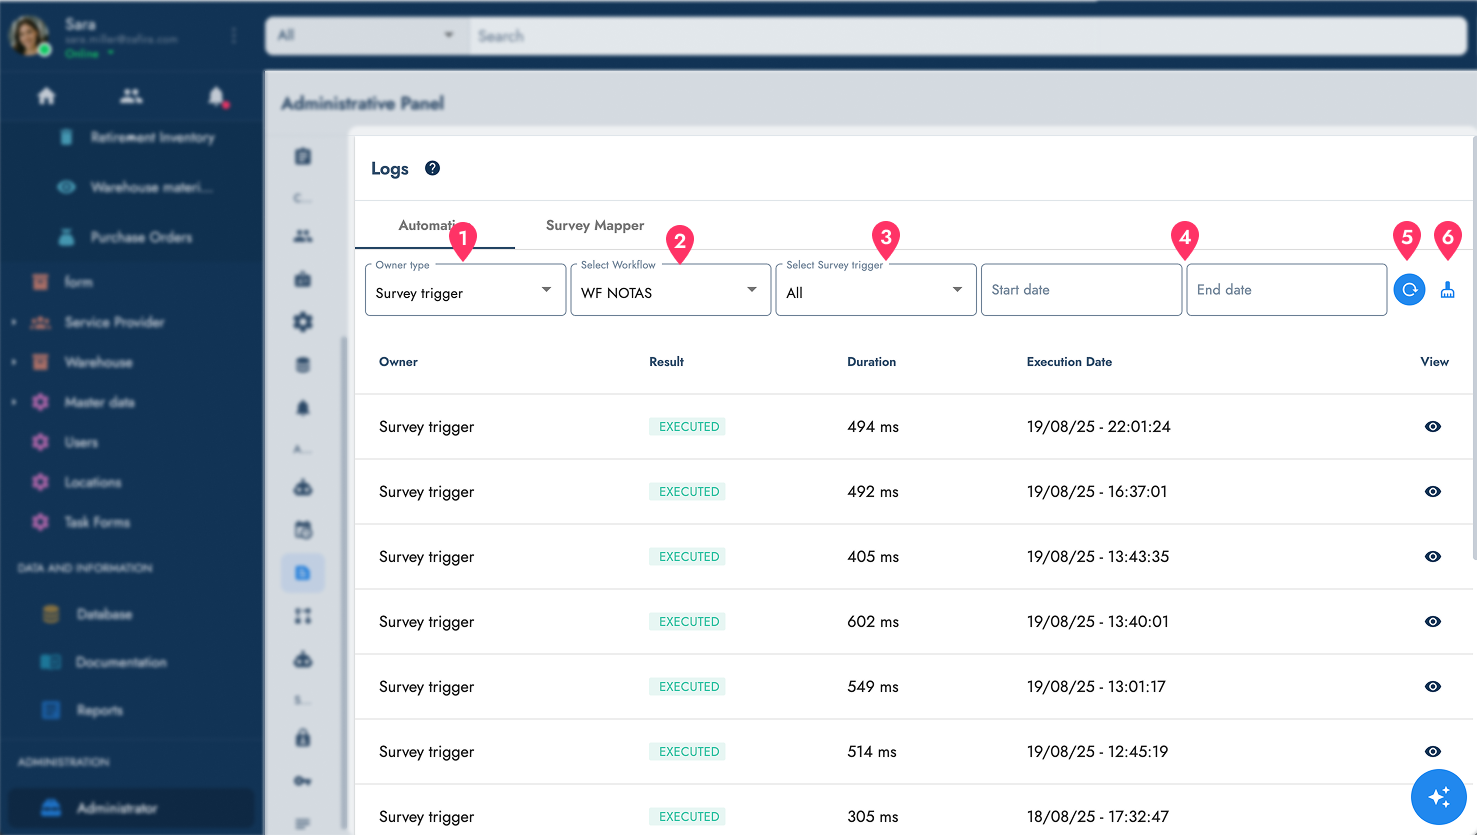
1 Owner Type Filter: Select from the following automation types:
- Bot: Filters logs from bot automations
- Start Form: Shows logs from start form automations
- Survey Trigger: Displays logs from survey-triggered automations
- State Change: Shows logs from workflow state change automations
- SLA: Filters logs from SLA-related automations
- Custom: Displays logs from custom automation types
3 Dynamic Context Filter: Based on your selection in the Owner Type filter, this field will dynamically populate with relevant options:
- If "Survey Trigger" is selected, it displays survey triggers
- If "State Change" is selected, it shows available state changes
- If "SLA" is selected, it lists available SLAs
5 Refresh Search Button: Apply the selected filters to update the log list with results matching your filter criteria.
6 Clear Filter Button: Reset all filter selections to their default state, removing any applied filters and displaying the complete log list.
These filters work together to provide a more comfortable and efficient log search experience, allowing you to quickly identify and review specific automation executions.
List Details
The initial settings panel displays the list of automations in descending chronological order. It is divided into the following four columns:
- Owner: The type of automation log (e.g., Bot, Start Form, Survey Trigger, etc.).
- Result: Possible results are executed or failed.
- Duration: Time it takes for an automation to execute. Results return in seconds and milliseconds.
- Execution Date: The date and time the automation executed. The date is in DD/MM/YY format.
- View: Click to open the log view and access more information.
- Each automation will be stored in the log list for no more than seven days.
- The logs list refreshes every minute but can be manually refreshed by pressing the refresh icon found in the upper-right corner.
Log Details
Once an automation has been chosen for viewing, a new settings panel will appear and more information will be made available.
The settings panel will look something like the following image:
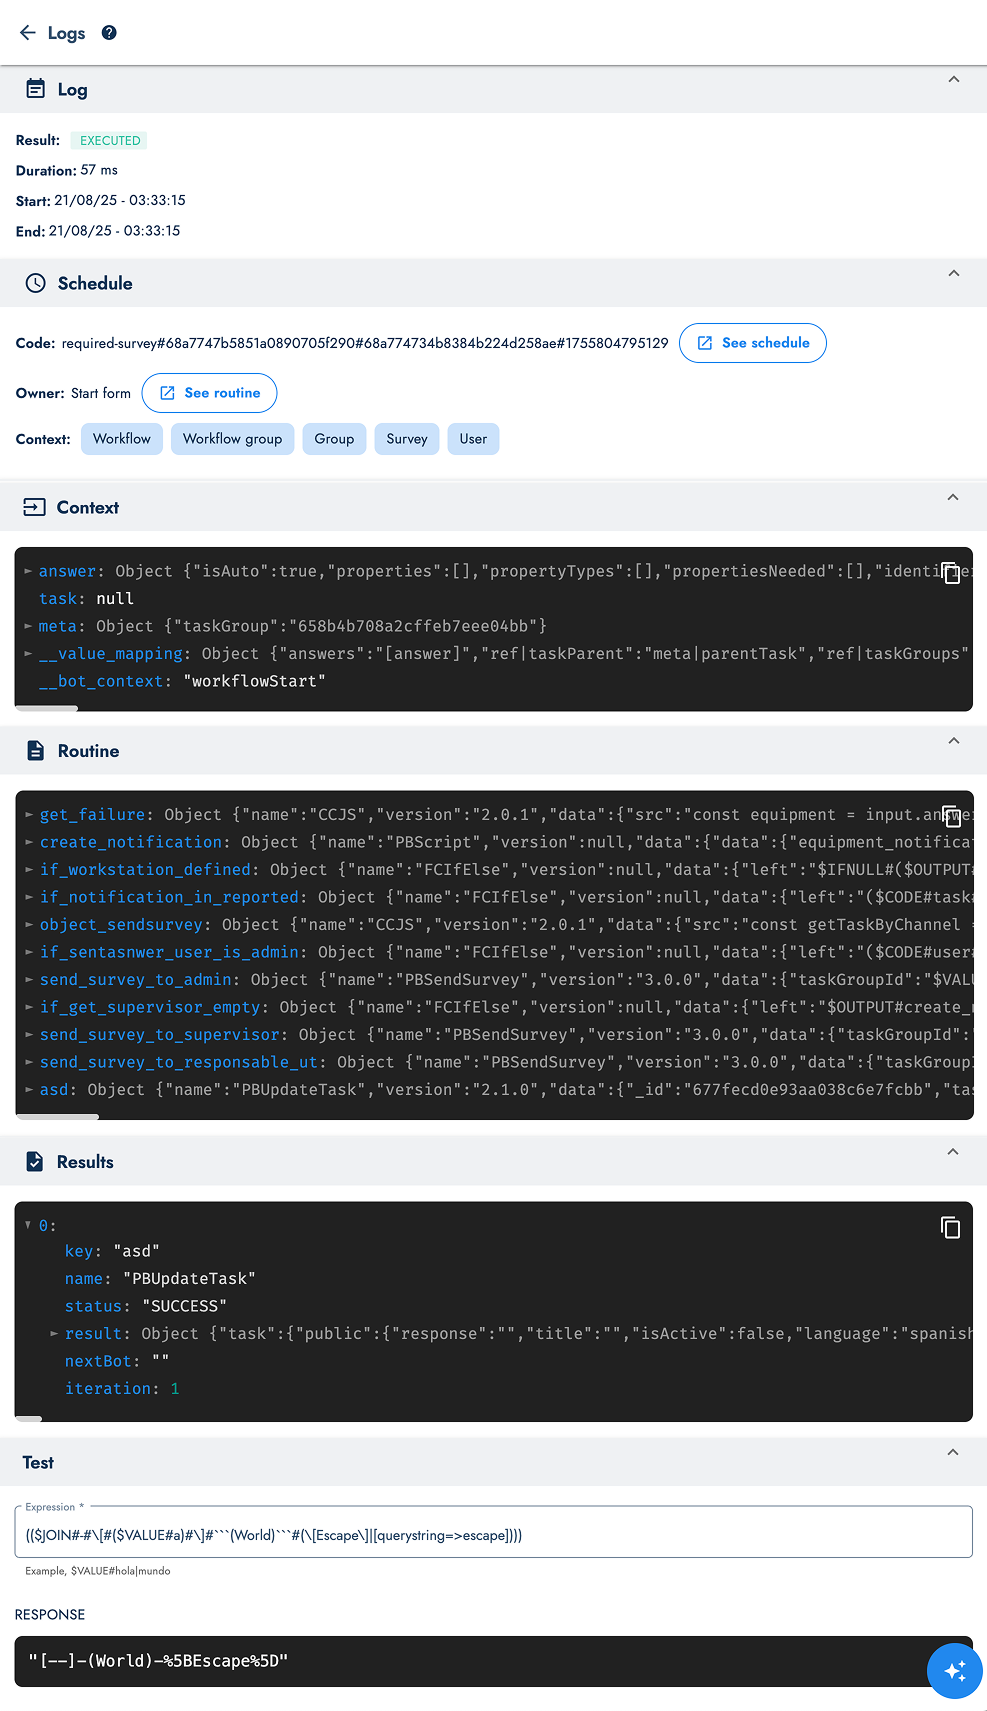
The information displayed in the settings panel is divided into the five sections –log, schedule, context, routine, results– explained below:
Displays the automation's basic information, which is also shown in the automation log list.
- Result: Possible results are executed or failed.
- Duration: Time it takes for an automation to execute. Results return in seconds and milliseconds.
- Start & End Dates: The date and time the automation executed. The date is in DD/MM/YY format.
- Code: Indicates the routine's Id number and links to its place within the schedules section.
- Owner: Indicates the type of automation or routine and links to its routine builder. When an automation is tested with the routine builder, its owner will be indicated as "Test" and won't have any link.
- Context: Links to the elements related to the routine.
Click here for more information on data context.
- Name: Indicates the name of the bot or stage type used in the step.
- Data: Indicates the specific data entered corresponding to the stage type.
- Next: Indicates the name of the next step or stage, either if the run was successful or not.
- Key: Stage name.
- Name: Stage type (bot).
- Status: Depends on the stage type.
- Result: Depends on the stage type.
- NextBot: Indicates the next stage type or bot called.
- Iteration: Indicates the stage's place in routine order.
When errors are caught, the Error section appears at the bottom of the settings panel. It will look somewhat similar to the following image:

Log Lists in Other Places
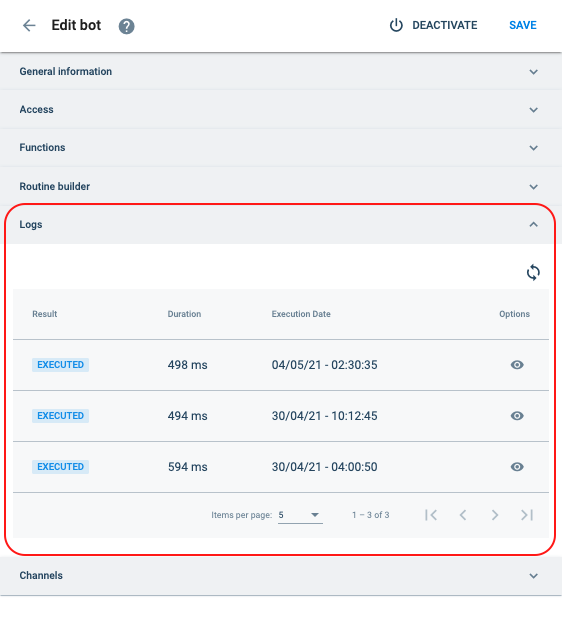
Routine Builders in Workflow States:
In SLAs:
In other automations:
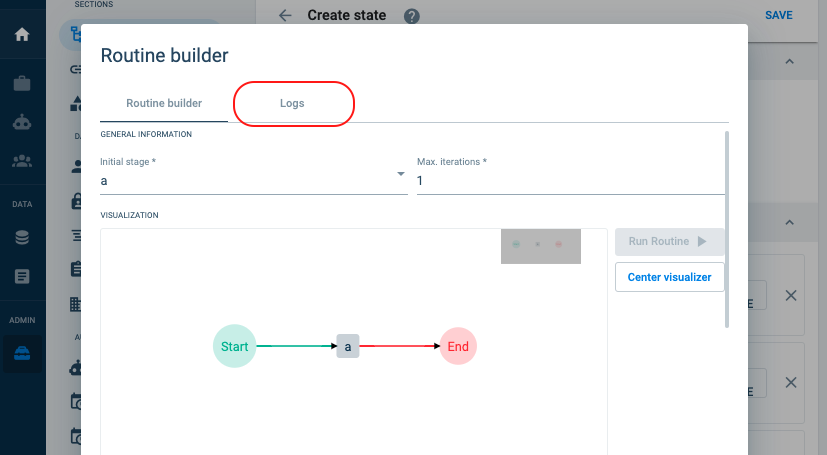
Run Routine "Tester"
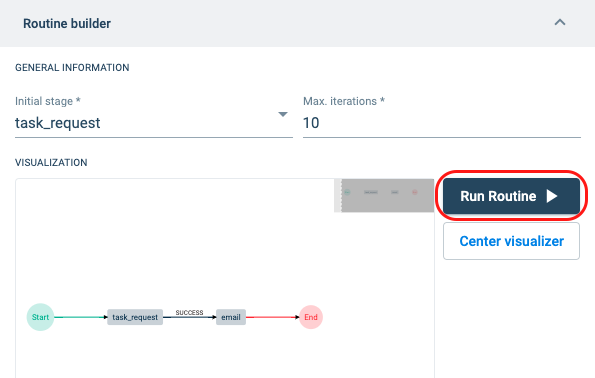
The Run Routine button is part of the Routine Builder. It opens up a window that will help you test and debug your routines while you are building them. The Run Routine window has two sections: Context and Automation Log.
The Run Routine window will look something like this:
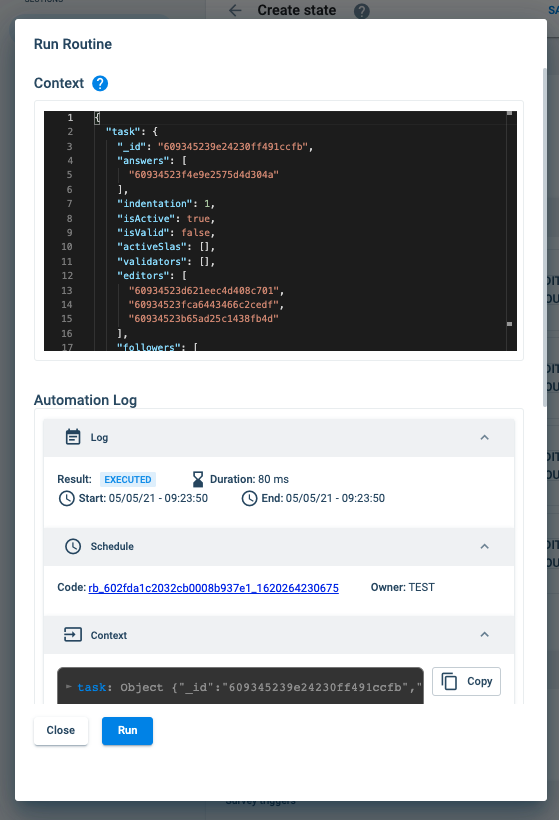
Context Editor
The Context editor is the big black box on the upper half of the window. It acts just like a code editor and is used to edit the data context for testing purposes.
Next to the Context title, you can find a link to the Triggers & Contexts section for more information on data context.
When using Run Routine with a subtask, the Context editor is automatically filled with mock data for testing.
Run Routine is not a "playground". The routine will actually execute all the steps. So, for example, if you program the routine to send an email, it will really send the email. You can insert mock data into the Context editor to avoid mishaps.
Automation Log
The automation log in Run Routine is the same as described above.