Question Code Automations
Program logic, retrieve data, and add customized automations on Survey Questions with JavaScript Code.
Overview
Question Code Automations permit adding Javascript code to a survey question. These automations can be set using customized code logic to add validation processes, retrieve external data, automatically fill out survey questions, and much more.
- Custom code must be written in JavaScript using an asynchronous function.
- The code runs on the client-side within a sandbox.
- On the backend, Question Code Automations are found in COTQuestionExec objects. (Sometimes Question Code Automations are referred to as Question Exec)
Setup
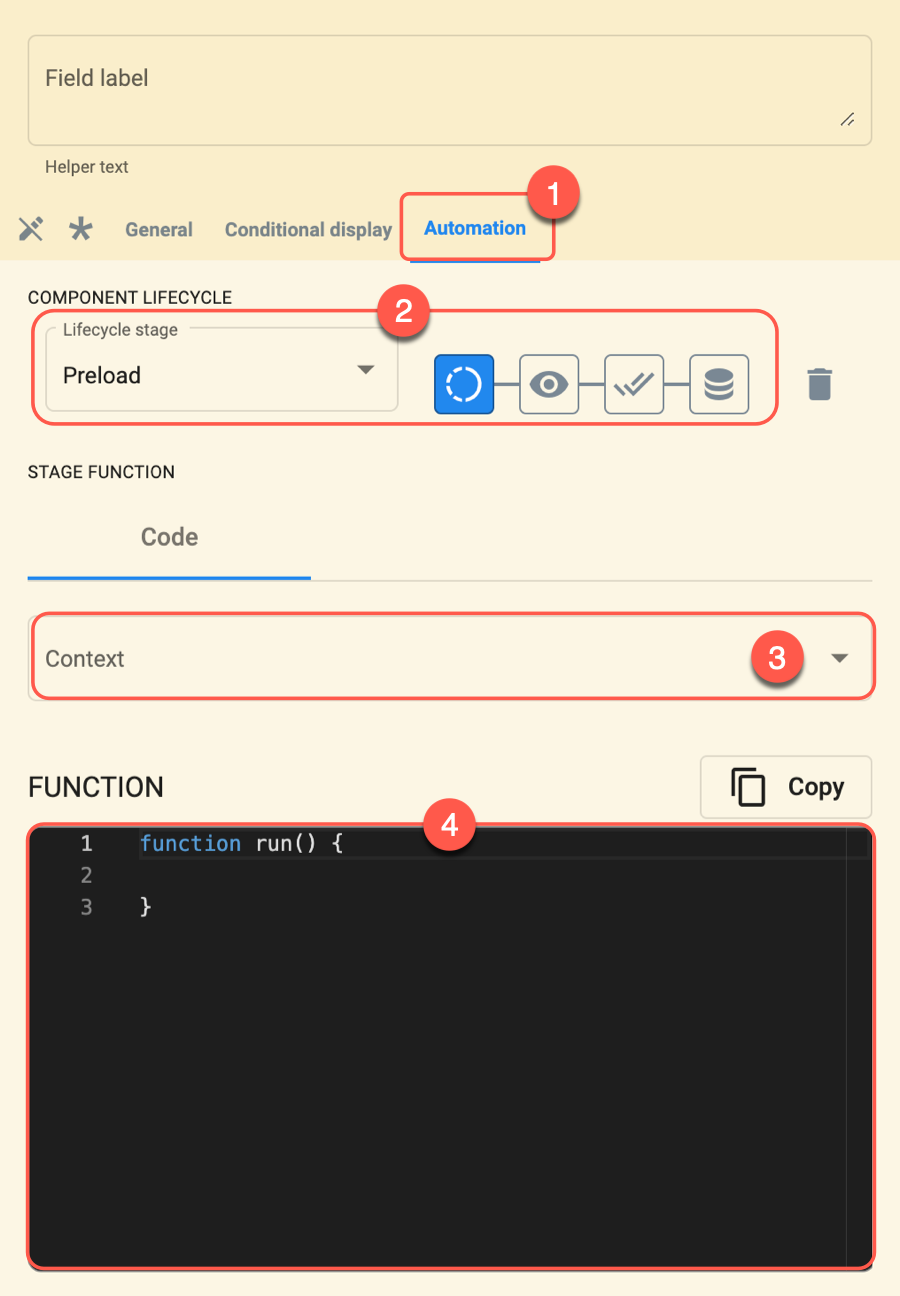
To add your custom code:
- Select the Automation tab within the survey component
- Choose a lifecycle stage.
- Choose the appropriate parameters.
- Put your Question Code function on the editor box at the bottom of the settings panel.
See the image below:
Component Lifecycle Stages
You can add custom code in any of the four stages of a survey component's lifecycle. Select the stage either with the dropdown menu or by clicking the corresponding icon.
See the image below:
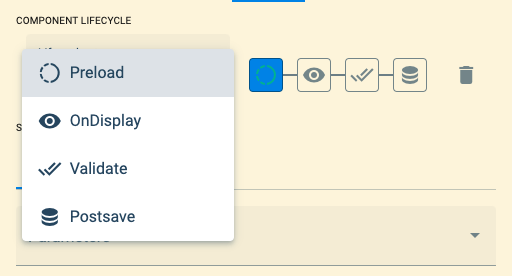
- Preload: The code executes when the survey is created.
- onDisplay: Code executes when a survey is in editing mode, i.e., when a user opens the survey from the channel, and it is displayed for answering.
- Validate: Code executes before internal validations and before sending the survey. This permits adding additional levels of validation (business guidelines, protocols, etc.).
- Postsave: If custom and internal validations are passed, the code executes after sending the survey.
- OnPlay NEW: Code executes when a user presses a custom button within the form. This allows manual triggering of automations instead of automatic execution.
- Lifecycles can be complex, especially when dealing with asynchronous functions. Avoid using repetitions.
- Use survey field answers to validate other fields.
- Use validations for complex rules involving string manipulation or mathematical operations.
- When possible, try using routines instead of executing code on the postsave stage.
Stage Funciton / Coding Guide
In the Stage Function section, you can write or paste your Question Code function into the editor box and set the necessary parameters for it to work.

See the Embedded Code Editor section for more information on how to use the editor.
Parameters (Context Variables)
Parameters or context variables enable communication with different endpoints.

The following context variables are available for use in the code but must be selected from the Parameters menu for them to be accessible:
- property#channel: Properties associated with a channel.
- property#user: Properties associated with a user.
- channel#self: Channel where the survey is located.
- user#me: User that is answering the survey.
- user#company: The company the user belongs to.
- responses#self: Survey field answer stored as value.
- message#self: Message associated with the survey.
These parameters or context variables can be further specified in your code. Just look up the appropriate models for each parameter. For example, if you wanted to use some specific channel properties, you could use the models to declare constants:
const channelId = context['channel#self']._id;   //  e.g. 606b0d554c479b00080f0d27
const channelCode = context['channel#self'].nameCode;    // identification code
const channelDisplay = context['channel#self'].nameDisplay;  // display name
Question Code Function
Write or paste your code into the editor.

Question Code Automation MUST comply with at least two requirements:
The Question Code Automation SHOULD be written as an asynchronous function named
run, without any arguments.Structure example:
async function run () { /* yourCode; */ return []; }The function MUST return an array with command objects.
Command NotesA. The function may return more than one command.
B. Below are descriptions and samples of the available command objects.Structure example:
return [
  {
    cmd: <cmd-name>,
    value: <cmd-value>,
    result: <cmd-result> //Used with RESULT commands.
    target: <cmd-target> //Used with SET-RESPONSES commands.
  }
];
- Use console logs or print statements within your code to show what your function is doing on the browser console and debug if necessary.
- Wrap your code logic in try-catch statements.
- Code defensively, expect null values in your logic, and try to handle null cases when reading an answer from another question.
- Let survey field answers automatically determine other answers. The target option in the SET_RESPONSES command can help you with this.
Command Objects
Command objects provide the system with instructions and data for continuing the process.
READONLY
Description: Sets the field to read-only mode.
Example: {cmd: 'SET_READONLY', value: 'true' }
| Field | Values |
|---|---|
| cmd | SET_READONLY |
| value | 'true' | 'false' |
RESPONSES
Description: Places a value on the indicated field.
Example: { cmd: 'SET_RESPONSES', target: 'rating_00', value: '5' }
| Field | Values |
|---|---|
| cmd | SET_RESPONSES |
| target | 'self' | 'Survey question identifier' |
| value | Click here to view value type format. |
REQUIRED
Description: Sets the field as mandatory, requiring an answer.
Example: { cmd: 'SET_REQUIRED', value: 'true' }
| Field | Values |
|---|---|
| cmd | SET_REQUIRED |
| value | 'true' | 'false' |
RESULT
Description: Validates responses with a "true" or "false" result.
Example: { cmd: 'RESULT', result: 'false', value: 'Please try again.' }
| Field | Values |
|---|---|
| cmd | RESULT |
| result | 'true' | 'false' |
| value | custom error message |
Network Requests
The Question Code Automation can make network requests, i.e., API requests that can be customized with user survey input and then filtered and processed to be used to fill out the survey or any other process that can be automated with the code.
- Use network requests with caution and only for retrieving precise data.
- Avoid including passwords or API tokens directly in your code.
To make a network request, you must include in your code the following function: networkRequest(url, { headers, method, body }, options).
If an authentication token is needed to make an API request, add {token: true} option to use the current user's token.
Code structure example:
const example = await networkRequest(`url`, {
            method: 'GET' | 'POST' | 'PATCH',
            headers: {...},
            body: {...} // Used with POST & PATCH
        },
        {
            token: true // Adds user's API token to the header
        });
    return [];  //Must return a command object.
}
See Example 3 for more details.
Examples
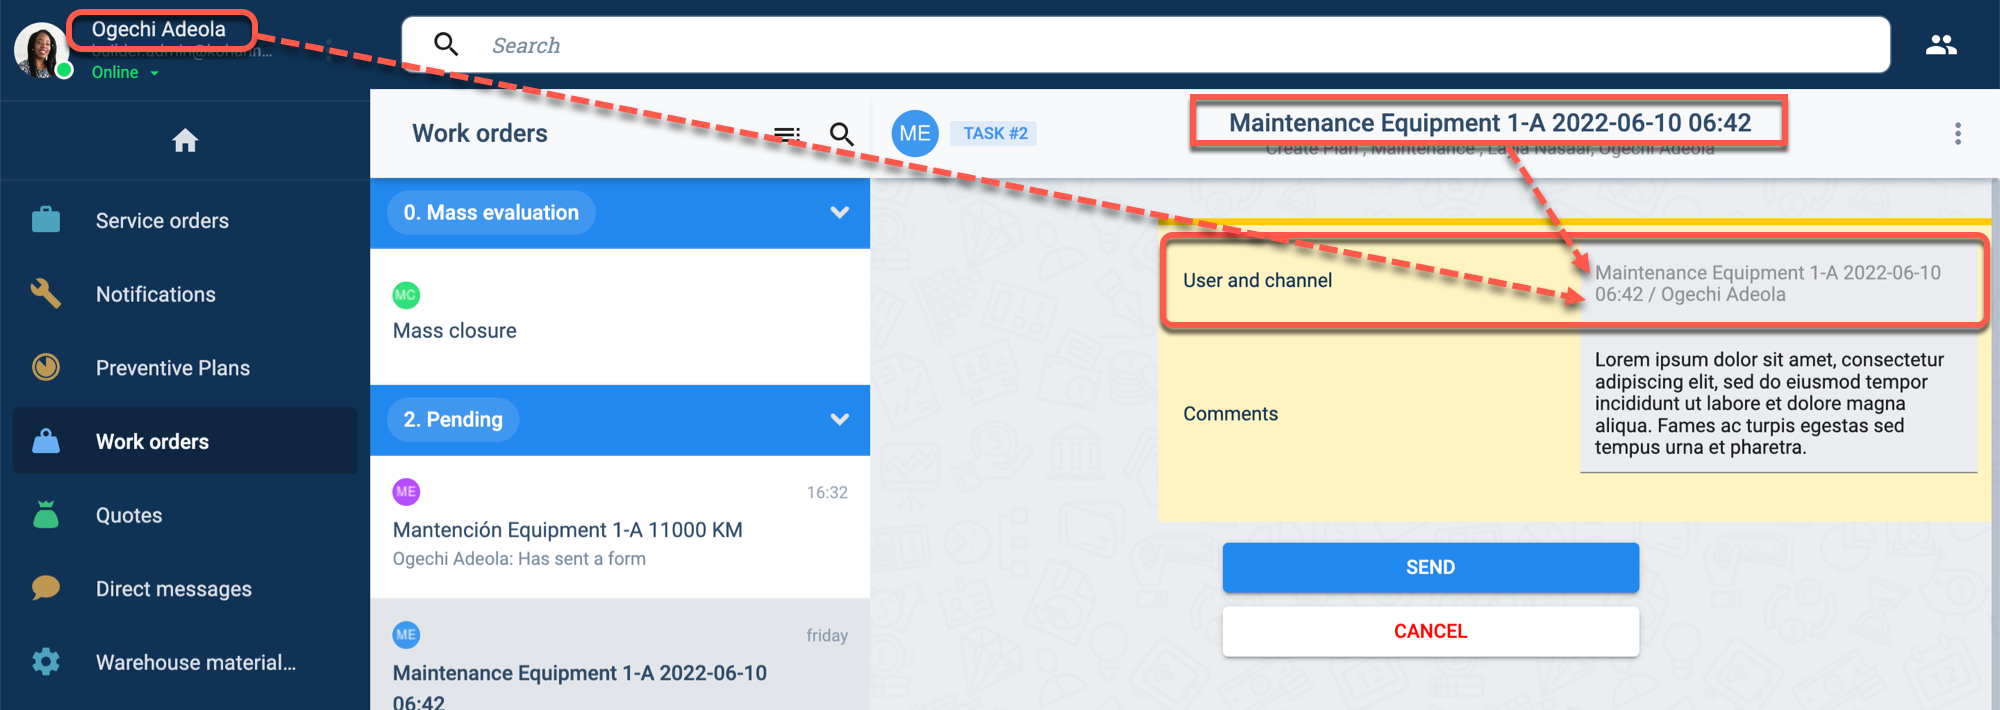
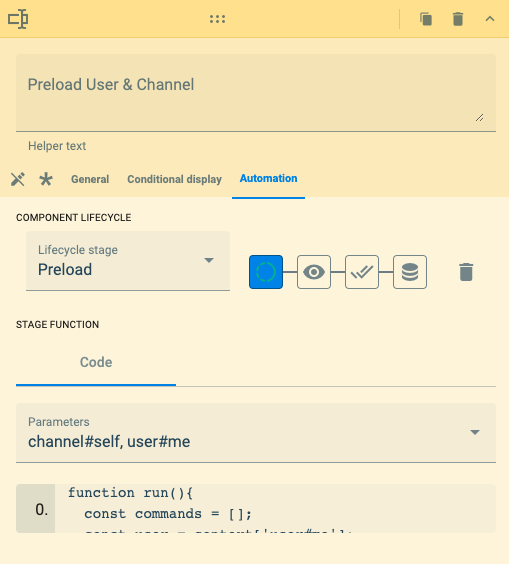
Example 1: Preload User and Channel
Displays the current channel and user name on read-only survey field, as shown below:
Settings:
- Set lifecycle on Preload stage.
- Set parameters to user#me and channel#self.
Code sample:
function run() {
    const commands = [];
    const user = context['user#me'];
    const channel = context['channel#self'];
    const channelName = channel.nameDisplay;
    const userName = user.name.names + ' ' + user.name.lastName;

    commands.push({
        cmd: 'SET_RESPONSES',
        target: 'self',
        value: channelName + ' / ' + userName
    });
    commands.push({
        cmd: 'SET_READONLY',
        value: 'true'
    });
    return commands;
}
Your settings panel should look something like this:
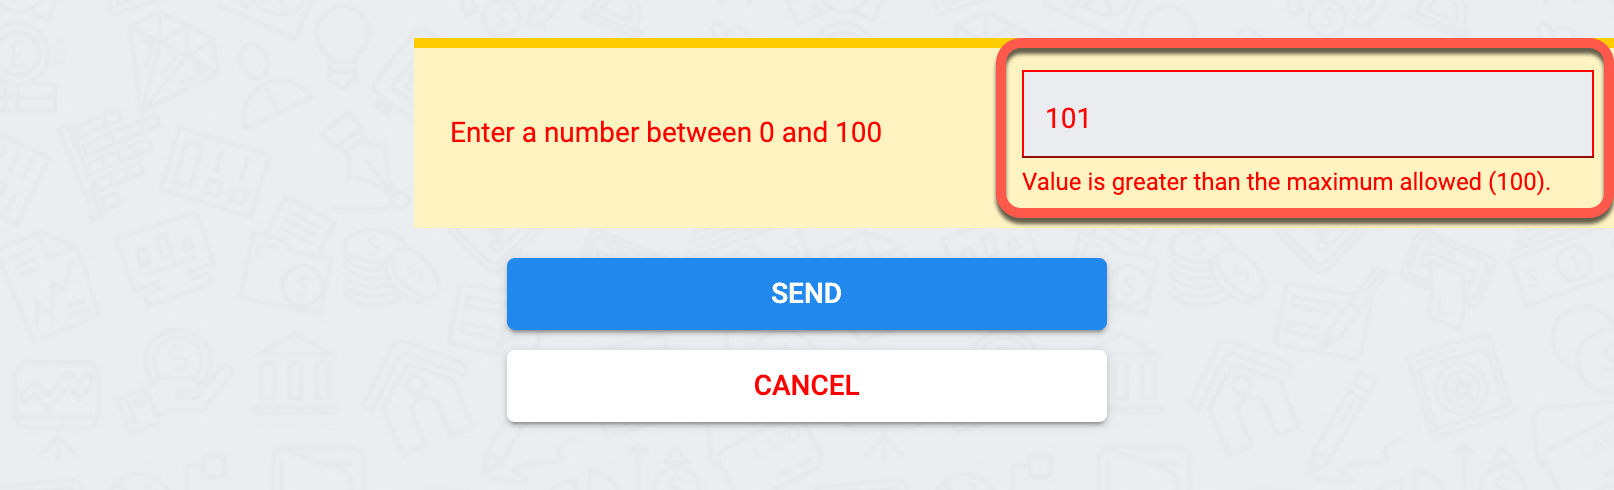
Example 2: Validate Value
Validates if a value is between 0 and 100. An error message appears and the form cannot be submitted. See image below:
Settings:
- Set lifecylce on Validate stage.
- Set parameters on responses#self.
Code:
function run() {
    const val = context['responses#self'][0];

    if (!val)
        return [{
            cmd: 'RESULT',
            result: false,
            value: 'Please enter a number.'
        }];

    if (val < 0)
        return [{
            cmd: 'RESULT',
            result: false,
            value: 'Value is lower than the minimum allowed (0).'
        }];

    if (val > 100)
        return [{
            cmd: 'RESULT',
            result: false,
            value: 'Value is greater than the maximum allowed (100).'
        }];

    else
        return [{
            cmd: 'RESULT',
            result: true
        }];
}
Example 3: Make a network request.
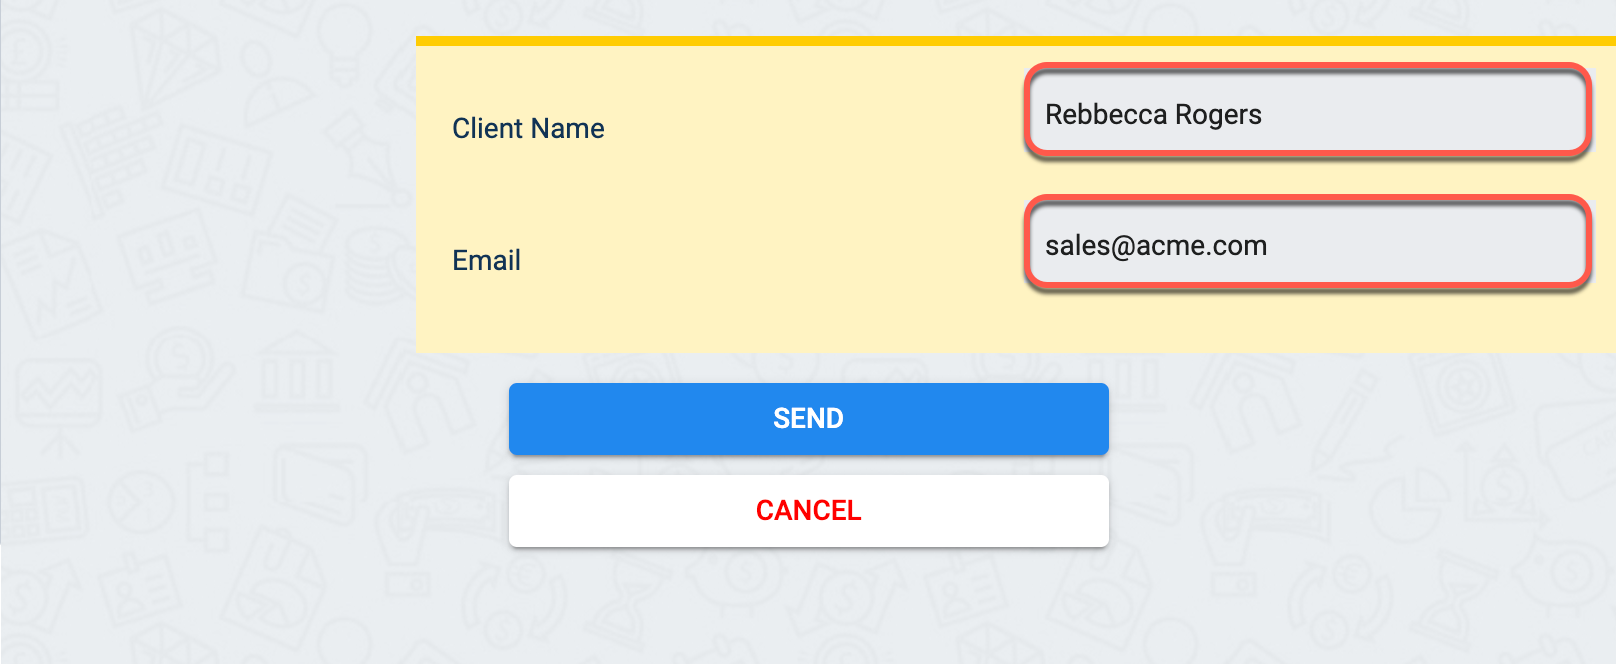
This example makes an API request to retrieve all elements belonging to a particular collection and use the data to fill out the form.
- In the example, the network request retrieved an array of all the elements belonging to the
clientcollection. The code is hotwired to use the fourth element in the array and extract from it the client's contact name and email and use them to fill out the form. - With a little bit of coding, you can add customized logic to the survey to automate data retrival and usage.
Settings:
- Set lifecycle on Preload stage.
- No parameters are required.
Code:
async function run() {
    const test = await networkRequest(
        `https://www.cotalker.com/api/v2/properties?propertyTypes=client`, {
            method: 'GET',
            headers: {
                "admin": "true"
            },
        }, {
            token: true
        });
    const printTest = test.data.properties[3];
    console.log(test);
    return [{
            cmd: "SET_RESPONSES",
            target: "self",
            value: printTest.schemaInstance.contact_name
        },
        {
            cmd: "SET_RESPONSES",
            target: "contact_email",
            value: printTest.schemaInstance.email
        },
    ];
}
The code above retrived this element (COTProperty):
{
    "data": {
        "_id": "62a8f377f2fb5bf8612fc356",
        "subproperty": [],
        "isActive": true,
        "name": {
            "display": "ACME",
            "code": "ein_99-787654"
        },
        "propertyType": "client",
        "schemaInstance": {
            "address_1": "130 32nd St.",
            "tax_id": "153225974",
            "email": "sales@acme.com",
            "contact_name": "Rebbecca Rogers",
            "address_2": "-",
            "city": "Union City",
            "state": "NJ",
            "zip": "07087",
            "phone": "2018653676"
        },
        "company": "62a8f3225c32dfdb26a90b77",
        "createdAt": "2022-06-06T11:57:48.474Z",
        "modifiedAt": "2022-06-14T18:54:46.230Z"
    }
}
With this data, the returned commands set responses for two survey fields: