Micro-Tutorial
How to obtain the element data submitted through a survey form.
Introduction
Suppose you have a survey with a multiple-choice question that obtains its options from the elements within a collection. Since the selected option is an element found within the database, using some COTLang script, you can use the element's data within an automated routine associated with the survey.
Below is a simple automated routine used for demonstration purposes. It is triggered after a survey form has been submitted. The routine takes the chosen element's display name and uses it in a system message.
In the following section, you can find more information and a brief tutorial on how use COTLang scripts within automated routines to obtain element data submitted through a survey.
Using element data gathered from submitted survey forms provides enormous potential for creating automations that can handle and update your database information.
Summary
Before passing on to the step-by-step example, we provide a quick reference summary of the settings used to set up the automation.
Automated API Request
We can use a Network Request, i.e., a parameterized bot used to make API requests, to help us obtain element data submitted through a survey. This type of bot can be set as a stage within a routine.
Below is a list of bot settings and COTLang scripts that can be used to make this API request: https://www.cotalker.com/api/v2/properties/{id}.
In the table below:
- Underneath the Administrative Panel's user interface field names, the COTParametrizedBot.stages[ ] nomenclature is indicated in italics.
- When UI and data model nomeclature differ, both sample types are indicated.
key
get_property
name
Network Request
NWRequest
data.url
1- $JOIN#/#($ENV#BASEURL)#(api)#(v2)#(properties)#($VALUE#data|[find=>identifier=identifier_code]|process|0)
2- $JOIN##https://www.cotalker.com/api/v2/properties/#($VALUE#data|[find=>identifier=identifier_code]|process|0)"
3- $JOIN#/#($ENV#BASEURL)#api#v2#properties#($VALUE#data|[find=>identifier=identifier_code]|process|0)
NOTES:
- Option 1 is the best choice because it helps indicate the different parts of the URL path.
identifier_coderefers to a survey question's identifier.
data.method
GET
data.defaultAuth
Switch ON on the Admin Panel.
true
data.headers
{"admin":true}
Obtaining Output Data
$OUTPUT
The OUTPUT command can be used to obtain the previous stage's data.
Example (obtaining an element's display name):
$OUTPUT#get_property#data|data|name|display
Example (obtaining an element's code name):
$OUTPUT#get_property#data|data|name|code
$CODE
The CODE command transforms the code into an object which can be used within the routine.
Example (using an element's display name):
($CODE#property#id#($VALUE#data|[find=>identifier=identifier_code]|process|0))|name|display
Example (using an element's code name):
($CODE#property#id#($VALUE#data|[find=>identifier=identifier_code]|process|0))|name|code
identifier_code refers to a survey question's identifier.
Step-by-Step Example
Below is an example that uses the suggested scripts for obtaining element data submitted through a survey form.
Previous Steps
Survey Field Identifier
First, you need to know which survey and the identifier of the field the element will be found on.
Here we go to a survey we made called Choose Equipment.
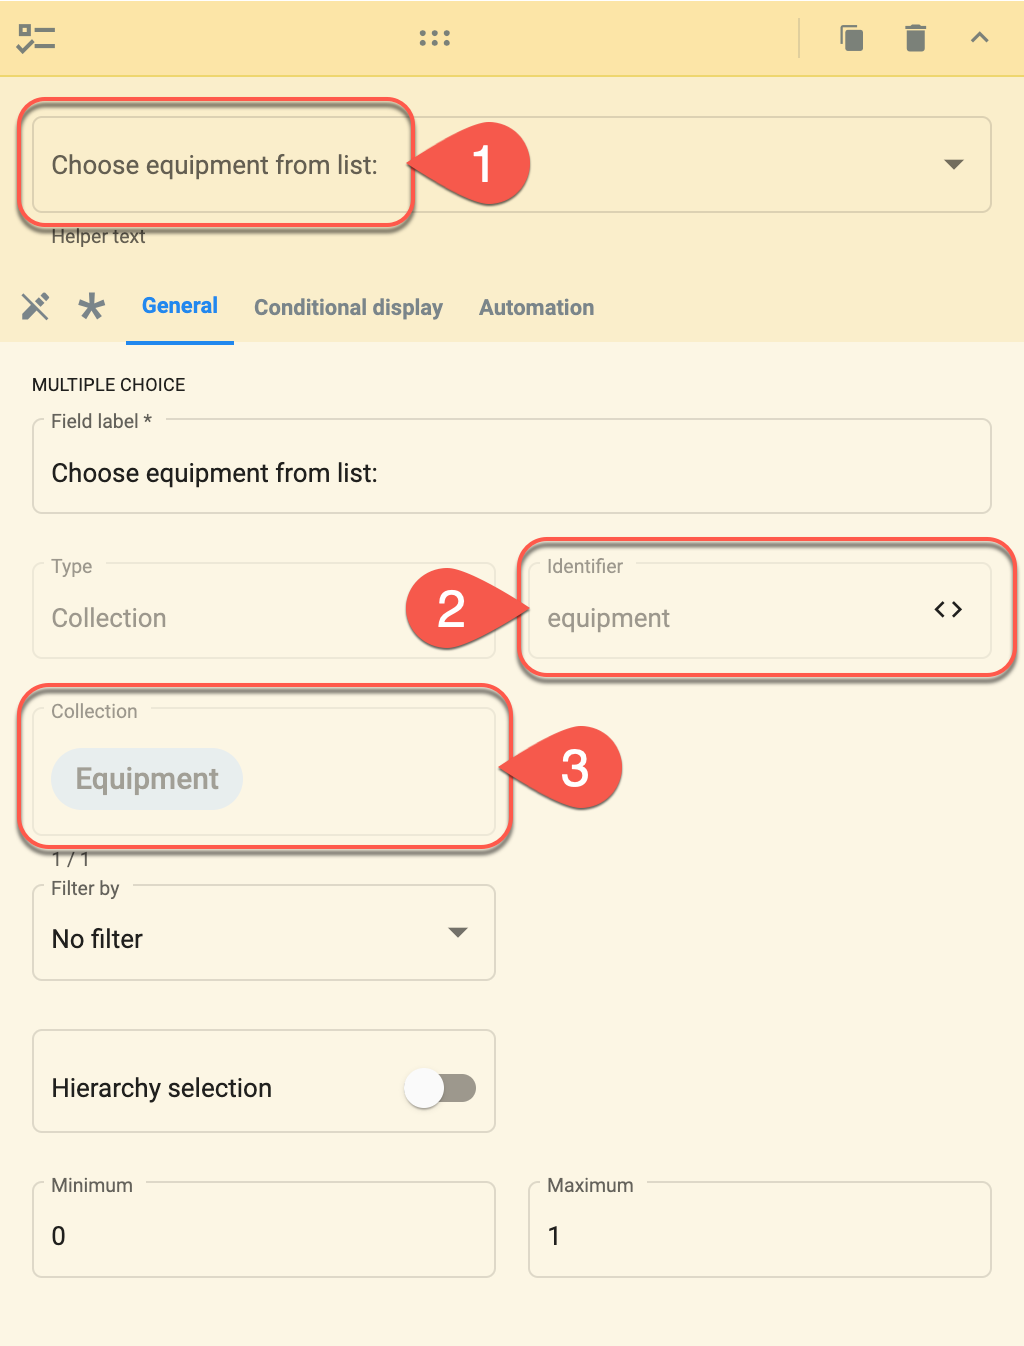
- We open the field labeled Choose equipment from list:.
- The field's identifier is
equipment. We will need to remember this name. - The elements displayed as options in this multiple choice question are taken from the Equipment collection.
Set Up the Bot
Next, you need to create a bot and set it up to work with the survey.
Make sure it has at least the following:
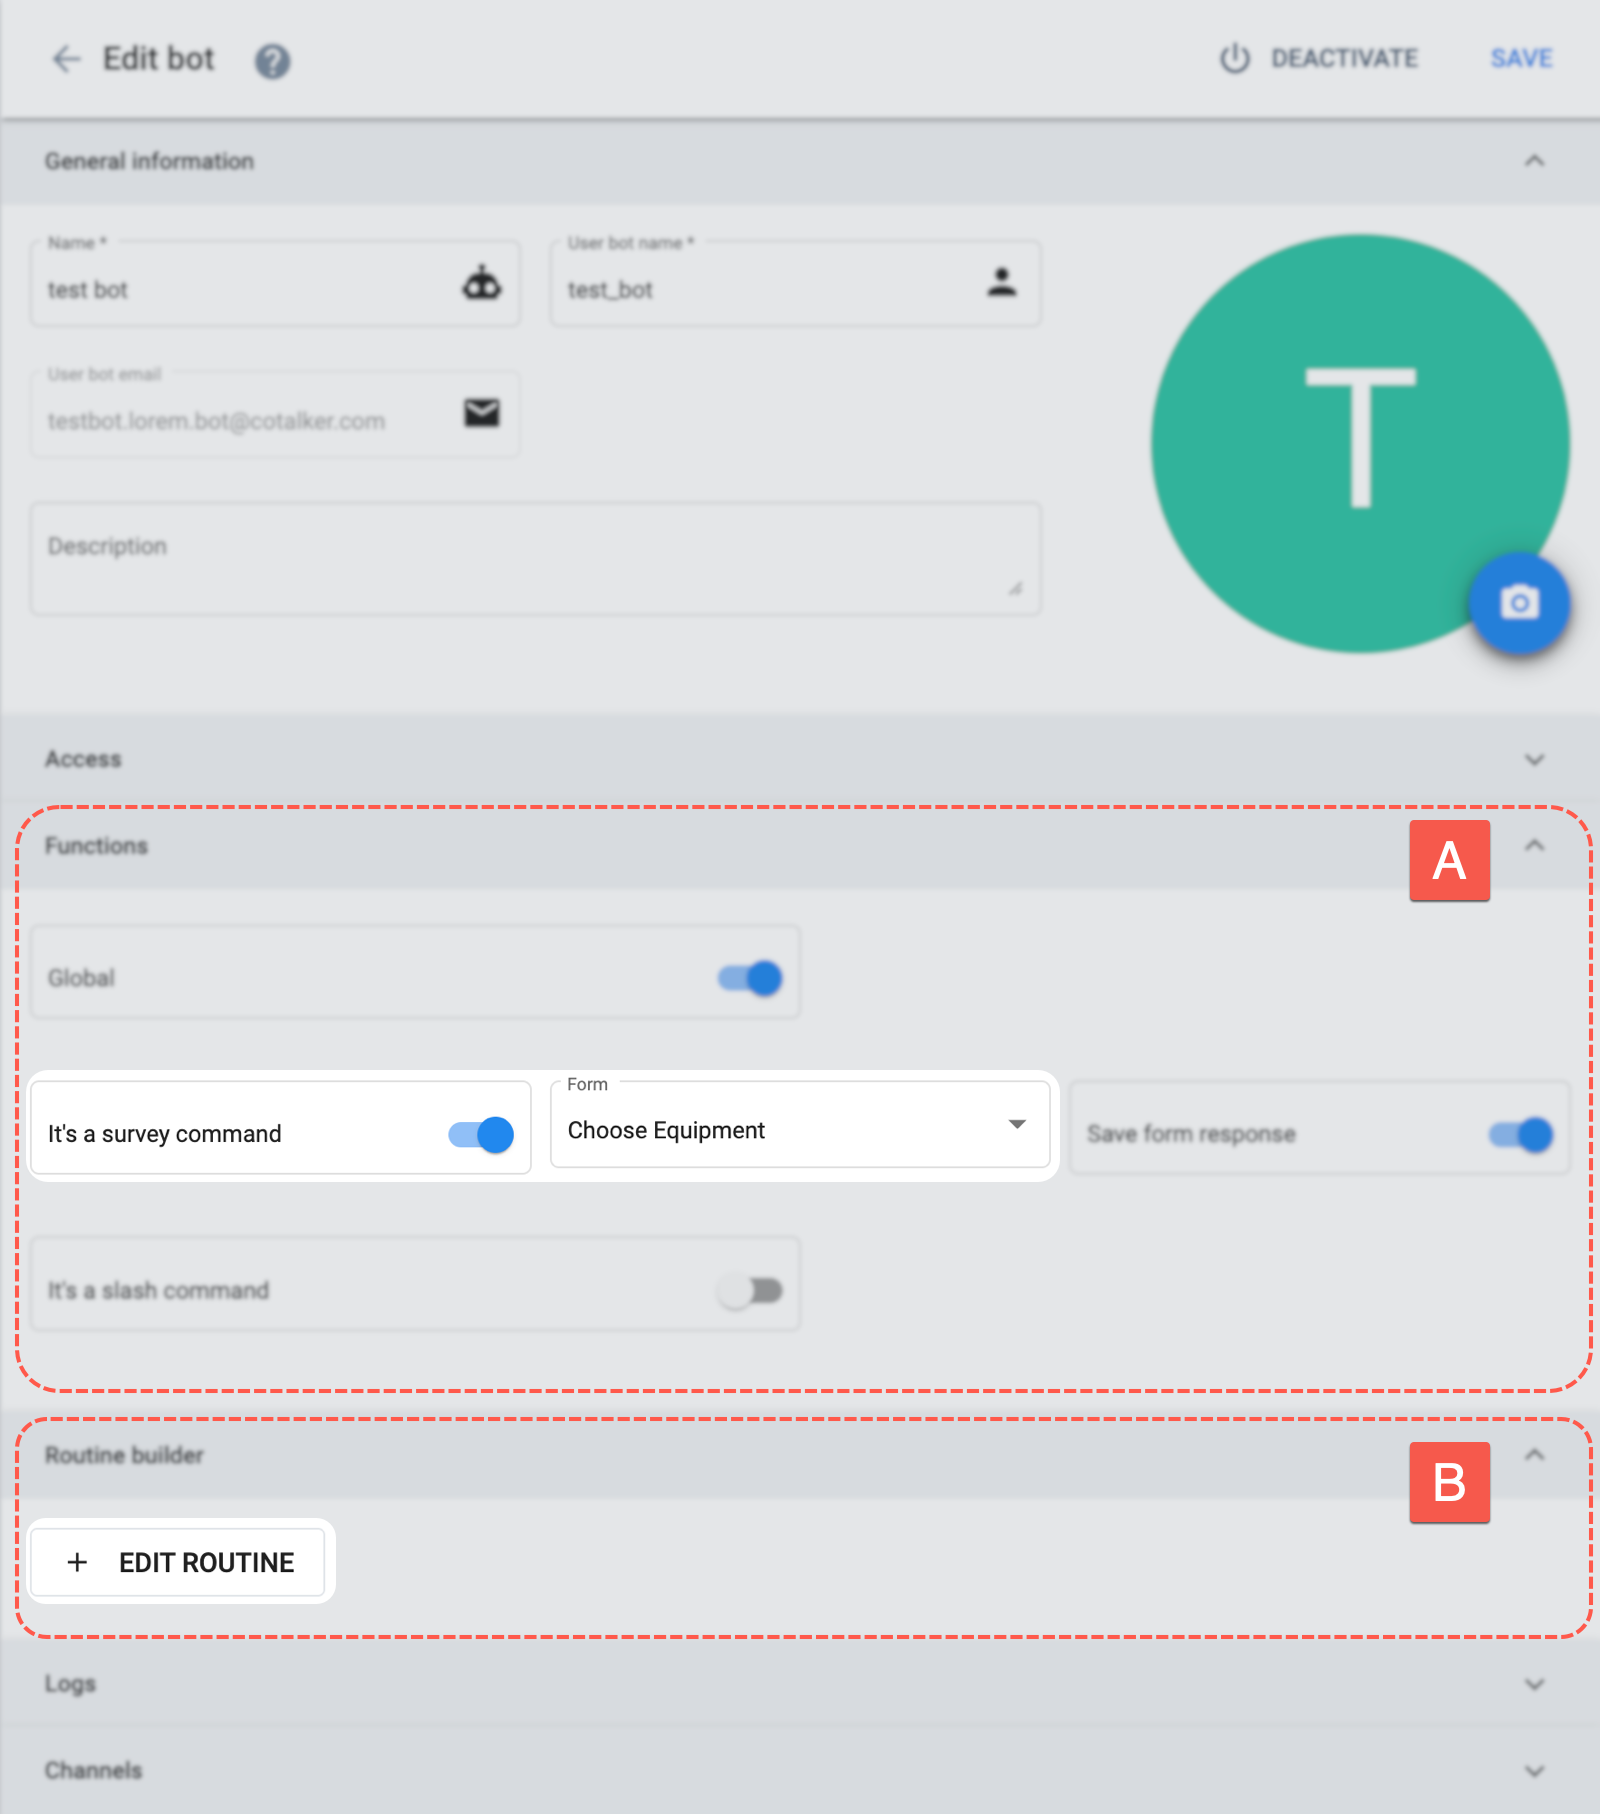
A. Functions
- Set the
It's a survey commandoption. - In the Form field, choose the survey form to associate with the bot.
B. Routine Builder
- Press + Add Routine to configure the bot's automated routine that will be triggered every time the survey form is submitted.
Configure First Stage
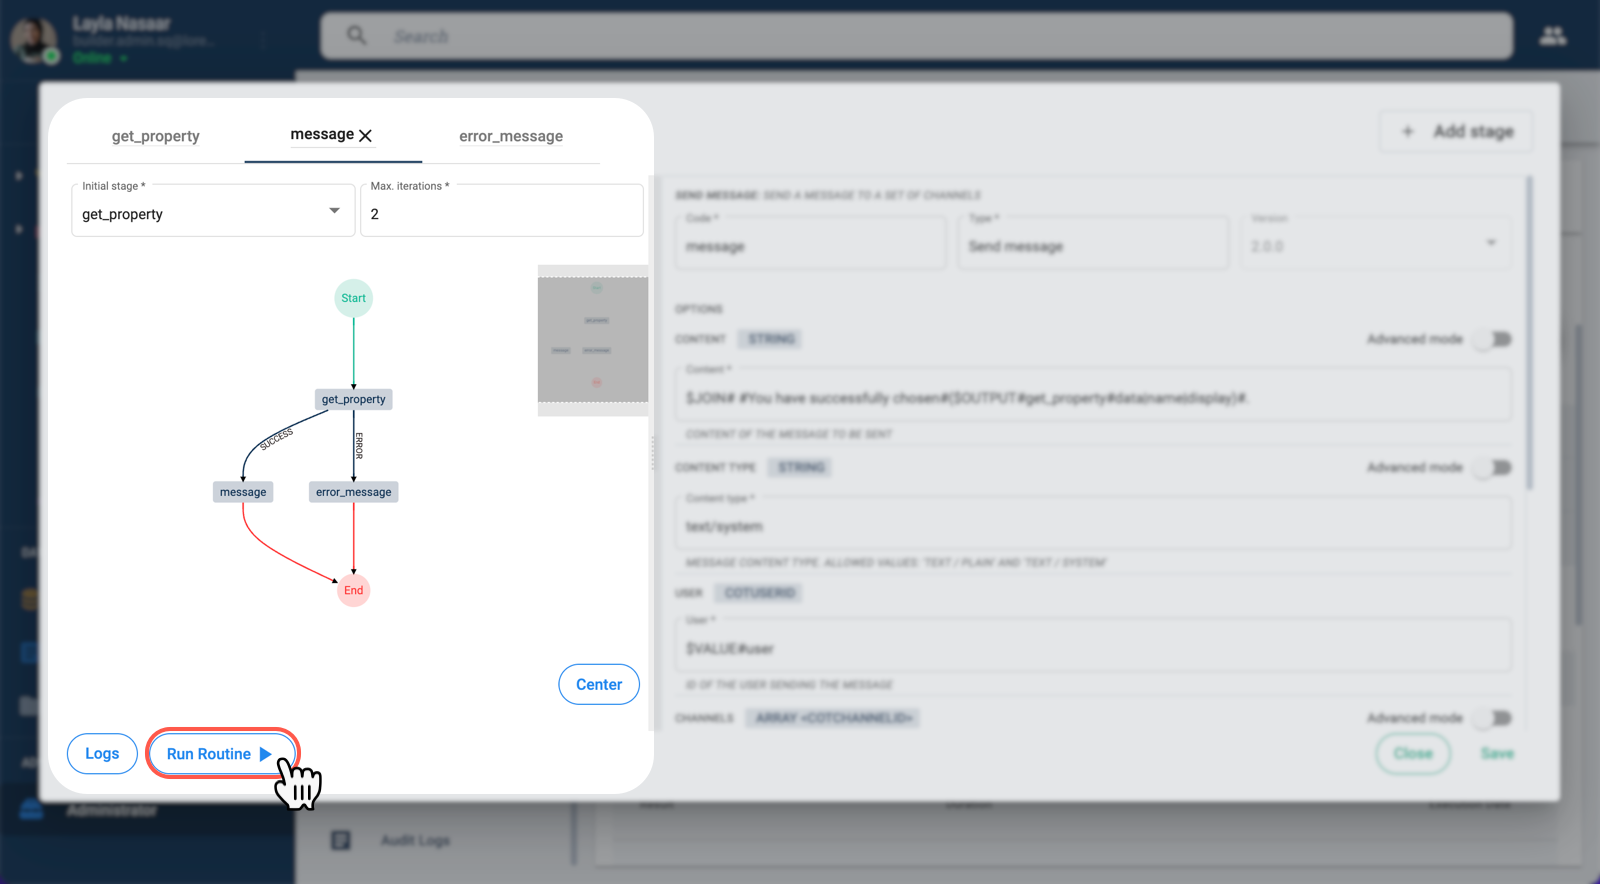
Once the +Add Routine button is pressed, the Routine Builder opens up, as shown below.
For this first stage, we will make an API request to get into the database and extract the chosen element's data. In order to make the request, we will need to use the Network Request stage bot. Setup details are shown below:
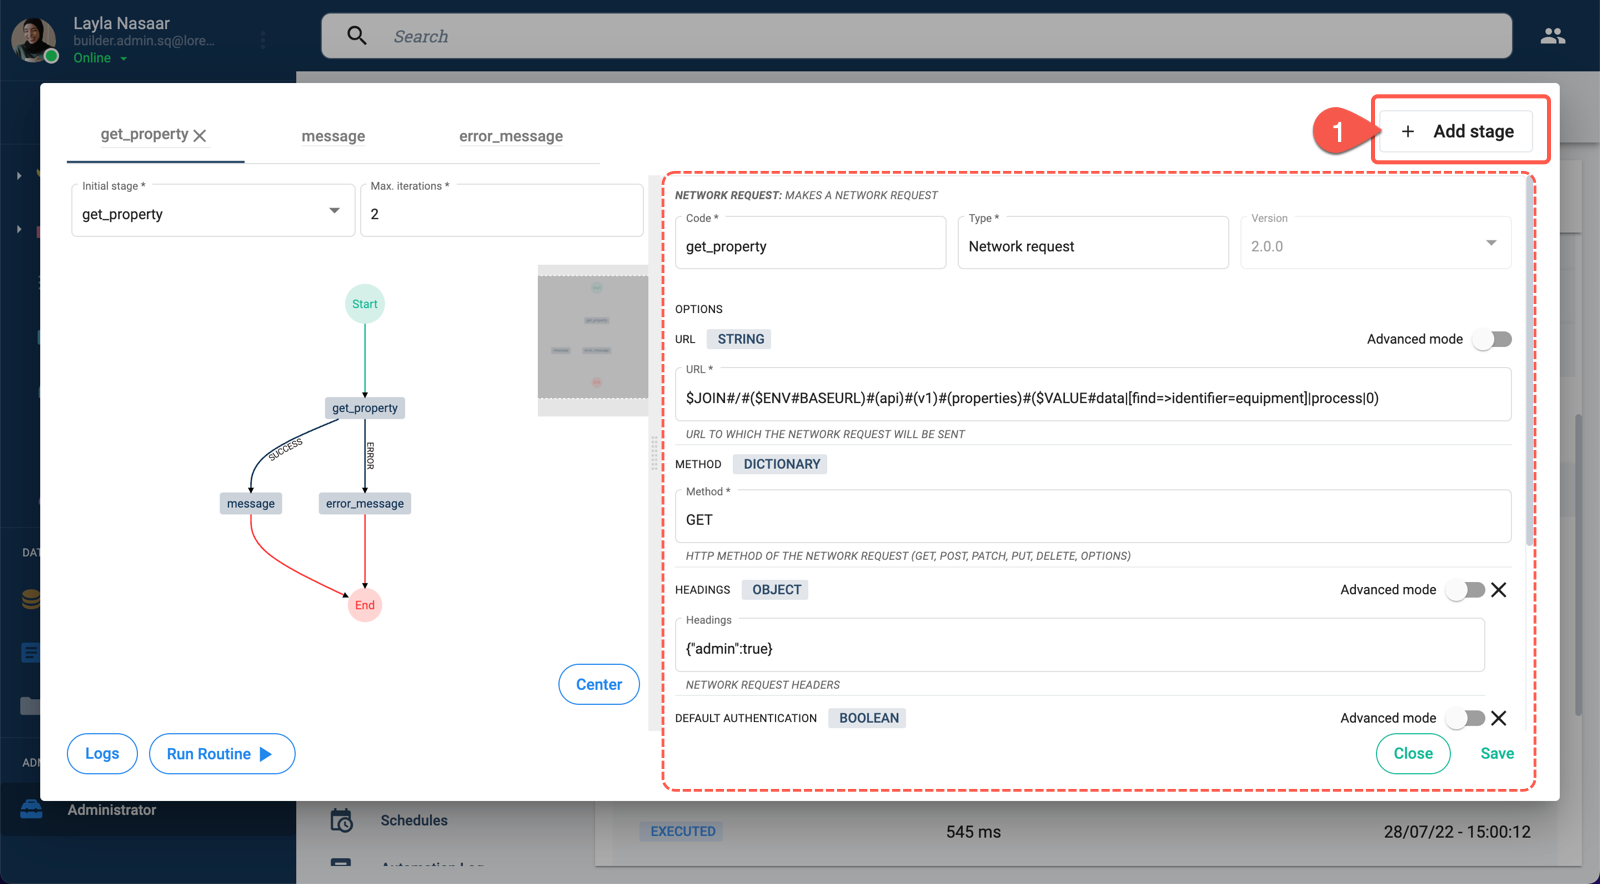
- Press +Add Stage to configure the first stage.
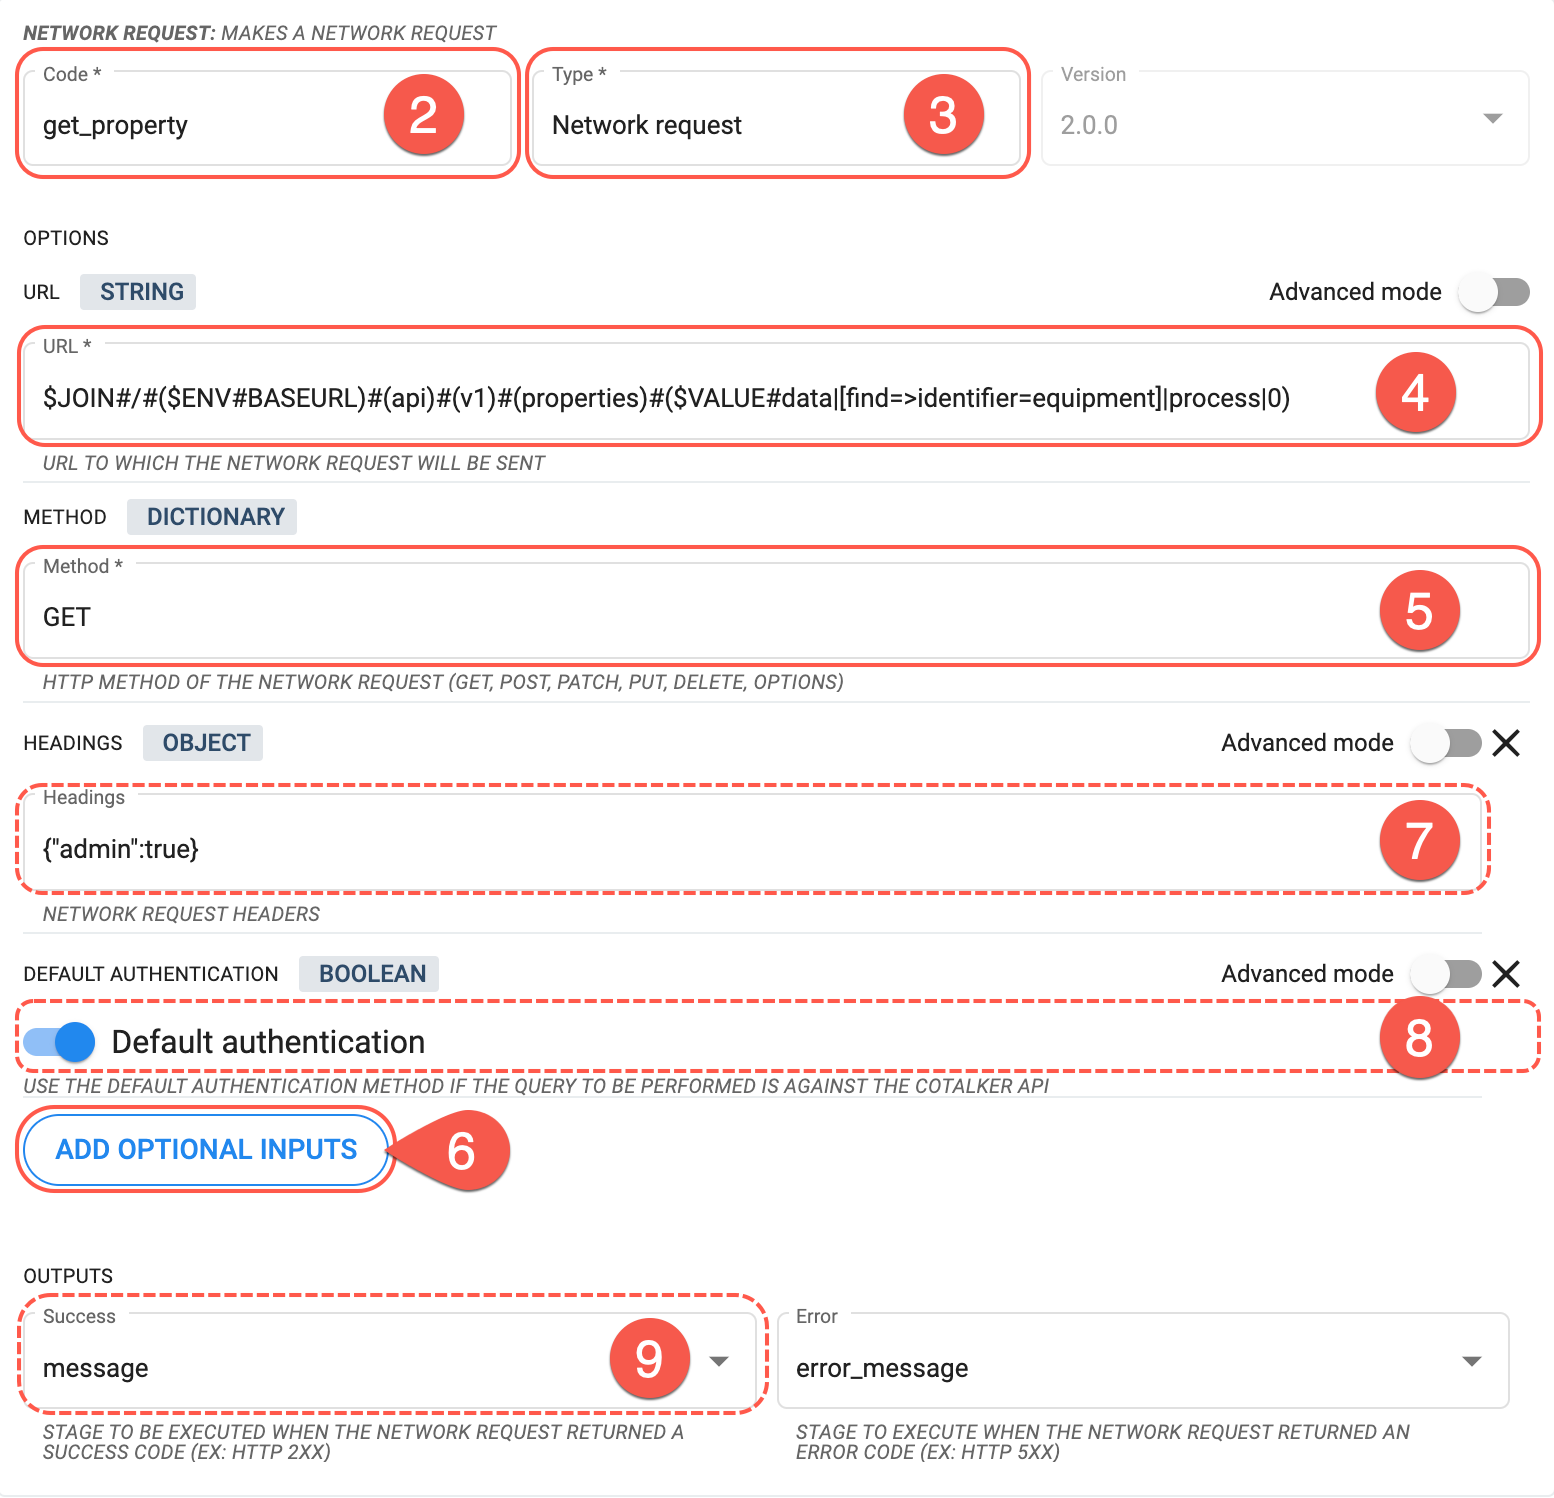
- Code: Give the stage a name, e.g.,
get_property. - Type: Choose Network request as the stage type.
- URL: This field requires the URL needed to make an API request. Add the following COTLang script to automatically generate the URL using the element chosen in the survey:
$JOIN#/#($ENV#BASEURL)#(api)#(v1)#(properties)#($VALUE#data|[find=>identifier=equipment]|process|0). - Method: For this example, we'll use the
GETmethod. - Add Optional Inputs: Press this button to add the Headings field. Repeat to add the Default Authentication field.
- Headings: Add the necessary request headings in JSON format in a single line.
- Default Authentication: Turn on this option to automatically and securely send the required authentication bearer token.
- Outputs: Indicate the next stage in the routine. The stage must be already created. If it has not yet been created, you can return here later after the next stage has been created and configured. Below is an example of how to set up the second stage.
Send Data to Second Stage
We can add a second stage to the routine, which will use the data extracted by the network request. To begin, we must press the + Add Stage button again and then set up the stage. An example is shown below:
- Code: Write a name for the stage.
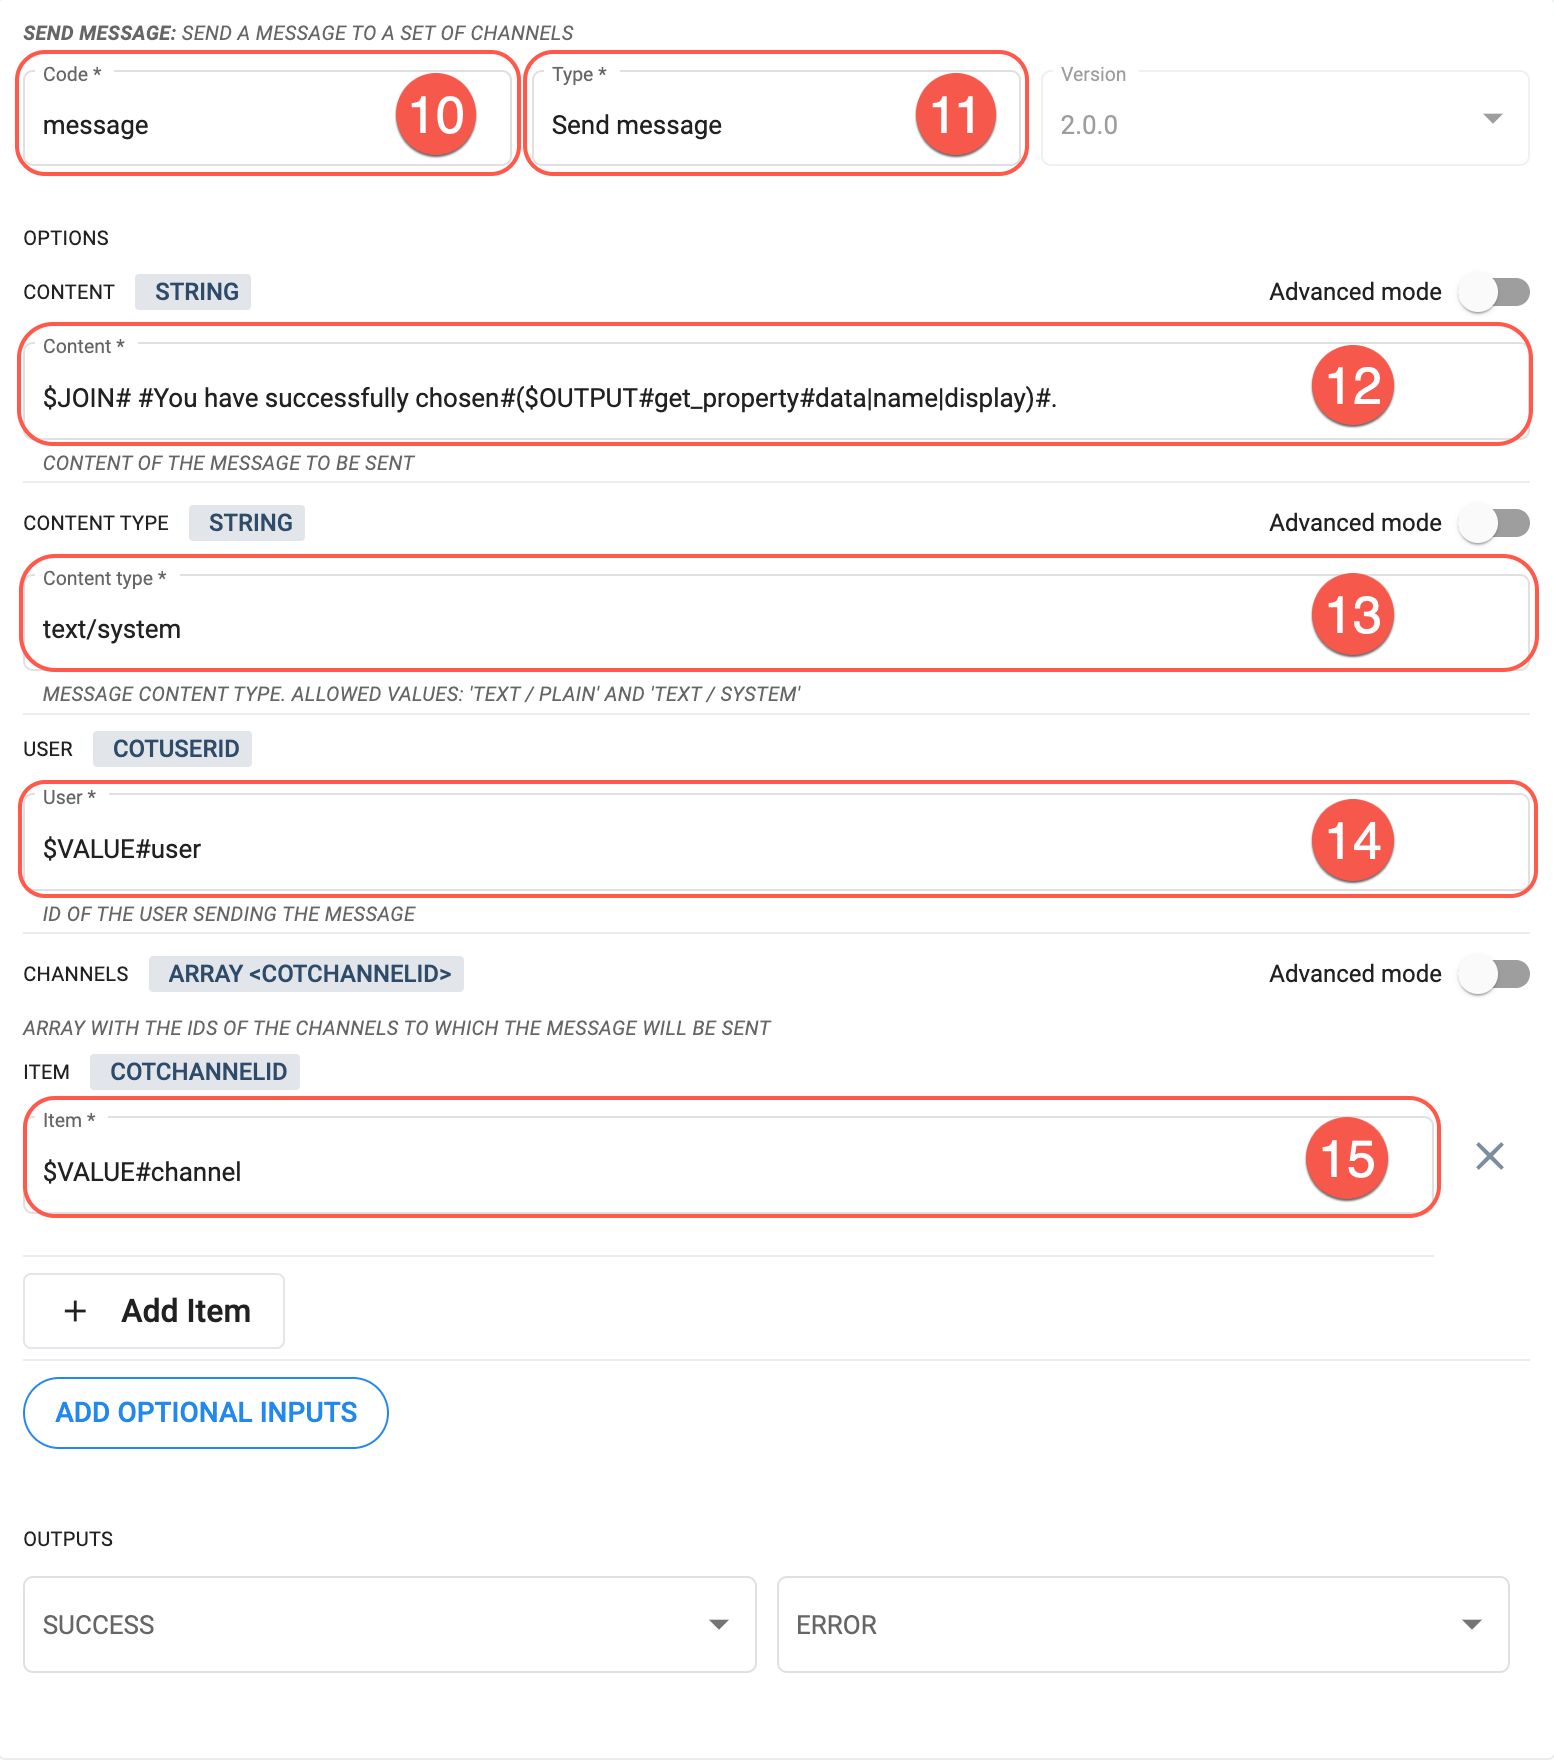
- Type: Choose a stage-type bot. For this example, we chose the Send Message stage bot.
- Content: We will include the data gathered from the network request in the message content. To do this, we use the COTLang command
JOINto append the content text with the gathered data. We also use theOUTPUTcommand to obtain the data retrieved in the previous stage.
For example:$JOIN# #You have successfully chosen#($OUTPUT#get_property#data|name|display)#. - Content Type: We used
text/systemoption to send a system message through the chat channel. - User: This field requires a user's ObjectId. To get this information automatically from the context, we use the COTLang
VALUEcommand.
For example:$VALUE#user - Item: This field requires the ObjectId of the channel in which the message is to be posted. We can obtain the Id of the channel from which the survey was submitted and where we wish to post the message by using the COTLang
VALUEcommand.
For example:$VALUE#channel
If you haven't already done so, remember to add this stage to the previous stage's Output setting.
Once you are done, you should be able to see something like the image below:
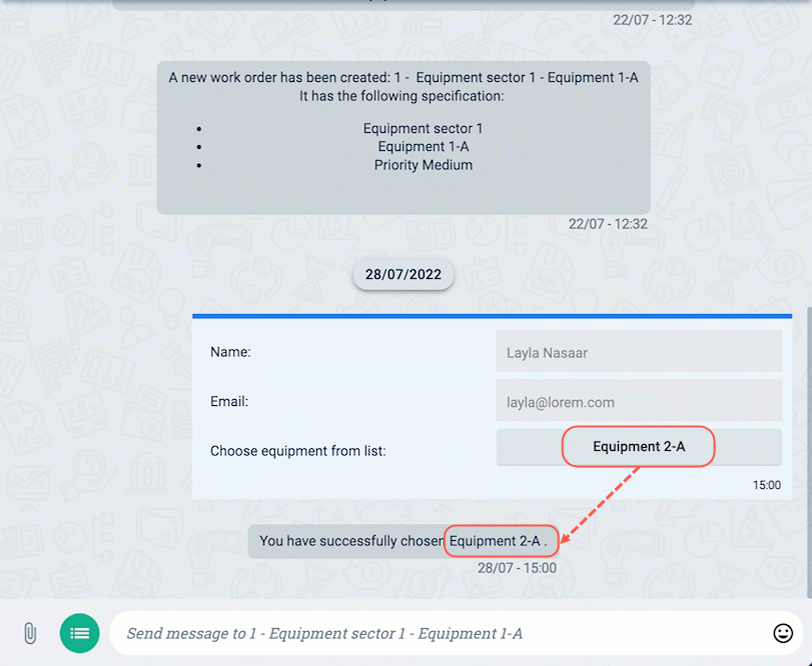
The name of the equipment chosen from a multiple choice list is placed in the automatically generated system message.
On this micro-tutorial, we only shared a very simple example of how COTLang can be used to extract information from data contexts. Much more can be accomplished using these tools with a bit of ingenuity!