Markdown Syntax

Overview
Editing notes requires using markdown – a simple syntax used for automatically formatting documents. It's easy to use. You just have to remember some of the character-syntax commands. With markdown, you can format text, insert images, add links, create diagrams, and much more. Once you get the hang of it, you'll end up liking markdown more than regular word processing, especially when you need to make quick notes and not worry much about formatting.
To make things easier, the note editor provides auto-complete hints for markdown. The editor toolbar also helps out by inserting the markdown syntax you need by clicking on the corresponding icon.
For more information about markdown syntax, visit the free and open-source Markdown Guide:
Basic Markdown Syntax
Title
Add titles or headings to your note with a number sign #. Titles are automatically set as links, added to the sidebar navigation menu, and added to the note's table of contents.
#Heading level 1##Heading level 2###Heading level 3####Heading level 4
Alternative Syntax:
===The text above the line adopts Heading level 1---The text above the line adopts Heading level 2
Table of Contents
Use the syntax [toc] to embed a table of contents generated automatically using the titles # found in the note.
Font Format
All text put between the respective syntax characters will adopt the format styling. There are different ways to arrange the syntax, here are some examples:
*italic*or_italic_= italic**bold**or__bold__= bold***bold – italic***,_**bold – italic**_= bold – italic`short code`=short code~~Deleted text~~=Deleted text
Links
To add a URL link:
link to [Cotalker Documentation](http://doc.cotalker.com) = link to Cotalker Documentation
To add an anchor link for a title within the document:
Press here to [go back to Overview](#overview) = Press here to go back to Overview
Horizontal Rules
To create a horizontal rule, i.e., a line that goes across the document, use either:
---, ___, or ***.
Result:
Blockquotes
Use > to add blockquotes.
> Lorem ipsum dolor sit amet, consectetur adipiscing elit...
Result:
Lorem ipsum dolor sit amet, consectetur adipiscing elit...
Lists
Create numbered lists:
1. This is the first item.
2. This is the second item.
3. This is the third item.
4. This is the fourth item.
Result:
- This is the first item.
- This is the second item.
- This is the third item.
- This is the fourth item.
Create bullet lists:
- This is the first item.
- This is the second item.
- This is the third item.
- This is the fourth item.
or
* This is the first item.
* This is the second item.
* This is the third item.
* This is the fourth item.
Result:
- This is the first item.
- This is the second item.
- This is the third item.
- This is the fourth item.
Escaping Characters
To display a literal character that would otherwise be used to format text, add \ in front of the character.
\# Hastag= # Hastag
Extended Markdown Syntax
Typography
The Notes tool includes some extended typography not included in basic markdown syntax:
(c) (C) (r) (R) (tm) (TM) (p) (P) +-= © © ® ® ™ ™ § § ±Remarkable---no, awesome!= Remarkable––no, awesome!During 1980--1988.= During 1980–1988.19^th^= 19thH~2~O= H2O
Code
Code blocks let you show code with adequate highlighting and indentation according to programming language. You can create code blocks either by:
- indenting lines by four spaces or one tab, or
- adding
```before and after the code block.
Example:
```json
{
    "item 1" : "string",
    "item 2" : [
        "array item 1",
        "array item 2"
    ]
}
```
Result:
{
    "item 1" : "string",
    "item 2" : [
        "array item 1",
        "array item 2"
    ]
}
Add the language or syntax type after the first ``` to highlight accordingly, e.g., json, javascript.
Tables
Create tables with | to separate columns. Add --- to indicate column headers.
Example:
Table | Column 1 | Column 2
---- | ---- | ----
row 1 | `item a` | *item b*
row 2 | item c | **item d**
Result:
| Table | Column 1 | Column 2 |
|---|---|---|
| row 1 | item a | item b |
| row 2 | item c | item d |
Task Lists
Make task lists or checklists that readers can mark or check when viewing the note in document view.
Example:
- [ ] This is the first task.
- [ ] This is the second task.
- [x] This task is checked.
- [ ] This task is unchecked.
Result:
- This is the first task.
- This is the second task.
- This task is checked.
- This task is unchecked.
Emojis
Use emoji shortcuts within your note:
:smile:= 😄:joy:= 😂:heart:= ❤️
Check this Emoji Cheat Sheet for a complete list of emoji shortcuts.
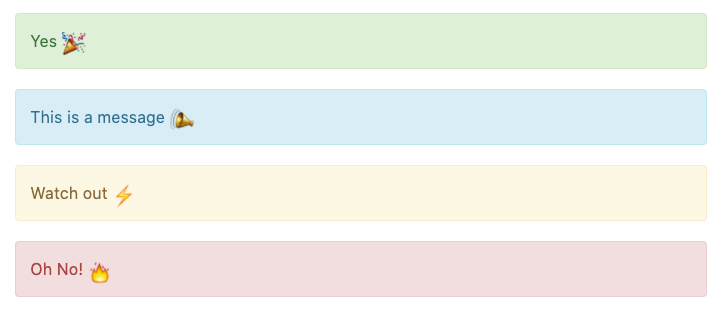
Alert Area
Create alert boxes that contain special information for readers.
Examples:
:::success
Yes :tada:
:::

:::info
This is a message :mega:
:::

:::warning
Watch out :zap:
:::

:::danger
Oh No! :fire:
:::
Result:
Adding Images
To add images to your notes, use the following syntax: .
Example:

Result:
![]()
You can also drag & drop images to the Note writing pad to automatically upload the image to the Cotalker server and create the markdown link in the note.
Making Diagrams
There are several built-in extensions that can generate in the Notes tools. Here is an example using Mermaid.
Example:
```mermaid
graph LR;
    S[COTSurvey] --> C1[COTSurveyChat #1]
    S --> C2[COTSurveyChat #2]
    S --> C3[COTSurveyChat]
    C1 --> Q1T[COTQuestion - Field Label]
    C1 --> Q1I[COTQuestion - Input Settings]
    C2 --> Q2T[COTQuestion - Field Label]
    C2 --> Q2I[COTQuestion - Input Settings]
    Q2I --> QE[COTQuestionExec]
    C3 --> Q3[COTQuestion - Label & Input]
```
Result:
Apart from Mermaid, other diagram mardown syntaxes available with the Notes tool are: sequence diagrams, flow charts, graphviz.
Try out these examples in your notes:
Sequence Diagrams
```sequence
Alice->Bob: Hello Bob, how are you?
Note right of Bob: Bob thinks
Bob-->Alice: I am good thanks!
Note left of Alice: Alice responds
Alice->Bob: Where have you been?
```
Flow Charts
```flow
st=>start: Start
e=>end: End
op=>operation: My Operation
op2=>operation: lalala
cond=>condition: Yes or No?

st->op->op2->cond
cond(yes)->e
cond(no)->op2
```
Graphviz
```graphviz
digraph hierarchy {
  nodesep=1.0 // Increases the separation between nodes

  node [color=Red,fontname=Courier,shape=box] // All nodes will this shape and colour
  edge [color=Blue, style=dashed] // All the lines look like this

  Headteacher->{Deputy1 Deputy2 BusinessManager}
  Deputy1->{Teacher1 Teacher2}
  BusinessManager->ITManager
  {rank=same;ITManager Teacher1 Teacher2} // Put them on the same level
}
```
Mermaid
```mermaid
gantt
  title A Gantt Diagram

  section Section
  A task: a1, 2014-01-01, 30d
  Another task: after a1, 20d

  section Another
  Task in sec: 2014-01-12, 12d
  Another task: 24d
```
Embed externals
Embed external media or files in your notes.
Youtube example:
{%youtube 9BUoos0KSvs %}
Result:
PDF example:
{%pdf https://www.w3.org/WAI/ER/tests/xhtml/testfiles/resources/pdf/dummy.pdf %}
Result: