Customizations
Preventive Maintenance
Available on: Professional Plans Enterprise Plans Unlimited Plans
Introduction
Preventive Maintenance Plans use checklists for each maintenance check. Therefore, companies will need a checklist for each type of preventive maintenance check they wish to carry out.
This section provides a step-by-step use case example of how to create a customized checklist for a preventive maintenance plan. For more in-depth information, visit the Surveys section in the Admin documentation.
Use Case Sample
The ACME company wants to include its smoke detectors within its preventive maintenance plan. Among the requirements, they need to do a monthly check on their smoke detectors as part of this plan. This maintenance check requires a checklist with the following specifications:
| Item | Description |
|---|---|
| Maintenance Check Type | Smoke Detector |
| Frecuency | Monthly |
| Indicators | Do indicator lights show that the machine is functioning correctly? |
| Sensors | General cleaning and maintenance. |
Below you will find how to incorporate these specifications into a preventive maintenance plan.
Step-by-Step Instructions
This section covers the steps you need to take to create the checklist and make it part of the preventive maintenance plan.
You will need a user profile with an access role containing permissions to configure the Administrative Panel.
Summary
A. Create Checklist
B. Connect to Database
C. Create a Preventive Maintenance Plan
D. Maintenance Work Order
A. Create Checklist
Create a survey used as the maintenance checklist users fill out when carrying out the preventive maintenance plan.
Create a survey.
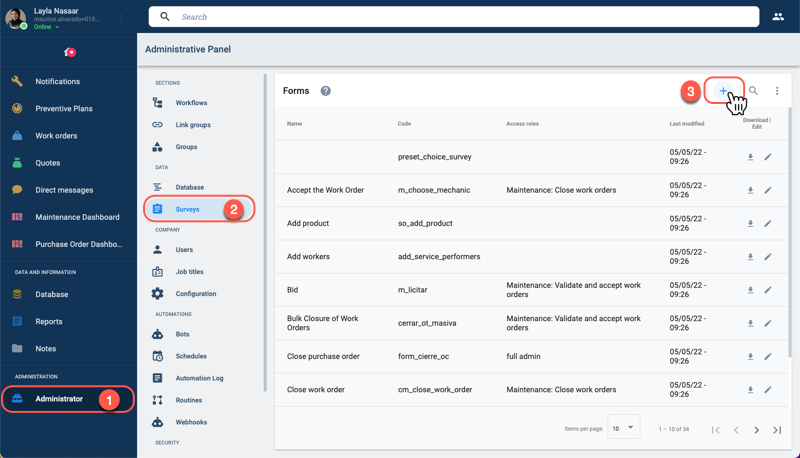
- Select Administrator on the Main Menu Bar.
- From the Administrative Panel, press Surveys.
- Press the + icon to create a new survey form.
Set up the survey's general information.

- Type the title for your checklist in the Name field.
- After writing in the Name field, a suggestion will automatically appear in the Code field. The code is used to identify the resource and cannot be modified after saving. This code will be needed later along the setup process.
- After writing the checklist title in the Name field, it will automatically appear on the Form template.
Choose and set up survey components to be used in the checklist. Each component serves as a field or question users will see displayed in the maintenance checklist.
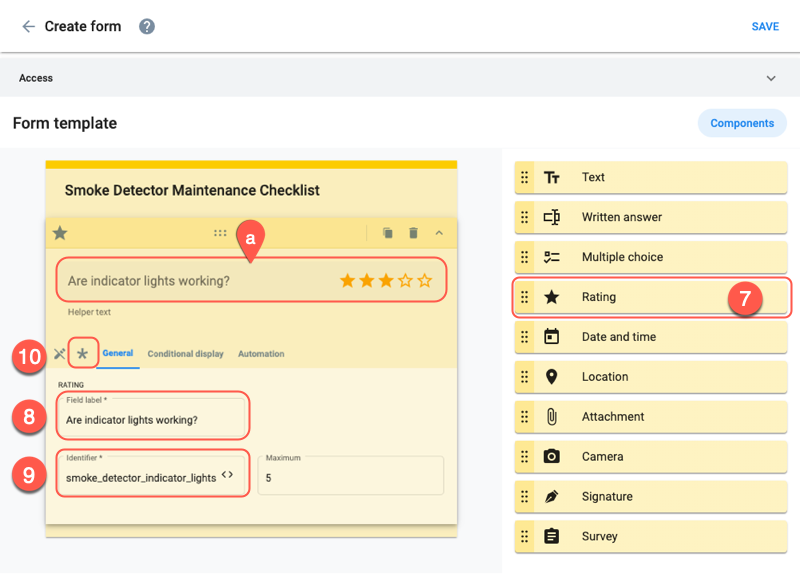
- Drag & drop the Rating component onto the Form template.
- In the Field label, enter the name of the item to be rated. This name will be seen by the user when they fill out the survey.
- Enter a unique code name for the component. The identifier must begin with a letter. Only lowercase letters, numbers, and underscores are allowed.
- The field can be set as required for users to answer by clicking the asterisk icon. By default, fields are optional.
- a. Preview of how the field will be displayed to users in the survey form.
Complete setting up the survey form and save.
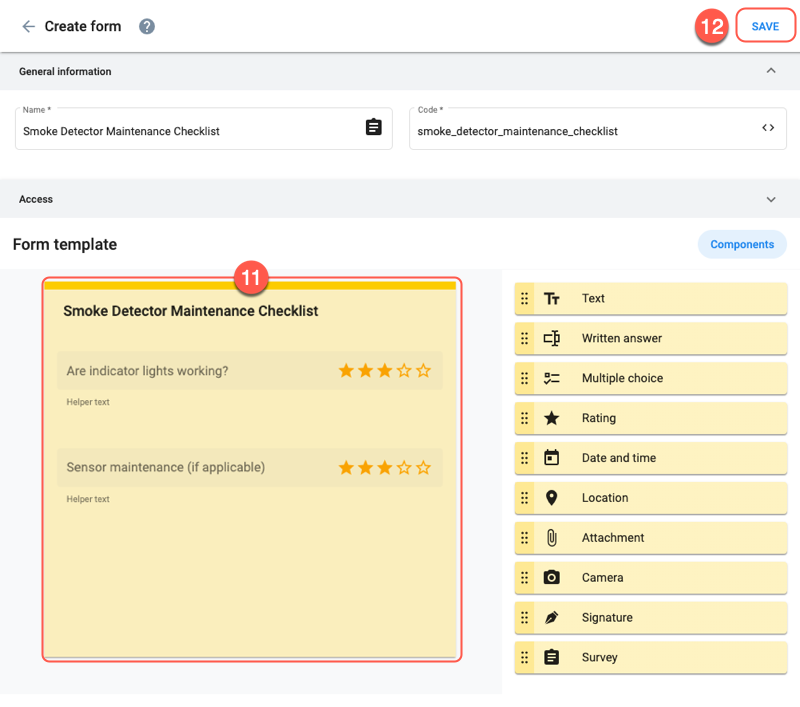
- Repeat the previous steps to add any other fields that should be on the checklist.
- Once you've completed setting up the survey form, press Save.
B. Connect to the Database
After creating the survey form, we need to set up the database to collect the information users submit when completing the maintenance checklist.
Open the Checklist collection which contains all company maintenance checklists.
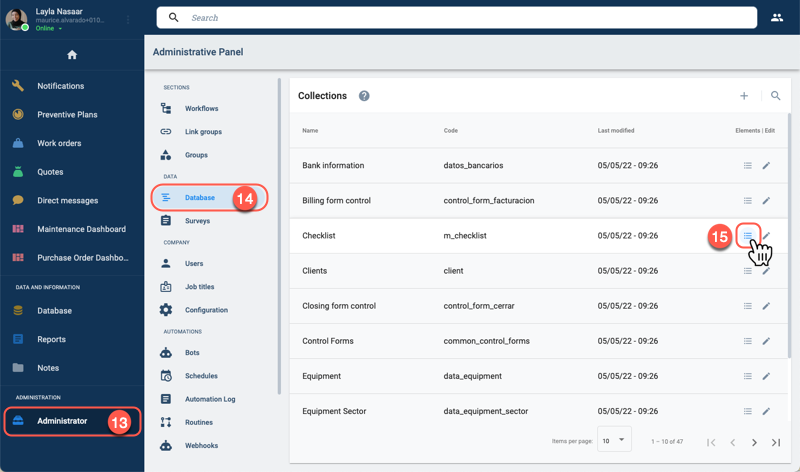
- Select Administrator on the Main Menu Bar.
- From the Administrative Panel, press Database.
- On the Checklist collection row, press the list icon to open the collection's element list.
Add a new maintenance checklist to collection.
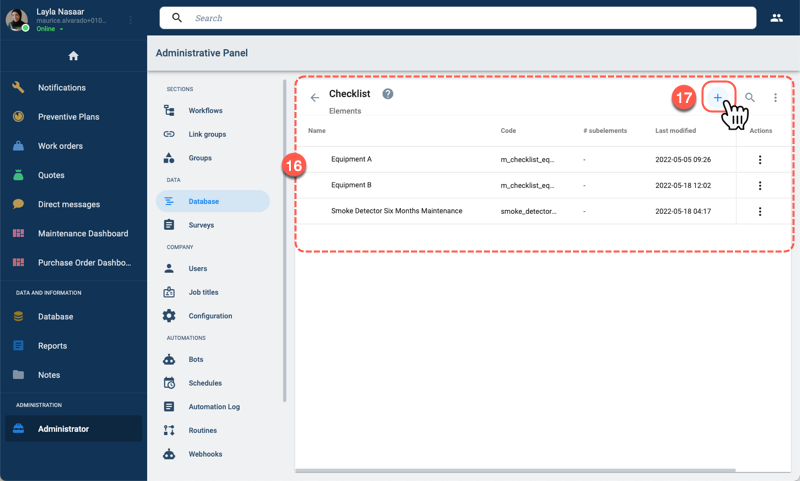
- The Checklist collection opens up displaying a list of the maintenance checklists created within the company.
- Press the + icon to create a new element that will represent the monthly smoke detector maintenance checklist.
In the Create element window, set up the new checklist.
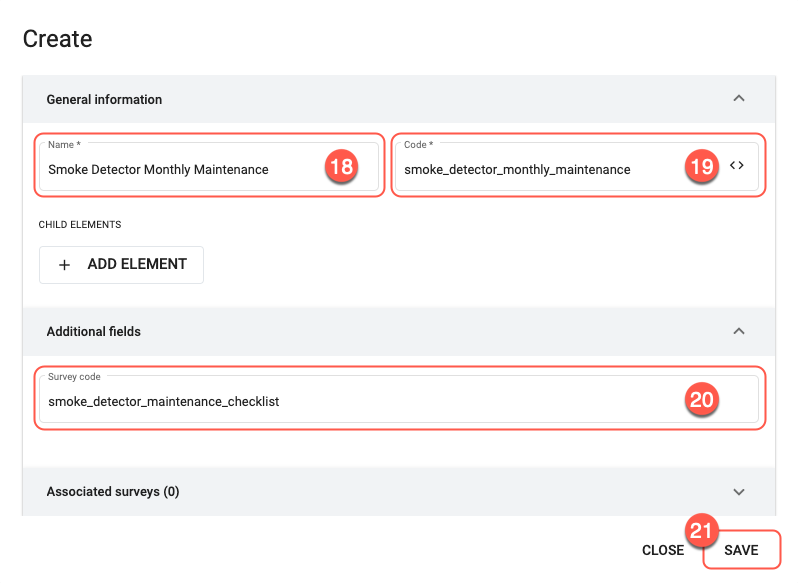
- Enter a name for the element that will represent the checklist.
- A suggestion for the Code will be automatically filled in after completing the Name field.
- Under the Additional fields tab, in the Survey code field, enter the maintenance checklist survey form's code. note
The survey form and its code were created on step 5 of this tutorial.
- Press SAVE when done.
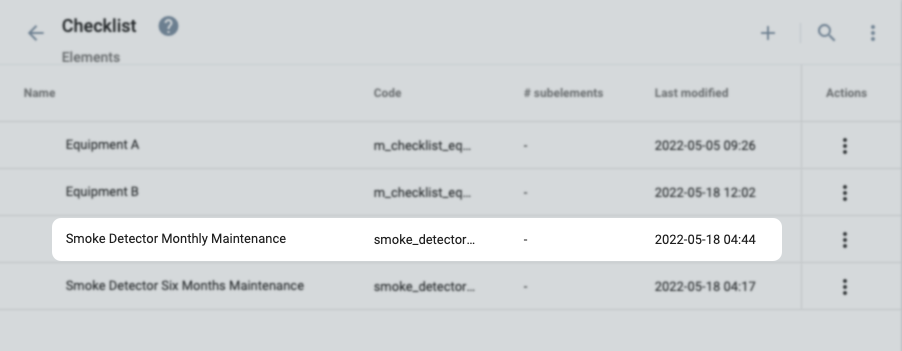
The Checklist collection should look something like shown below:
Find the collection containing the equipment to be associated with the maintenance checklist.
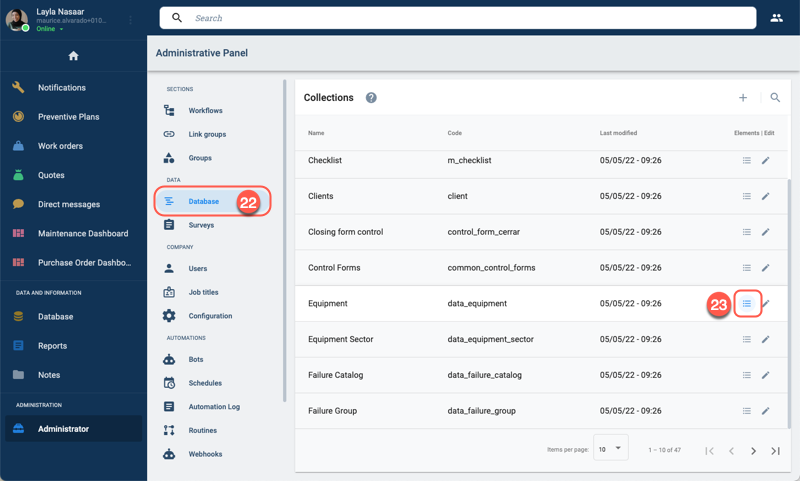
- From the Administrative Panel, press Database to open the Collections panel.
- On the Equipment collection row, press the list icon to open a list of all the registered company equipment.
Find and edit the equipment to associate with the maintenance checklist.
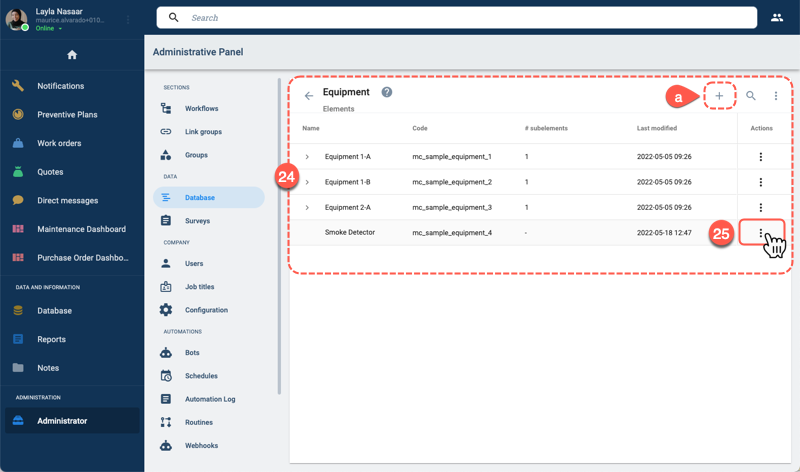
- The Equipment collection opens up displaying a list of all the equipment registered on the company database.
- On the Smoke Detector row, press the kebab icon to edit the element.
- a. In case the item is not found in the collection, it can be created by pressing the + icon. The settings for the new element are displayed in the example shown in the following step.
Associate the checklist to the equipment.
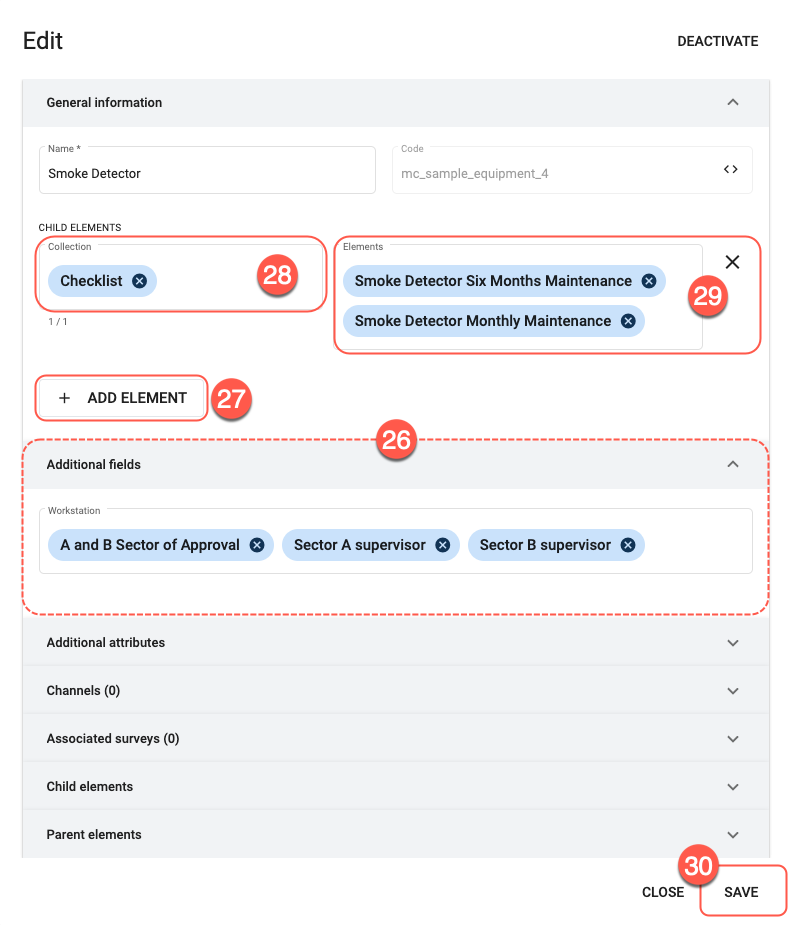
- The Smoke Detector element contains the Workstation field within the Additional fields tab. The Workstation field is a required field containing elements that represent user workstations. Only users associated with these same elements can access the checklist.
- Press the + ADD ELEMENTS button to associate this equipment element with the elements representing the corresponding checklists. The Child Elements fields appear after pressing the button.
- In the Collection field, choose the Checklist collection, which we configured previously.
- In the Elements field, choose all the elements that represent smoke detector maintenance checks. For this example, we chose the Smoke Detector Monthly Maintenance element, which we created earlier, plus the Smoke Detector Six Months Maintenance element, which was already found in our collection.
- Press SAVE to finsih.
C. Create a Preventive Maintenance Plan
Create a new preventive maintenance plan for monthly smoke detector checks.
Open the Create Preventive Plan form to set up a new preventive plan.
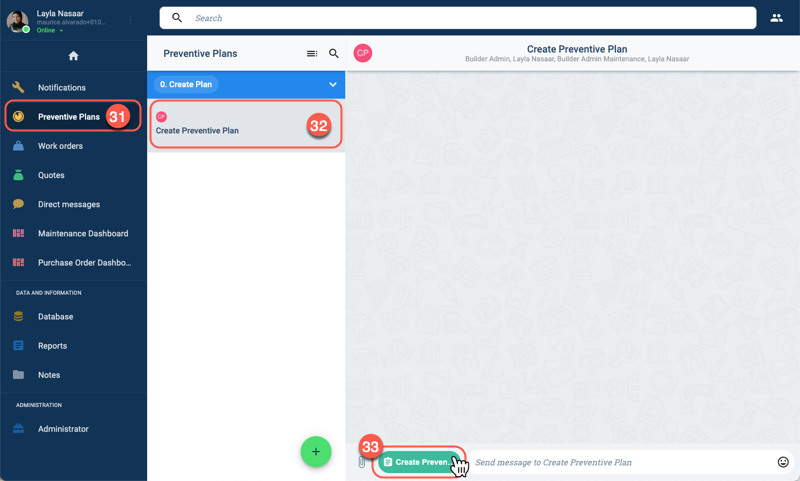
- Select Preventive Plans on the Main Menu Bar.
- From the Preventive Plans panel, press Create Preventive Plan to open the channel workspace.
- Press the Create Preventive Plan button found at the bottom of the channel workspace to open the corresponding form.
Configure the new preventive maintenance plan by filling out the form: General Information.
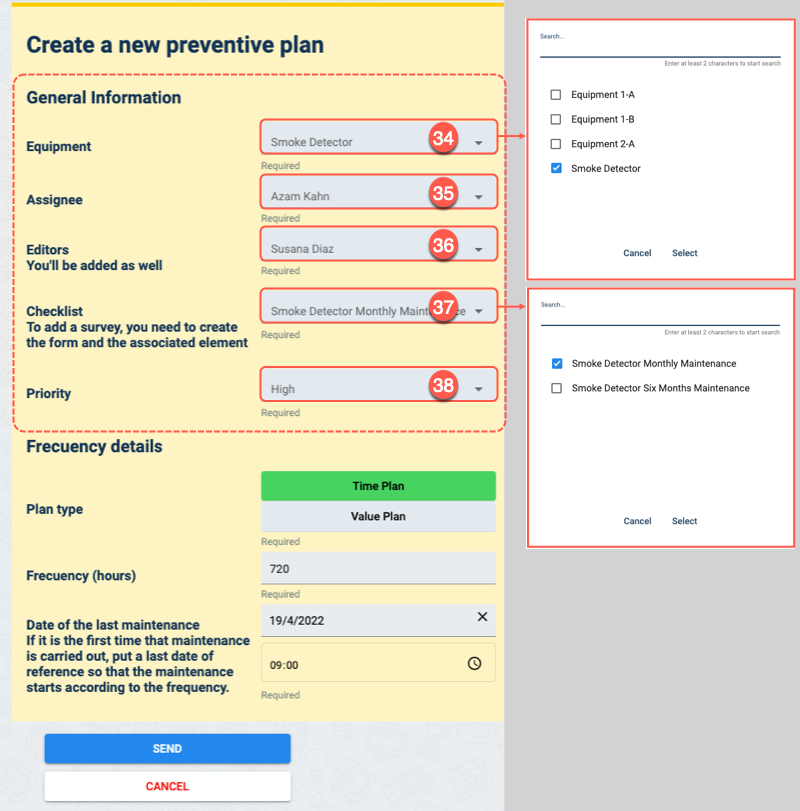
- In the Equipment field, choose the item on which the maintenance check will be performed. The available options are all the elements found in the Equipment collection. For this example, we chose Smoke Detector.
- The Assignee field indicates the user that will fill out the checklist when it is time to perform the maintenance check.
- Editors are users who can follow and edit the preventive maintenance plan and work order details.
- In the Checklist field, a list of available checklists for the chosen equipment is displayed. Here we will see the smoke detector maintenance checklists we associated with the smoke detector element. For this example, we chose Smoke Detector Monthly Maintenance.
- Priority can be set to High, Medium, or Low. Priority is used to filter the tasks.
Configure the new preventive maintenance plan by filling out the form: Frecuency details.
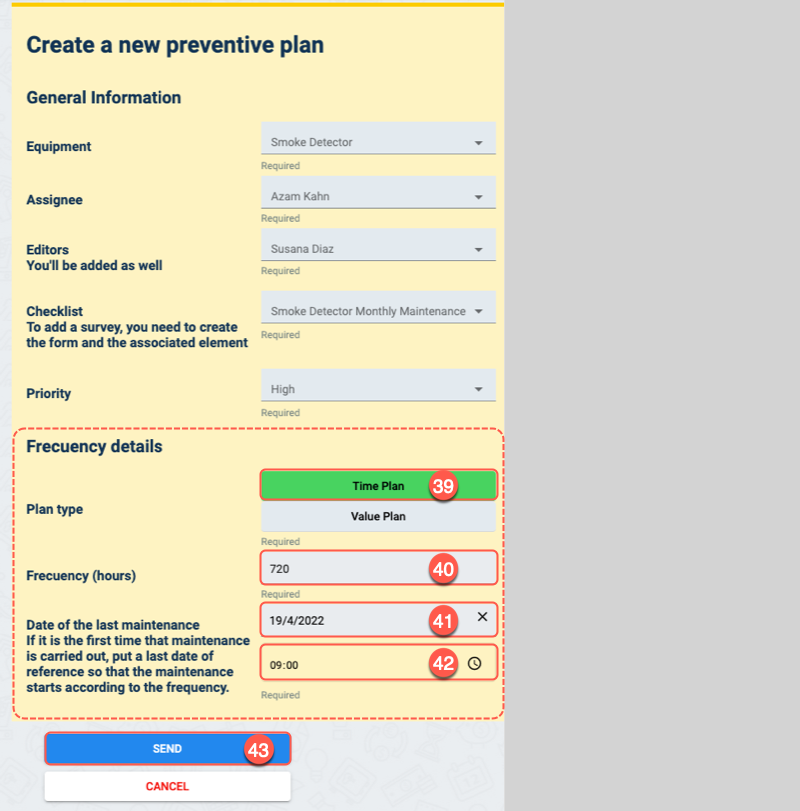
- Under Frecuency details, chose between time or value plans. Time plans are triggered when the programmed time lapse is completed. Value plans are triggered every time a determined equipment metric is met, for example, performing vehicle maintenance every 6,000 miles. For this example, we chose Time Plan to set up a monthly maintenance check.
- Frecuency is measured in hours. To perform a monthly maintenance check, we multiple 24 hours by 30 days, to get a total of 720 hours.
- Date of the last maintenance indicates the starting date of the maintenance plan.
- Indicate the time the maintenance check was performed.
- Press SEND.
Verify that the maintenance plan has been activated.
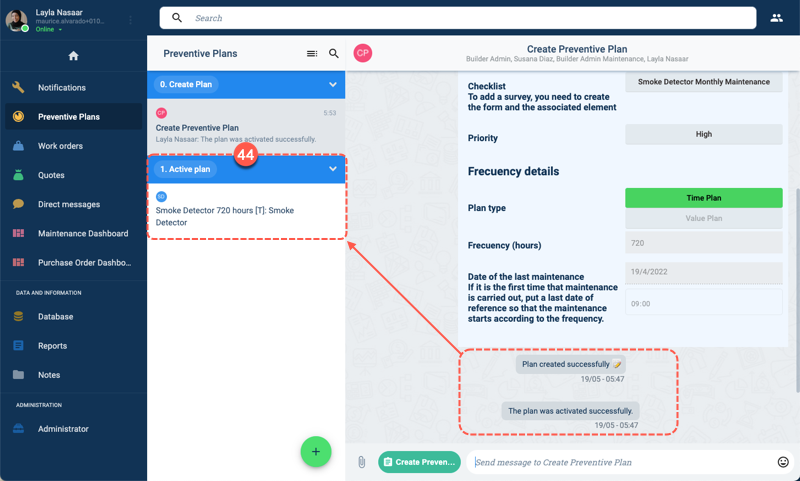
- After submitting the form, verify that the preventive maintenance plan has been activated by ensuring it is listed in the panel under the Active plan list.
D. Maintenance Work Order
Once the preventive maintenance plan has been set, a work order will be automatically created and sent to the corresponding stakeholders when the programmed time or value metrics are met.
Once it is time to perform the maintenance check, the assignee is alerted with a work order.
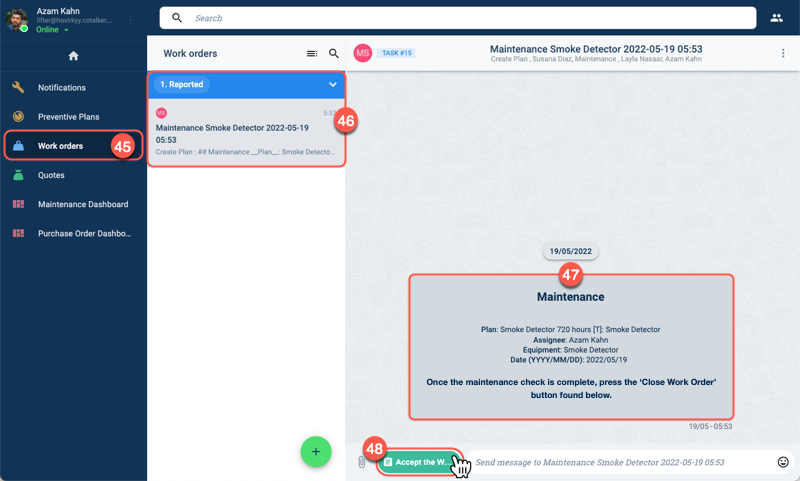
- The assigee must select Work orders from the Main Menu Bar.
- In the Work orders panel, the assignee must select the corresponding alert under the Reported list.
- Details of the maintenance check to be performed are posted in the alert's channel workspace.
- The assignee can choose to accept or reject the maintenance request by pressing the Accept the work order button. The Accept Work Order form will appear as shown in the next step.
The assignee must either accept or reject the work order.
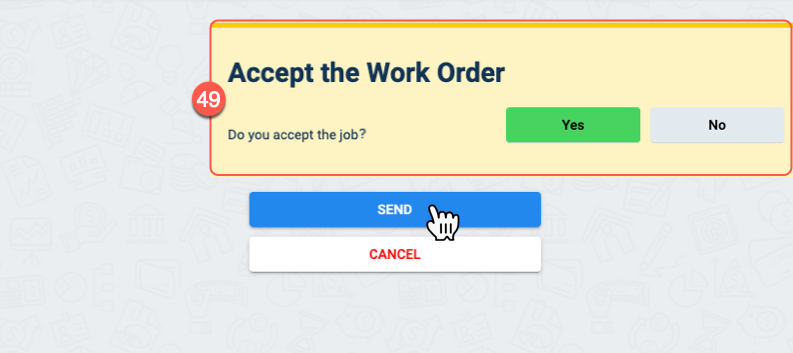
- Through this form, the assignee can either accept or reject the work order. If rejected, the work order remains in the Reported state. If accepted, the work order passes to the Pending state and the assignee will receive the maintenance checklist through the channel workspace.
Complete the maintenance checklist.
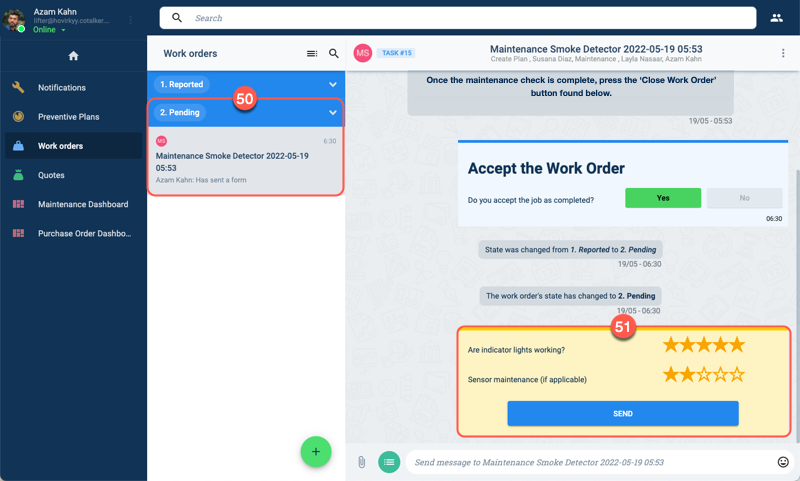
- The work order is set to the Pending state.
- The maintenance checklist created at the beginning of this tutorial appears in the channel workspace. The assignee must fill it out when inspecting the equipment.
Once the maintenance check is complete, the assignee or any other designated stakeholder can request to close the work order.
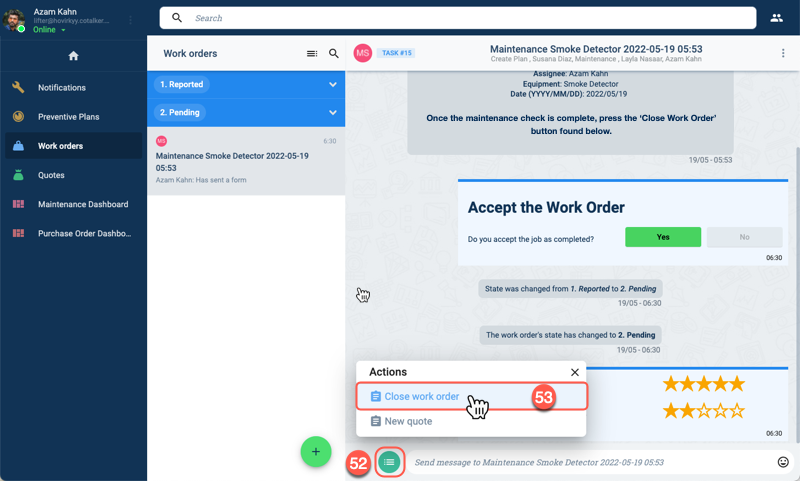
- Press the Actions button found at the bottom of the channel workspace.
- The Actions menu opens up and gives the user the Close work order option.
During the maintenance process, stakeholders can communicate with each through the channel workspace.
Fill out and submit the Close work order form.
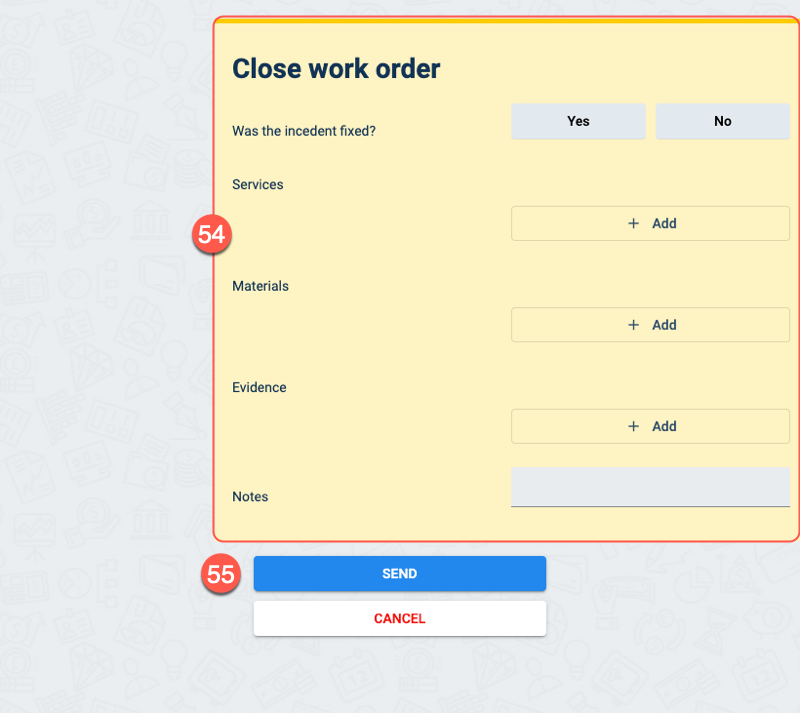
- Fill out the form. Services and materials are connected to the company's master data. Therefore, used materials will be discounted from company stock, while service costs will be summed and informed through the channel.
- Press SEND to submit the report and request the closure of the work order.
The work order report and closure request are sent.
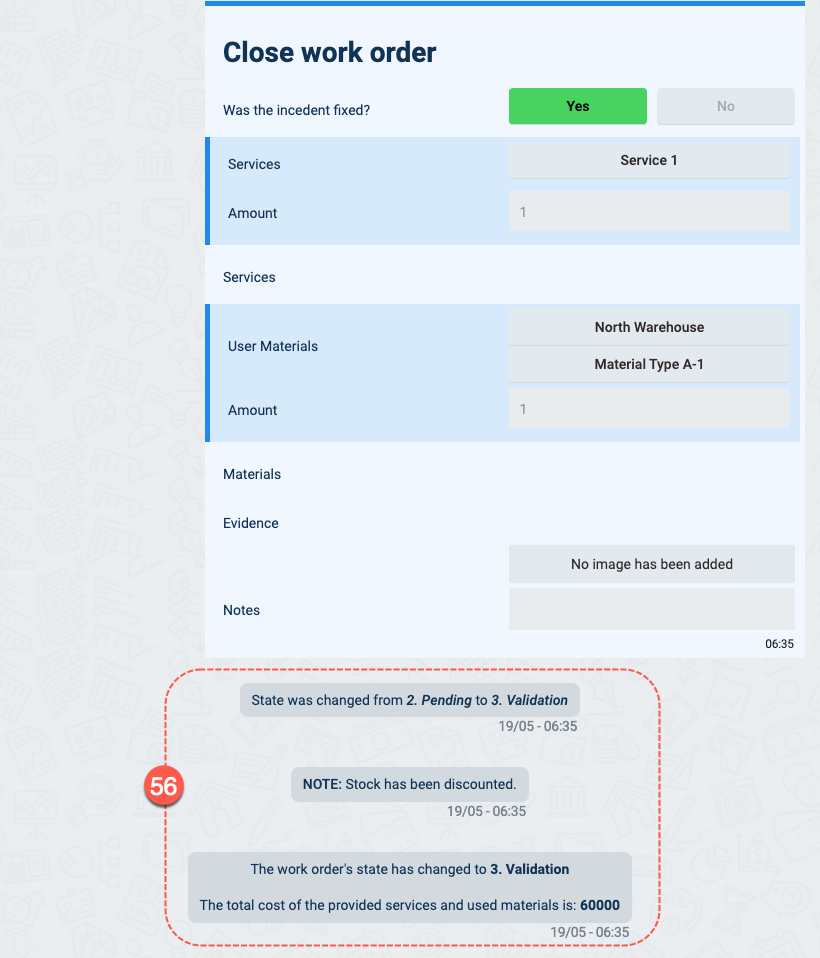
- The work order is set to the Validation state. Channel members are notified of the costs of services and materials used to carry out the maintenance procedure.
After reviewing the information submitted by the assignee, the supervisor can validate the work order closure request.

- The supervisor is notified that the work order is now in the Validation state.
- Press the Work order reception to open the corresponding form.
The supervisor fills out the Work order reception to either approve or reject the performed maintenance check.
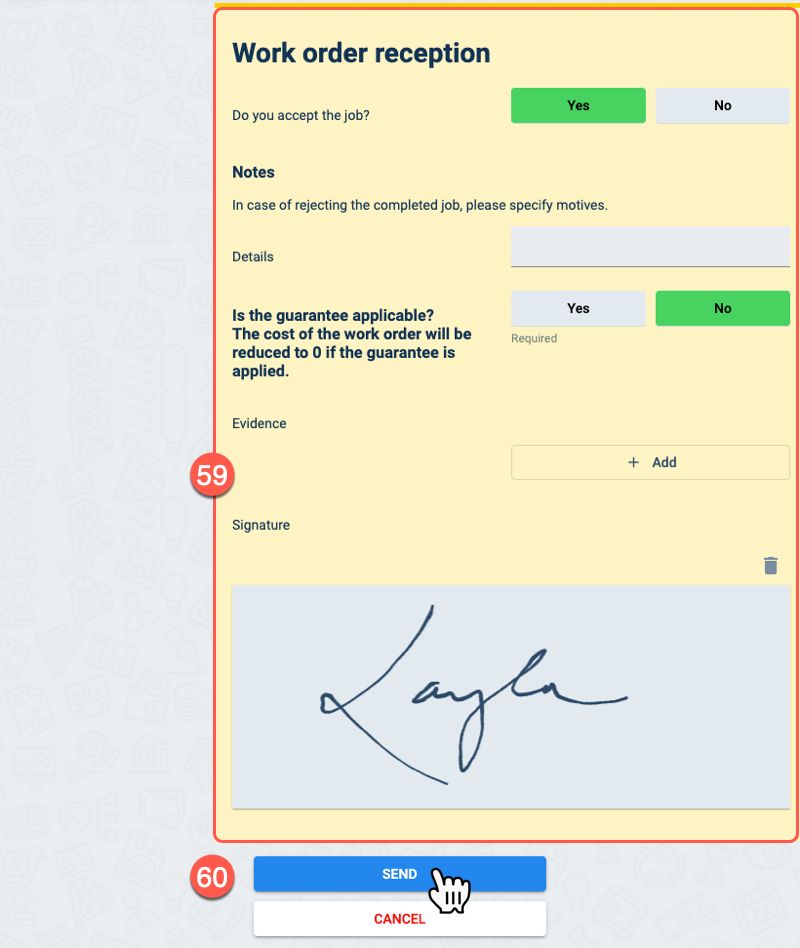
- The supervisor fills out the form to inform approval or rejection of the request to close the work order. If approved, the work order is closed, if not, it goes back to the Pending state. On the form, supervisors can inform their reasons for rejecting the work performed. They can also stipulate if the work carried out falls under a guarantee that assumes all costs.
- Press SEND to submit the form and inform stakeholders of the status of the work order.
Once validated, the work order is closed.
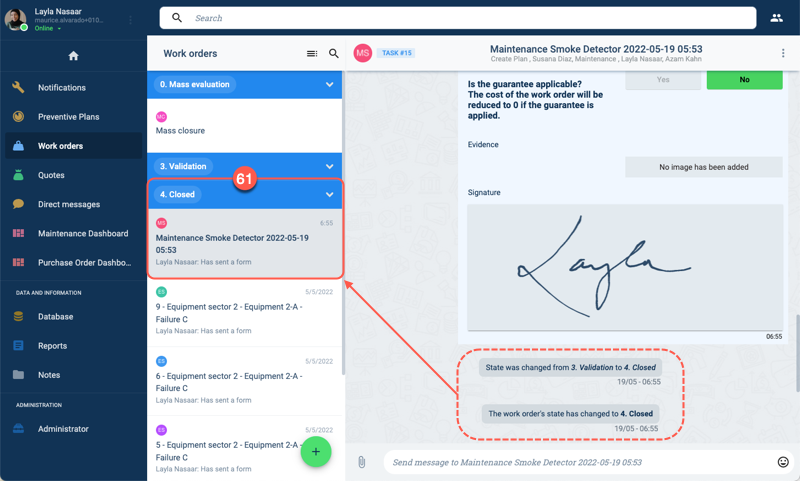
- After submitting the approval form, the work order passes to the Closed state.
In this preventive maintenance plan, a new work order for a maintenance check on the smoke detector will be created in 30 more days, and the process will begin again.