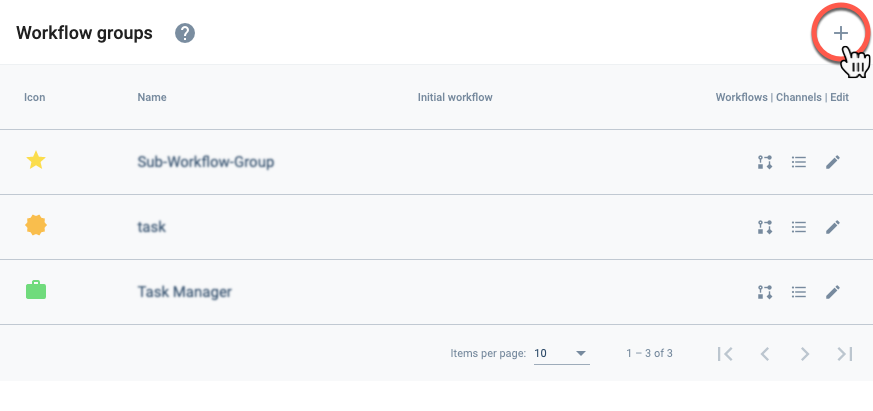
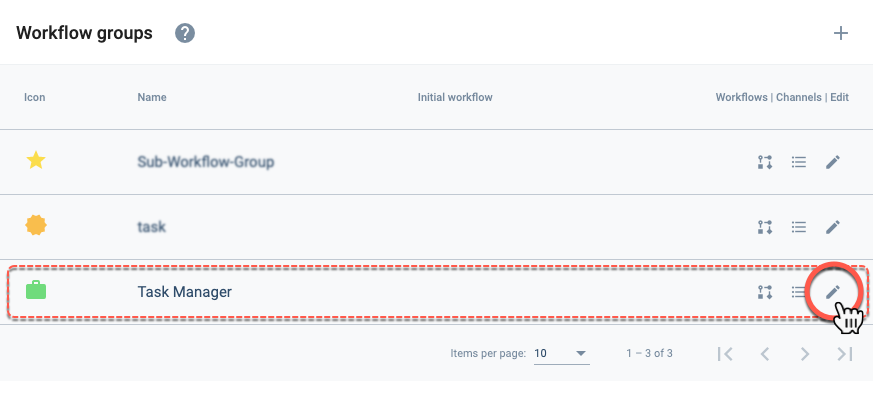
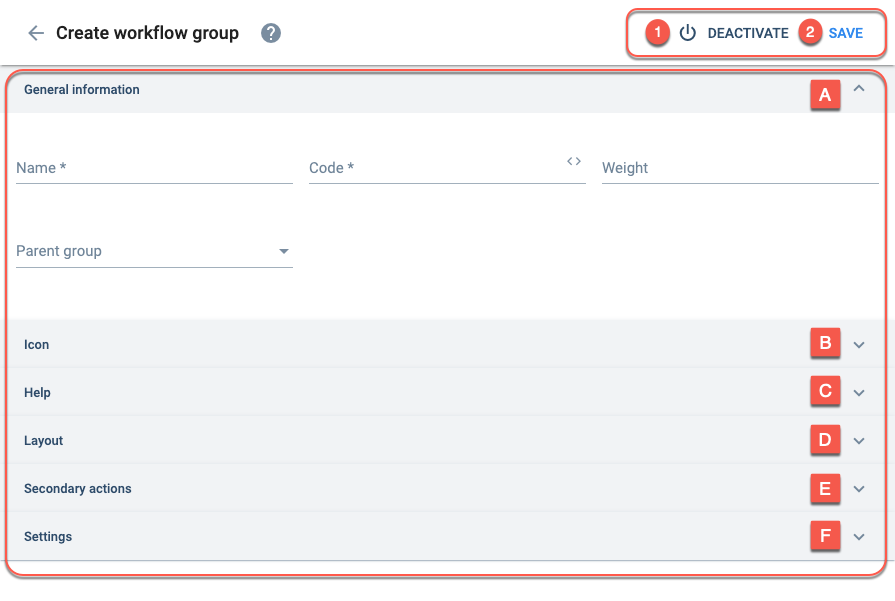
Create/Edit a Workflow Group
Create and configure workflow groups. A workflow group contains workflows with their states, forms, and automations.
Create a Workflow
From the Initial Settings Panel (Workflows), press +.
Edit a Workflow
From the Initial Settings Panel (Workflows), press the corresponding icon from the workflow list.
Settings Panel Layout
After choosing to create or edit a workflow, the following settings panel opens up:
Options:
- Dev Mode: Enables advanced developer options. Once enabled, it cannot be disabled.
- Deactivate: Deactivate the element.
- Save: Save current configuration.
Settings:
A. General Information
Basic setup and display options.
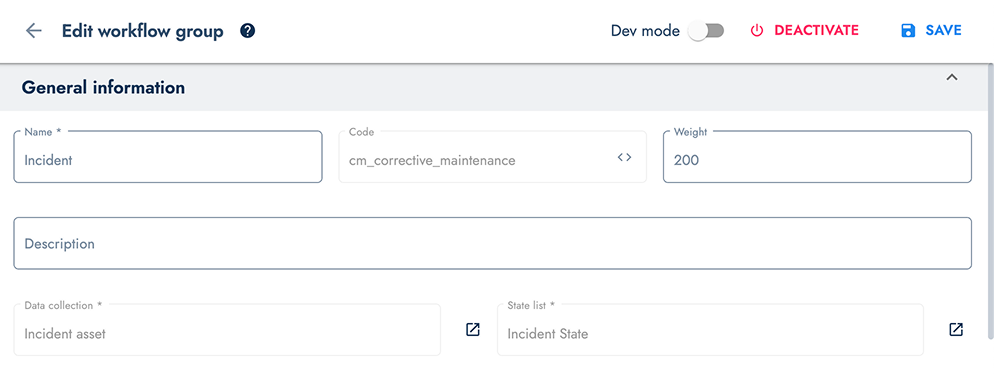
Basic Workflow Configuration Fields: This section displays the primary configuration fields for setting up a workflow group:
- Workflow Name: The display name for the workflow group
- Code: Unique identification code for the workflow (lowercase letters, numbers, and underscores only)
- Weight: Relative positioning number for list ordering (smaller numbers appear first)
- Description: Brief explanation of the workflow group's purpose
- Data Collection: Selection of the collection that will act as the asset for task definitions
- State List: Collection containing the available workflow states
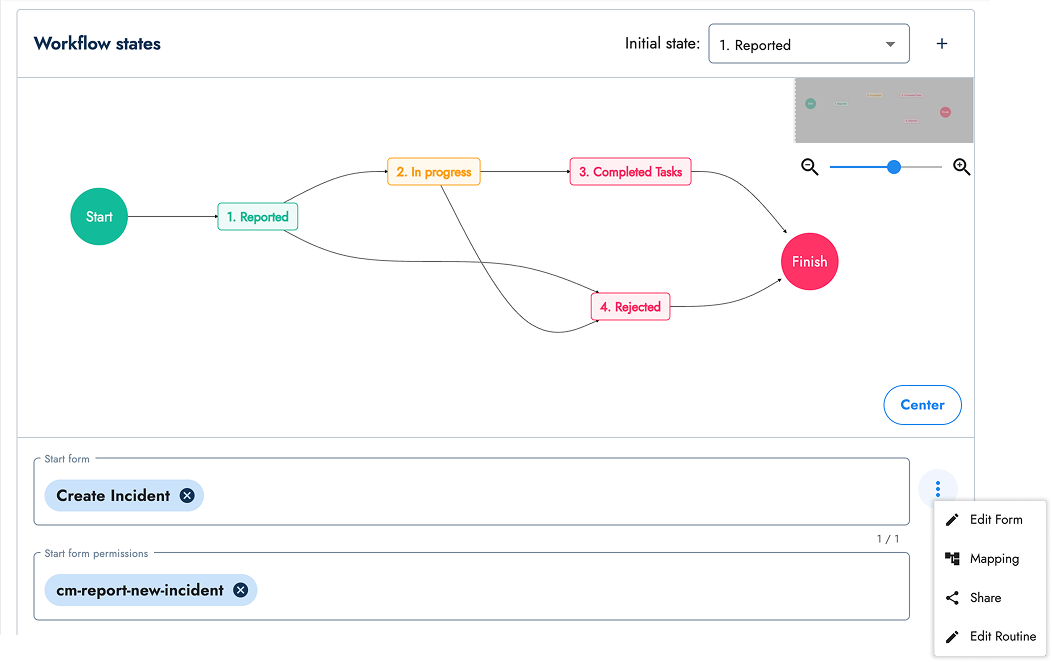
Workflow States Diagram and Start Form Configuration: This section shows the visual workflow diagram and start form settings:
- Workflow States Diagram: Visual representation of the workflow flow and its states. Use the + button to create new states
- Start Form: The selected survey form that will initialize the workflow. This survey must be previously created and can be chosen from the dropdown menu where all existing surveys appear as options. For more details, see the Start Form section. Once selected, the Share button will appear. The actions button provides four key functions:
- Edit Form: Opens the editor for the selected start form
- Mapping: Opens the mapper panel for this form
- Share: Provides sharing options for the form
- Edit Routine: Opens the routine builder for workflow automation
- Start Form Permissions: Select permissions users need to create a subtask. Users are required to have at least one of the selected permissions. Users are assigned permissions through their access roles
- Automatic Task Creation with Start Form: Checkbox option to enable automatic task generation when the start form is submitted
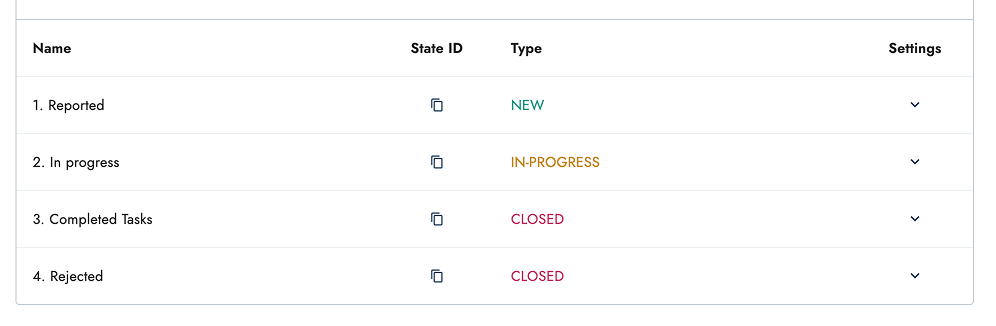
States List Management: This section displays the complete list of workflow states with management options:
- State Name: Display name for each workflow state
- State ID: Unique identifier that can be copied for reference
- Type: State classification (New, In Progress, or Closed)
- Settings Button: Configuration options for editing each individual state
Each state entry provides quick access to essential state information and editing capabilities for workflow management.
B. Data Model
Configure the data structure and elements for this workflow group.
The Data Model section allows you to define custom data elements that will be associated with tasks in this workflow group. These elements extend the standard task information with additional properties specific to your business needs.
1. Elements Overview
The main Data Model interface displays a list of available element types on the left side. To add elements to your workflow, simply drag and drop the desired element type from the available options into the elements list. Once added, each element can be configured individually by clicking on it.
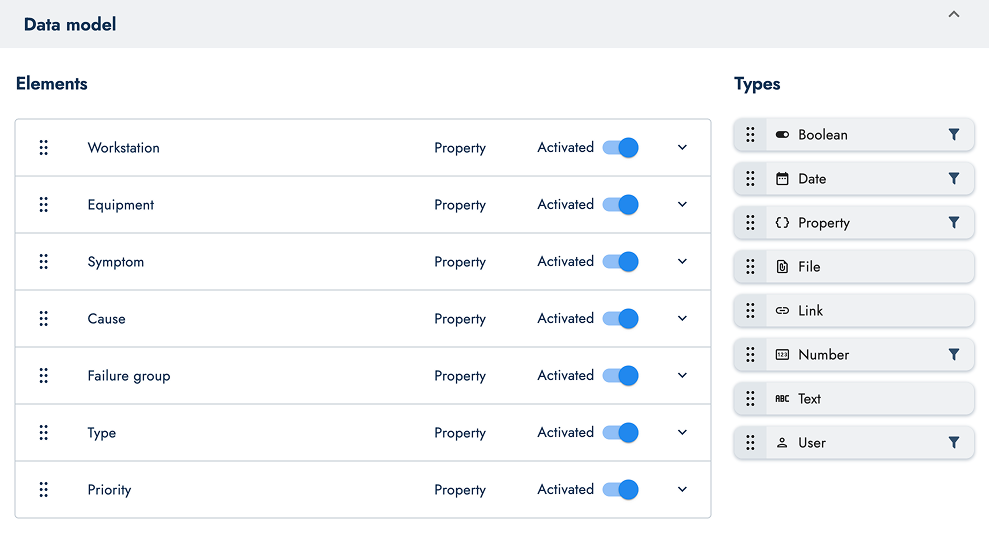
Available Element Types
The system provides eight different data types that can be added to your workflow:
- Boolean: True/false values for binary choices
- Date: Date and time fields for temporal information
- Property: References to existing database properties
- File: File attachments and document uploads
- Link: URL links to external resources
- Number: Numeric values for quantities, measurements, etc.
- Text: Free-form text fields for descriptions and notes
- User: User references for assignments and responsibilities
2. General Configuration
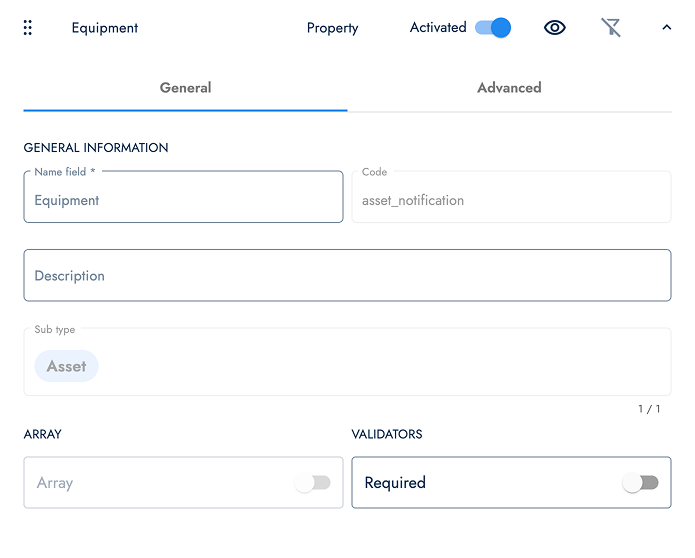
When you click on any element in the list, the General configuration tab opens. This section contains the fundamental settings for each element:
- Name: The display name that users will see for this field
- Code: A unique identifier used internally by the system
- Description: Additional information about the element's purpose
- Required: Whether this field must be filled when creating or updating tasks
- Element-Specific Fields: The available configuration fields will vary depending on the data type of the element you select. Each element type (such as Text, Number, Date, User, etc.) presents its own set of relevant options and properties.
These settings define how the element appears and behaves in the user interface.
3. Advanced Configuration (Workflow Version 2 Only)
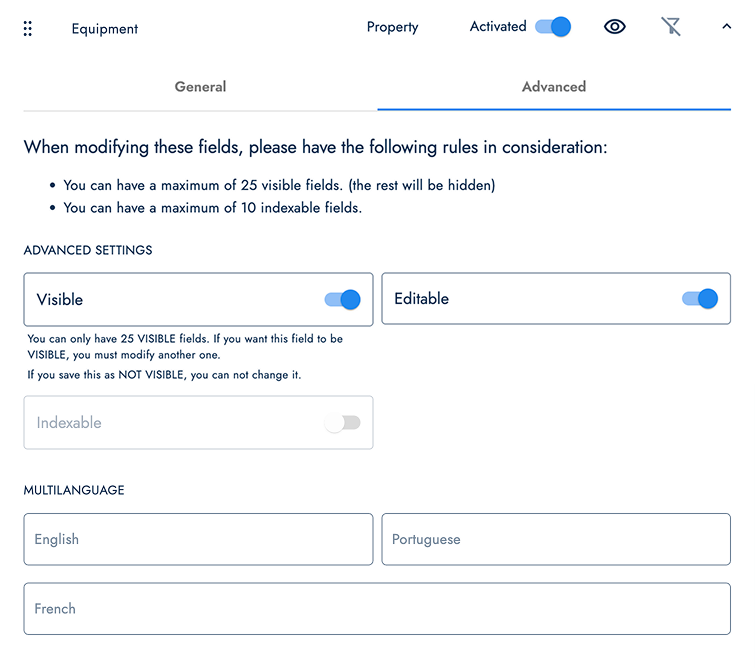
For workflows running on version 2, the Advanced tab provides additional configuration options that control element visibility and behavior:
Visible: Controls whether this element appears in the task detail view and table view. When disabled, the field exists in the data model but is hidden from users.
Editable: Determines if users can modify this field's value in the task detail view. When disabled, the field becomes read-only after initial creation.
Indexable: Enables filtering and searching capabilities for this field across different views. When enabled, users can filter tasks based on this element's values in list views and reports.
These advanced settings provide fine-grained control over how elements behave in the user interface and help optimize the user experience based on specific workflow requirements.
Multi-language Support
All workflow versions support multi-language configuration for element names and descriptions. This allows you to provide localized labels that match your organization's language preferences, ensuring that users see field names in their preferred language.
C. Tags and Additional Fields
Configure Tag fields and additional fields for tasks.
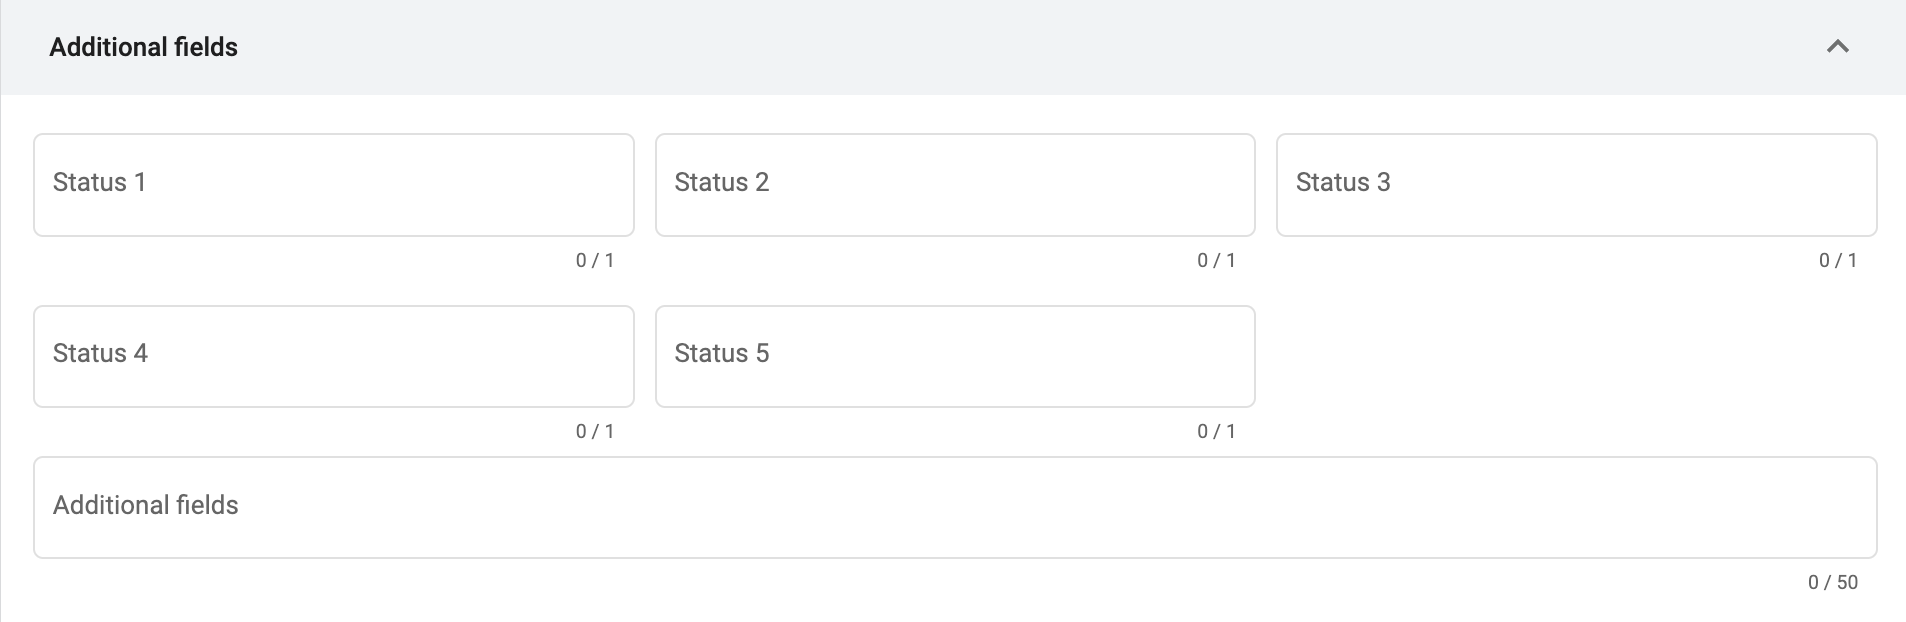
Adds a collection as an additional field or status on all tasks belonging to the workflow.
The elements within the collection are used as the available values (options) for each status.
Status options can indicate things like task priority, corresponding company department, or permissions for unassociated users.
Status values can also be used to filter, group, or sort the tasks in the task view.
Status fields are displayed on the general information of task details.
Status values appear on task descriptions when displayed on list or kanban views.
These collections correspond to the five status fields belonging to the dynamicPropertyTypes object of the COTSMStateMachine data model.
Collections used to add extra information to tasks. The additional fields contained within the selected collections will be used as additional fields on the task. Up to fifty collections can be selected.
The added collections with their respective additional fields can indicate things like task priority, corresponding company department, etc.
The additional fields can also be used to filter, group, or sort the tasks in the task view.
These additional fields will appear within extra tabs on task details.
These collections correspond to the allowedExtensions field in the COTSMStateMachine data model.
These additional fields differ from the statuses shown above (status 1-5). See "best practices" below for information on the preference of statuses over additional fields.
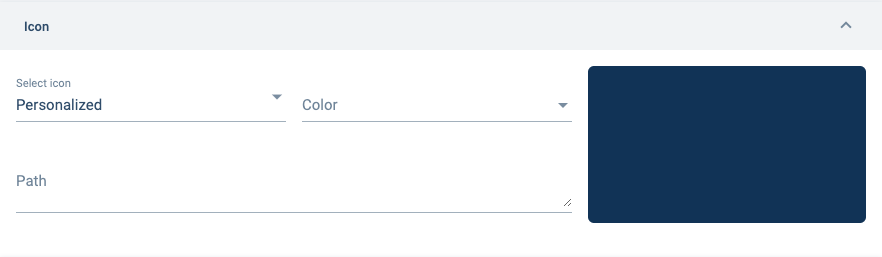
D. Icon Fields
Configures the group icon shown on the Main Menu Bar or Group Panel.
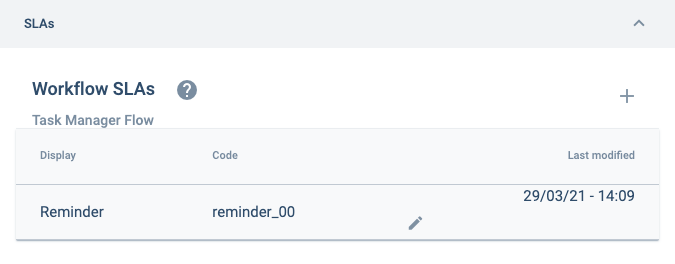
E. SLAs
Configure Service Level Agreements for workflow automation.
F. Advanced Settings
Configure advanced workflow options and permissions.
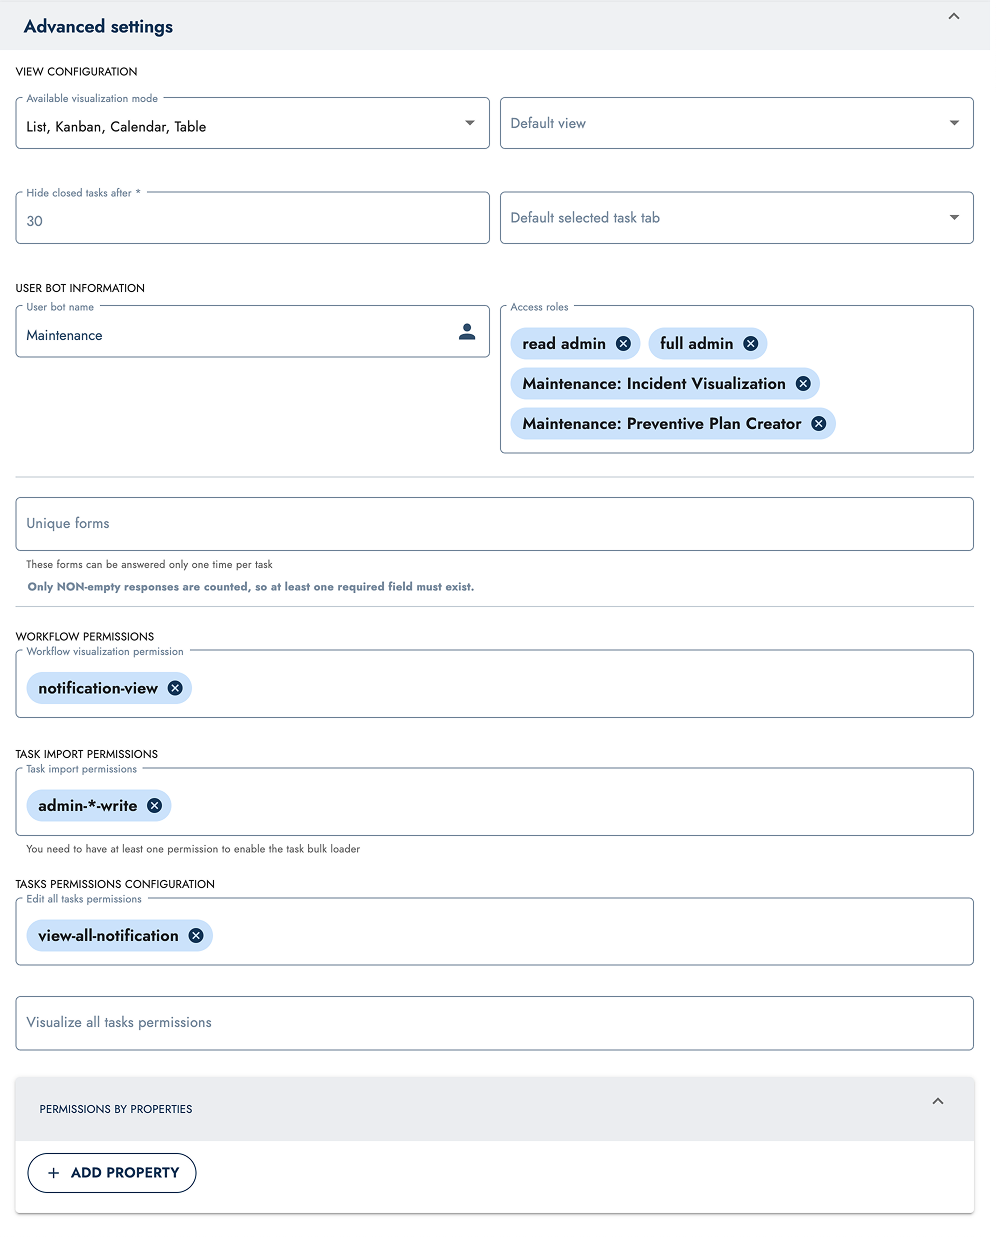
| Available visualization mode | Specifies how users can view tasks within the task panel. The available options (shown as icons in the menu bar) are: Calendar view, Table view, Kanban view, and List view. |
| Default view | Sets the default view in the task section. Options include: List, Kanban, Calendar and Table. |
| Hide closed tasks after | Closed tasks will disappear from the task panel after the specified number of days, but will remain accessible in the workflows channel panel. |
| Default selected task tab | Defines which task tab is selected by default when opening the task panel. |
| User bot name | Code name of the automatically created bot associated with the workflow group. The name is generated using the workflow group's code as a reference. |
| Access roles | Access roles that allow the bot to act on the workflow. |
| Unique Forms | Configure unique form settings for this workflow. |
| Workflow visualization permissions | Defines which users or roles can view the workflow and its tasks. |
| Task import permissions | Defines which users or roles can import tasks into the workflow. |
| Visualize all tasks permissions | Defines which users or roles can view all tasks in the workflow, regardless of assignment. |
| Permissions by properties | Set specific permissions based on task properties. Includes functionality to add custom properties. |
Best Practices
Using Status Fields vs Additional Fields
When using status fields and additional fields in your workflows, note the differences:
The five status fields (Status 1-5) correspond to the dynamicPropertyTypes field in the workflow's data model (COTSMStateMachine) and are displayed as standard task settings on the task details panel.
The additional fields can contain multiple collections and are stored in the allowedExtensions field of the COTSMStateMachine data model. These additional fields are displayed as extra tabs in the task details panel.
As best practice, it is recommended to use the status fields (1-5) because their structure permits greater consistency between the elements.
Sorting Tasks
It is recommended to sort tasks in the group panel by states so that users can visually identify the state their tasks are found in. Task (workflow) states are represented by the elements (properties) found in the collection (property types) associated with the workflow.