Create a Bot
Tutorial on how to create a bot summoned by a slash command sent as a message in a chat area.
Time: 20 minutes
A bot is an automation triggered either by a slash command or a survey. Every time a bot is triggered, it executes a routine with various stages. Choose from a variety of routine stage types to give your bots all kinds of tools to gather data and carry out diverse automations.
Company Requirements
The company has a problem: not all employees are regularly connected to the app. But we know that their email notifications are always active. To address this situation, we propose using a bot that will contact the person through an email message whenever a user types /emailbomb along with the recipient's email address in a chat area.
The email will contain a message mentioning the channel in which the person's pressence is required. Additionally, a system message will appear in the channel workspace indicating that the email was sent successfully.
Tutorial Objectives
- A. Set up basic bot settings.
- B. Set the first routine stage ("Send email").
- C. Set the second routine stage ("Send message")
Pre-Requisites
Access Role
- Due to the wide range of actions a bot can undertake, it is best if your user profile's access role counts with the
admin-*-writepermission that grants access to the entire Administrative Panel.
Steps
A. Set Up Basic Bot Settings
I. Go to the Bots section.

- From the Main Menu Bar, press the Administrator button.
- In the Administrative Panel, select Bots.
- The Bots section opens up.
II. Open the Create Bot settings panel.
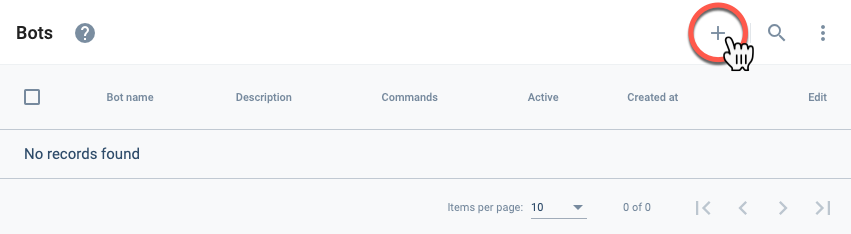
- Press the + icon to open the Create bot settings panel.
III. Set basic settings.

- Name: Email Bomb
- User bot name: email_bomb_bot
- Description: Send an automatically generated email to a user.
- Access Roles: default
- Global: Toggle on.
- It's a slash command: Toggle on.
- Slash command: emailbomb
IV. Open the routine builder.

- At the bottom of the Create bot settings panel, under the Routine Builder tab and press the + Add Routine button to open the Routine builder settings panel.
B. Set First Routine Stage (Send Email)
I. Open Routine Stage settings.
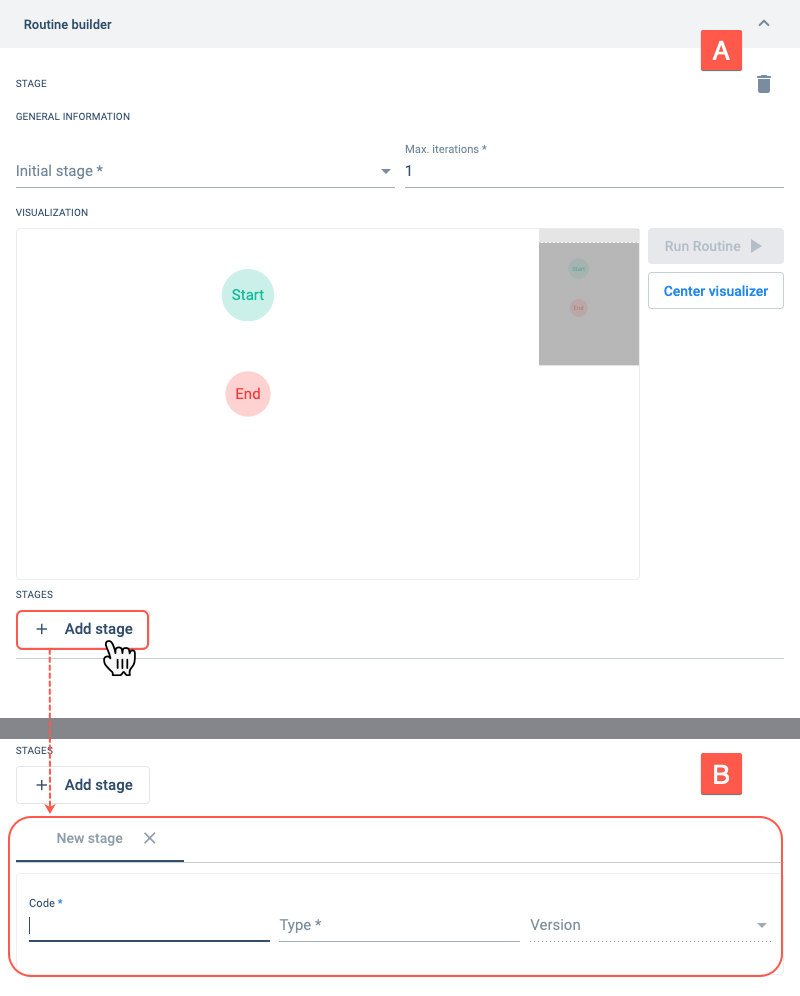
- A. From the Routine builder settings panel, press the+ Add Stage button.
- B. A New stage settings panel opens up.
Once you set the stage Type in the next step, more fields will open up according to the selected stage type.
II. Set up the stage.
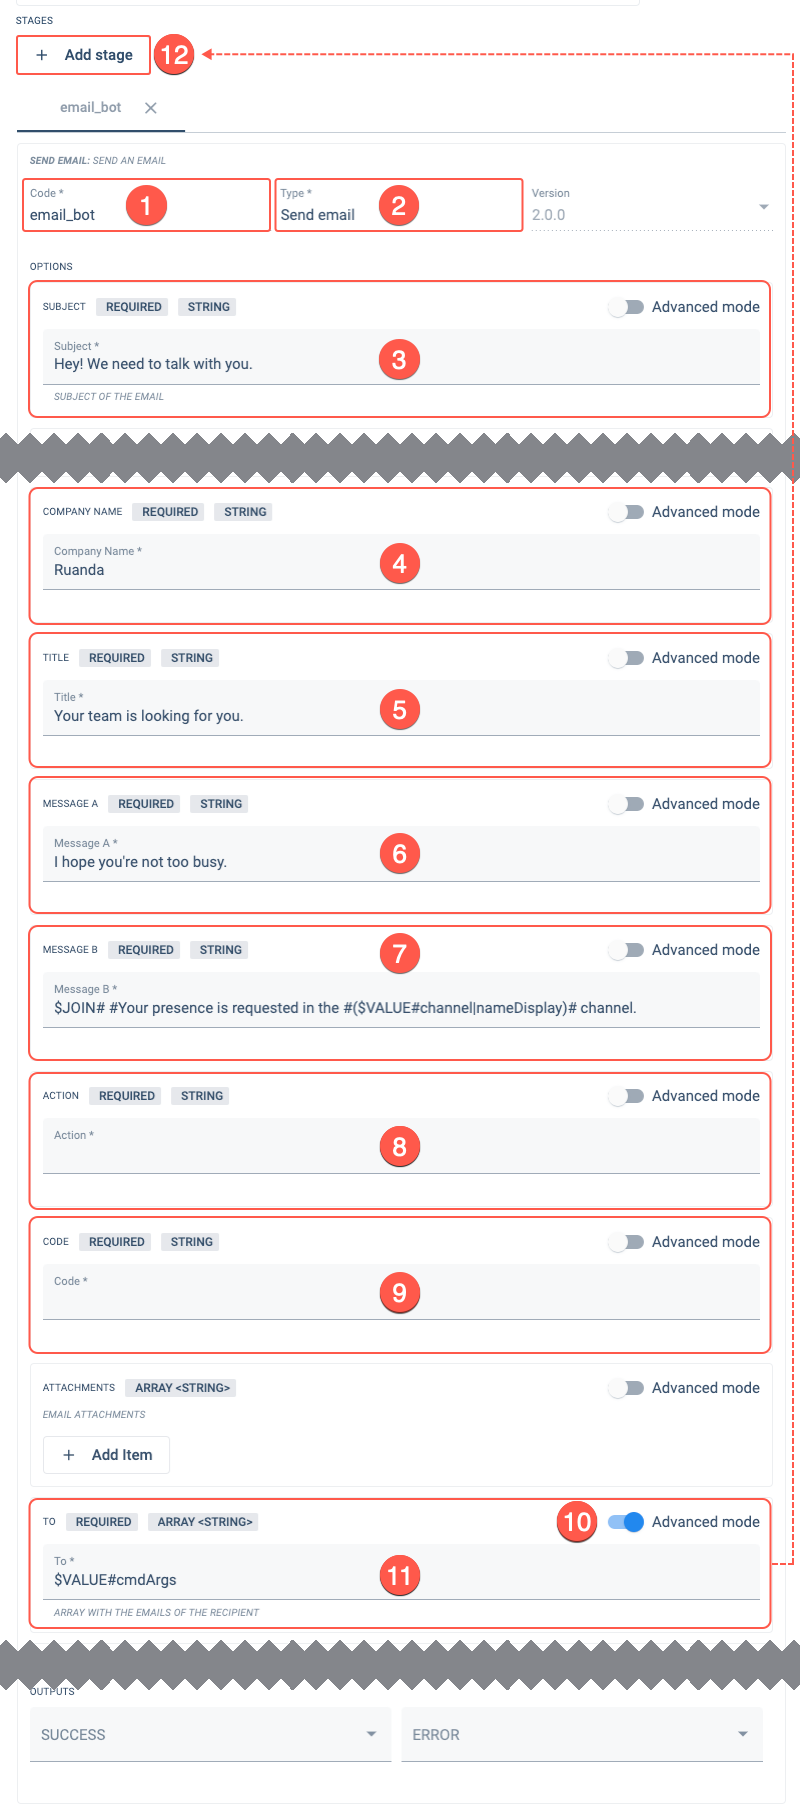
- Code: email_bot
- Type: Send email
- Subject: Hey! We need to talk with you.
- Company Name: Ruanda
- Title: Your team is looking for you.
- Message A: I hope you're not too busy.
- Message B:
$JOIN# #Your presence is requested in the #($VALUE#channel|nameDisplay)# channel. - Action: Add a blank space or character since this is a required field.
- Code: Add a blank space or character since this is a required field.
- Advanced mode: Toggle on the Advanced mode switch in the To field.
- To:
$VALUE#cmdArgs - Press + Add Stage and go to the following step.
- In the Message B (7) and To (11) fields, we use some Cotlang scripts to gather data from the context, i.e., the contextual data relative to the bot. The data context of the slash command bot we are working with comes from the slash command that is sent as a message in a channel. More specifically, the context is the message itself, any extra arguments added to the slash command (in our case, the email address), and the channel the message was sent in.
- For example, in Message B, we use
$VALUE#channel|nameDisplaycommand to get the channel name from the channel context. And, to add the result to a string, we use$JOIN#command. - In To,
$VALUE#cmdArgsretreives data from the command arguments context, in this case, the email address. For example, if I execute the slash command typing /emailbomb jane.doe@ruanda.com, the command argument context would bejane.doe@ruanda.com.
C. Set Second Routine Stage (Send Message)
I. Set up stage.
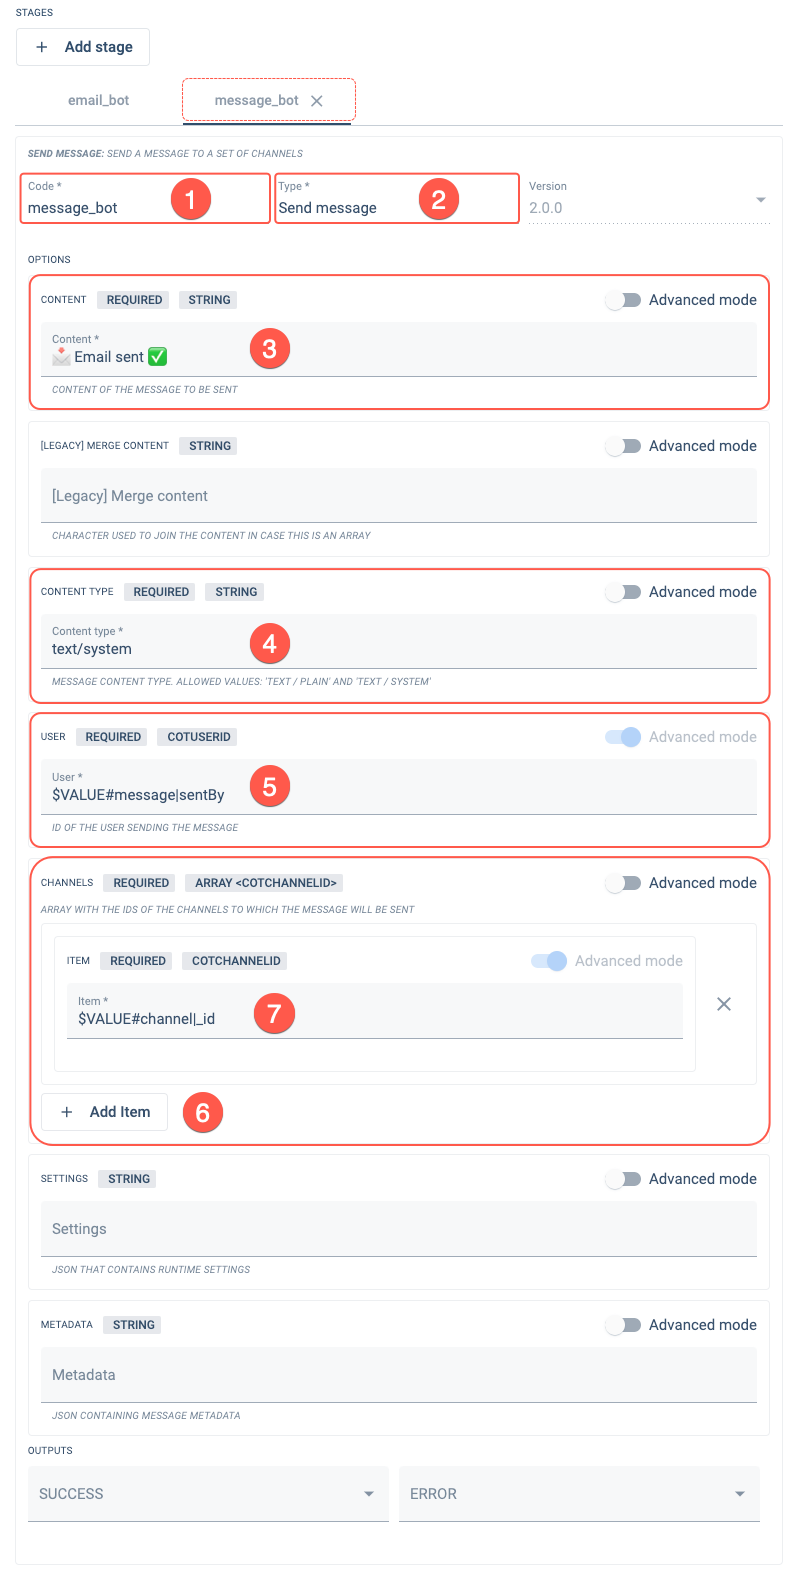
After pressing the + Add Stage button, set up the second stage with the following:
- Code: message_bot
- Type: Send message
- Content: 📩 Email sent ✅
- Content Type: text/system
- User:
$VALUE#message|sentBy - Channels: Press the + Add Item button.
- Item:
$VALUE#channel|_id
II. Complete Routine setup.
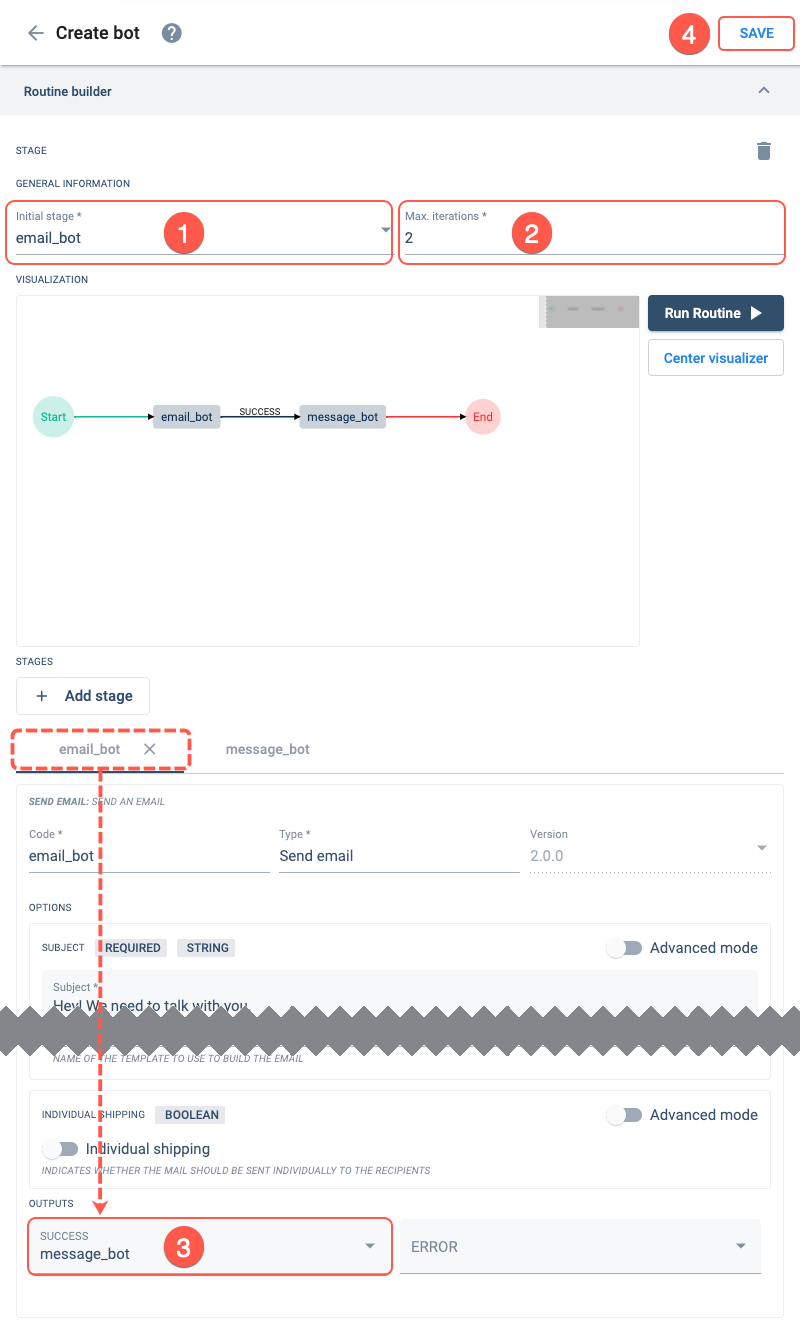
- Initial stage: email_bot
- Max. iterations: 2
- Success: message_bot (Make sure you are on the email_bot tab.)
- Press Save. You will be taken back to the Bots section.
Each execution of a stage is an iteration. Therefore, you need as many iterations as you have stages. If any stage loops, you will have to count each loop as an iteration.
Expected Result
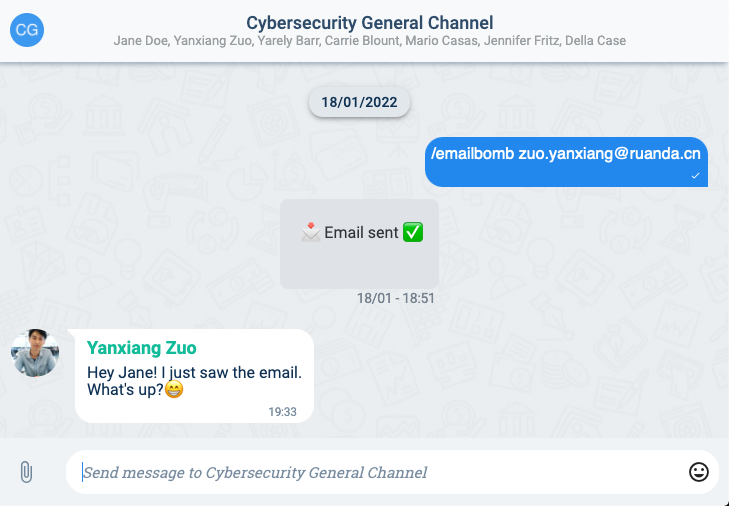
Now the bot is available on all channels.
If you direct yourself to a channel and type /emailbomb name@example.com, the system will send an email to the indicated address and an automated system message gets generated in the chat area.
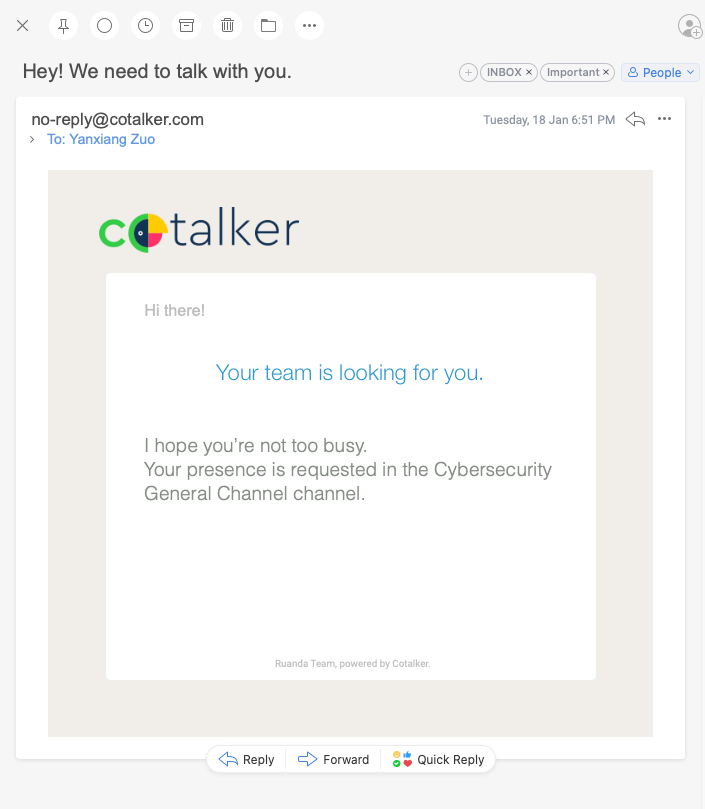
The recipient will receive an email similar to the one below:
Related Topics
- Bots Section: Administrative Panel documentation
- Routine Builder: Automation Tools documentation
- Routine Stage Types: Automation Tools documentation
- COTBot: Bots data model
- Bots API: REST API documentation